One thing to watch when you have a file with a lot of discreet vectors like that…you have to wait until the Pink preview finishes rendering on the screen before you send it to Print. Anything that hasn’t loaded onto the screen up front hasn’t made it into the printing instructions yet and will get left behind. And the more complex the file, with individual vectors, the longer it takes to load. (I’ve had some take up to thirty minutes…they were extremely complex.)
Sometimes enclosing everything in a weeding rectangle of a different stroke color helps it to load faster - it gets treated as a group in the motion planning. You can try that and see if it helps…it’s not necessary to actually print the rectangle, you can set it to Ignore.
(Your second picture didn’t come through so I’m just guessing that’s the problem here.)
Sigh. I mean it’s a server based force me to use the web browser thing that STORES the file. I’m confused. So, my client app which I thought was just viewing state from a server actually has state and I have to be aware of/worried about what color things are. OK cool. WIll lather, rinse, repeat.
My simplistic understanding is that the preview gets drawn on the screen as the data is loading into the machine’s working memory, so if you hit “print” before the preview is finished, you’re starting the job before everything has gotten there, and can end up with missing bits.
What they said, and I’ll add that what you are seeing is exactly consistent with the problem @jules and @geek2nurse are describing. It’s not always obvious what order the little bits will load, you just need to be patient and carefully inspect before hitting print.
an “idea for the hopper” should be a print button that doesn’t allow incomplete prints - maybe a display with 250/1000 items rendered or a countdown or “it’ll be a minute please wait” rather than blowing 2 hours on an incomplete cut?
I’m not really sure how it all works any more…back in my Web dev days (pre-CSS/Flash/etc.) I was forever getting frustrated over the whole “stateless connection” thing that meant you had no way to detect whether a user was still looking at your page once they’d clicked on it somewhere, and trying to find workarounds for deciding how to trigger the next thing.
I kinda think if there was a way to tell for sure from your browser that all the bits have made it to the Glowforge, they’d probably have made that the signal that it was ready to print, instead of doing it the way they did.
My rule of thumb is to wait until the print preview blanks out and starts over. Then I punch the button.
Oh, goodness, didn’t mean to make anyone feel it was necessary to trot out their resumes. I freely admit my tech knowledge is decades out of date. It just still factors into how I understand things, is all.
In my little world it doesn’t make sense for them not to have done it already, if it were possible to do it, so rather than cause myself unnecessary angst by trying to understand their reasoning, I just assume the GFUI can’t tell it’s all gotten there, so it’s up to me instead.
So I wait for the preview to finish, and then I push the button, and it’s all good.
nah, just something they need to fix sometime. a bit of sloppy (or not fully thought through) coding. that kind of stuff often ends up at the end. first you make the boat, then you patch the seams
It’s dependent on complexity - if it’s simple it may have downloaded to your PC’s buffer but the PC hasn’t finished the rendering because maybe your graphics card has to catch up.
But it happens enough around here that waiting is cheap insurance. Personally though I forget to wait most times
Can’t guarantee that waiting for the print buffer load is still an issue but there were a lot of problems reported. This is a staff response from December 17.
it’s the kind of thing that you will look at the end result and see things missing and be like “arrrrrrrrrgh”. Then you will swear you’ll never make that mistake again.
Thanks for letting us know about this, @dave1. I’ll need to look into this with our developers before I have more information, but in the meantime I wanted to share what I’ve found during my testing.
Others in this thread have pointed out that at one point, users were able to select “Print” in the app before a design was finished rendering in the Workspace, producing results similar to what you’re seeing. However, I was unable to reproduce any slow rendering with your file, and after extracting the logs from your unit to take a closer look at the print in question, what’s happening here doesn’t match that behavior. In cases where the “Print” button can be pressed before the design is rendered completely, the Glowforge plans the job only around the rendered portion of the design, leaving out the rest. In this case, I’m seeing a job plan that includes the entire design. This indicates that the design loaded and rendered completely in the app, and the results you’re seeing aren’t related to the behavior discussed above.
Please put in a word with engineering… even though that isn’t OP’s problem, that bug sucks, and we still see new users getting bit by it all the time. The Print button should be disabled until it’s safe to continue.
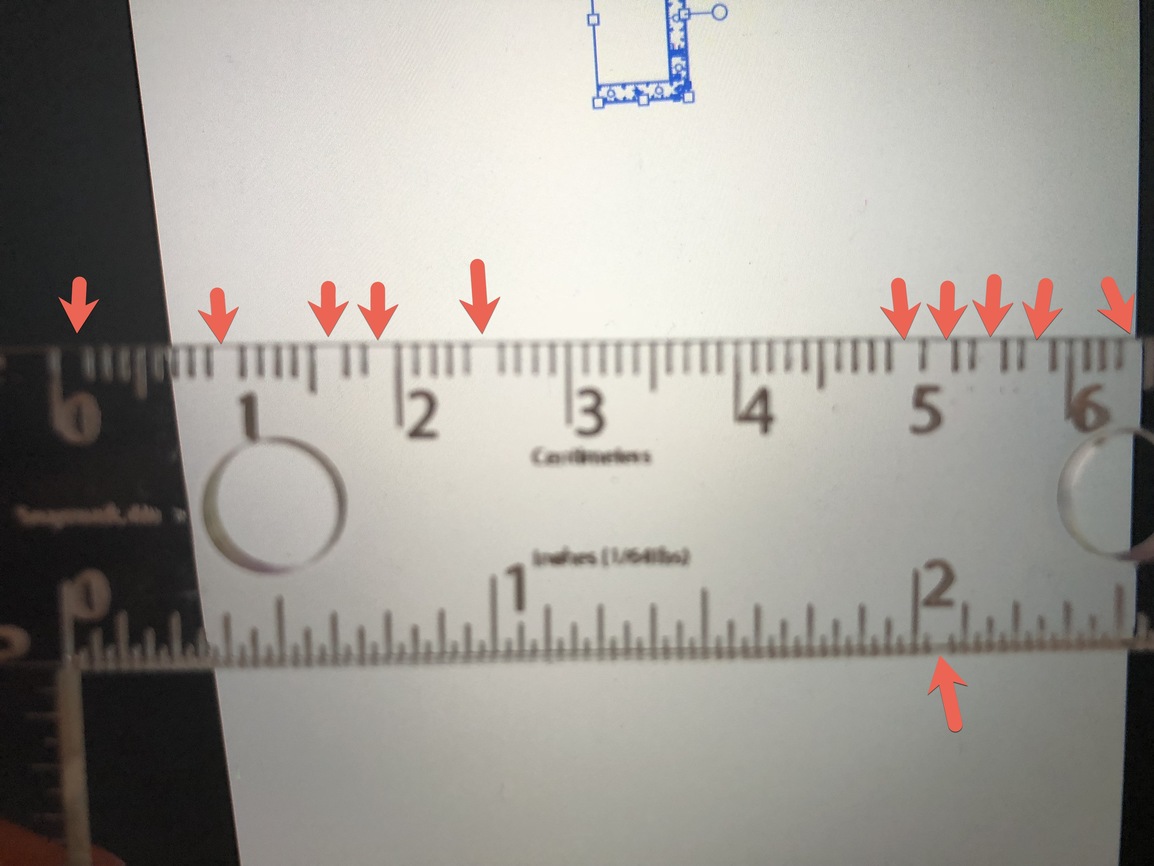
Thanks for your patience while we looked into this. We’ve reproduced this internally, and the team is looking into it now. These results are unique to engraves of vector designs that include a series of small, horizontally-aligned elements such as the marks on a ruler. I’m so sorry for the inconvenience.
There are two options for a workaround that should help you achieve better results:
In your design, the marks on the rulers are small rectangles each filled with a solid color. Try replacing the rectangles with single strokes, and set these lines to Score when printing.
Alternatively, you can make a bitmap copy of the ruler marks, and Engrave them. You may need to experiment with different settings to find the best for your material; you can find our more information about manual mode here.
I hope this helps. Thanks again for letting us know about this, and please let us know if you run into any other trouble.