I need someone to reach out to me about jagged lines. I had to remove the carriage plate recently to clean the assist fan and since then the engraves have been jagged. I’ve tried a few times to do the procss again.
Make sure when you put the carriage plat back on, you didn’t get the belt twisted! That happened to me once. Also make sure the belt is tight. If not, that will also cause the same problem.
The belt doesn’t look twisted. The jagged lines are like 80% of perfect, but not perfect. not passilble in my opinion.
Now, how tight are we talking here? I put the belt on to the left wheel first, then to the right, push the wheel all the way over to the right, and tighten.
Do that in reverse order. Belt on the right pulley and then the left. You don’t even have to loosen the pulley on the right side. The belt should be tight though. You should be able to walk the belt on the right pulley, but it shouldn’t be very easy. That way you know the belt is tight.
So I should tighten it back up, put the belt aroudn the right first, then put it around the left one? Does anyone know how tight I should tighten the wheel?
You should be able to simply push down on the belt while moving the carriage to the right and it should just pop off. That is how they show you to do it.
I coudln’t even get the belt off the pully without losening the right wheel. if the wheel on the right is tight, I cant even get the belt in between the right wheel and the metal wall of the tube. Right now the carriage is on, the belt is around the right wheel with it tight, and now I’m trying to put it on the wheel ot the left and it feels like there isn’t enough give to put it around the left wheel without breaking something : /
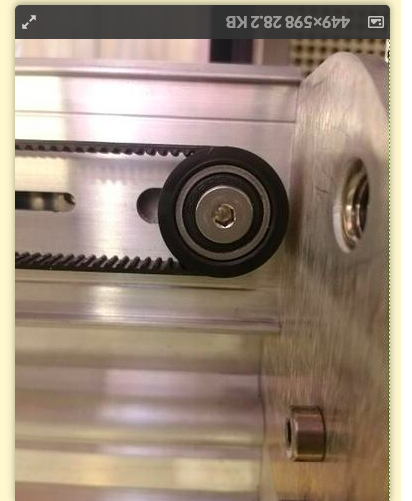
Here is a picture supplied by Support of the wheel looking up from the bottom of the Glowforge. It may be helpful to put a mirror under the wheel and trying to replicate the location of the wheel.
While you are pushing down on the front of the belt and moving the carriage to the right, it will just pop off.
If you can’t then you will have to loosen the bolt on that pulley to get some slack.
When you pot the belt back on, you have to make sure that belt is tight, otherwise it will cause the problems you are having.
To help our team investigate further, could you share a photo of the print in question? Please include the approximate date and time of the print as well.
Next, could you run a test print for me? The design we use has some known dimensions built into it and it will help me extract logs afterward to take a closer look. Here are the steps for the test:
Print the Gift of Good Measure on Proofgrade material, using Proofgrade settings.
When the print finishes, leave the lid closed and wait until the fans stop and the picture updates.
Take a photo of the front and back of the print and attach these photos to your reply.
Once we have the above, we’ll follow up with the next steps.