I’ve looked at other flask postings, and even had a successful attempt at doing a one off. Now I’m trying to produce 4 at a time and having a hell of a time figuring out a reasonable, repeatable workflow.
My idea was that I would cut a jig out of 1/4" that I would then glue to a 3/4" backer and use that rather than the crumb tray to set 4 flasks in. Simple idea, right?
But, I’m struggling since there’s really no concept of “origin” in the interface and that all of the operations take place at different heights and lid opens
I know a lot of people have done this, and after doing 100’s of cuts with this machine, I keep getting frustrated with trying to “register” anything to cut reliably.
I’m also a little lost on the distinction between “material height” vs. autofocus vs. manual focus height and how I should deal with this.
What I want:
To create a jig / backing tray that I can remove and replace into the GF for reliable reuse that allows the flasks to clear and also receive good focus results
To be able to place 4 flasks in the jig and have the artwork square perfectly with a reusable art template
To dial in my material height, focus and power settings so that I can perform this reliably and repeatedly
I know it’s been done. Thought my theory / approach would work, but i just wasted a flask and a sheet of wood, so figured I’d ask someone that has been through the pain.
BTW: You should not have to “waste” a flask while testing alignment. You can cover the flask with masking tape and then raise the laser speed and/or lower its power to just mark the tape. I’ve done that with other material. It avoids a lot of hair pulling!
The problem is not the rough concept of a jig, but how to build it and then reuse it repeatedly.
The flasks are tall enough that I cannot use the crumb tray. So, I need to put something at the bottom of the GF to support them and get them to the right height. And then, need to be able to center the artwork and also adjust the focus.
I’d like to be able to pull the jig/tray out, put 4 flasks in, center the artwork on my SVG template and print at any time and have it work. My previous success was by having an outline of the flask, scoring that on the backing board and then taping the flask there to engrave. I’d like to do something more repeatable and avoid the step of essentially setting up a temporary origin on the backing board.
It’s easy in theory and I have no problem with registration or positioning on systems and tools that have an origin. The problem he is that I need to establish a 0,0,0 reliably and then have the GF position focus and engrave repeatedly from that offset.
The suggesting for masking a flask and running low power is what I want to avoid. That’s okay for a one off (but difficult to remove the mask without shifting the target object). I want this to be repeatable and reliable so that I don’t need to do some kind of test engrave to make sure that things are aligned.
Using the placement tool and a jig that elevates the flasks properly and can be placed at precisely the same spot on the Glowforge floor is all doable.
@bapestar: You misunderstood me. I was suggesting masking to test your jig without damaging another flask. Reading posts here, you should be able to do exactly what you want—the key is somewhere on this forum!
So the flasks must be elevated about 1/2" to be within the focus range. In your design software on a 12" x 20" artboard, make four rectangles the size of the flasks with the artwork centered within the rectangles. Set the rectangles to cut and the artwork to ignore. Cut out the rectangles from a piece of thick draftboard. Secure this jig to two other pieces of thick draftboard and put your flasks in the cut out rectangles. The top of the flasks should now be about 1-1/2 inches from the bottom of the Glowforge with your honeycomb tray removed. Insert the jig and mark the front edge and left edge - maybe use tape so you can return this jig in exactly the same place every time you use it. Use the set focus tool and have it land on the draftboard rather than the flask. Move your file until the artwork lines up with the cut outs. Run a single score line for one of the rectangles to see if it matches the cut out. Adjust and repeat until the rectangular cut out aligns. Select one of the rectangles and note its bed position with the placement tool so you can check this in the future. Use the set focus tool on a flask and set your engraving settings. Ignore the rectangle cut lines and run the engraves. Next time, put in the jig making sure it is placed in the proper position. Double check the rectangle cut out for the flask using the placement tool and a light score. If it lines up, engrave the four flasks again.
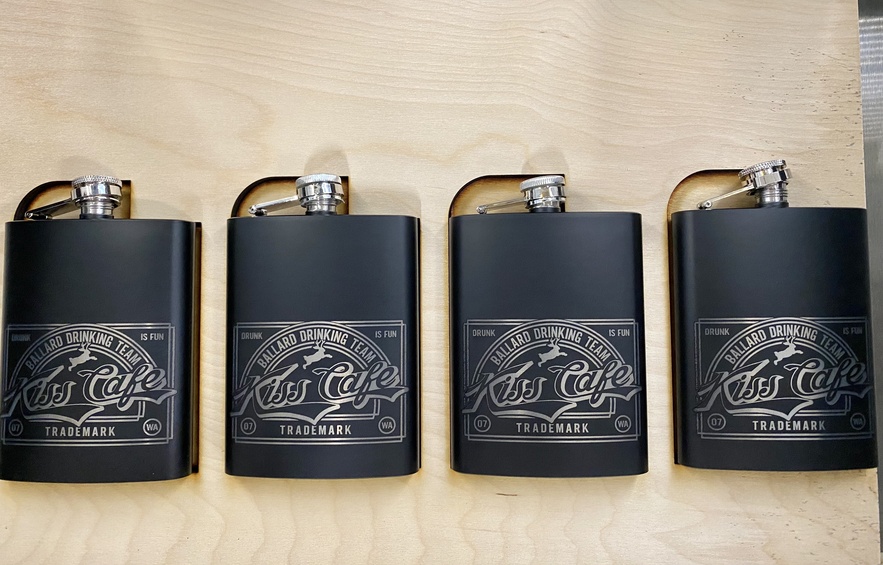
Thanks @dklgood and everyone else for some suggestions. I got a pretty good result (I’d still like to tune it) and documenting what i did in the event that it helps someone else.
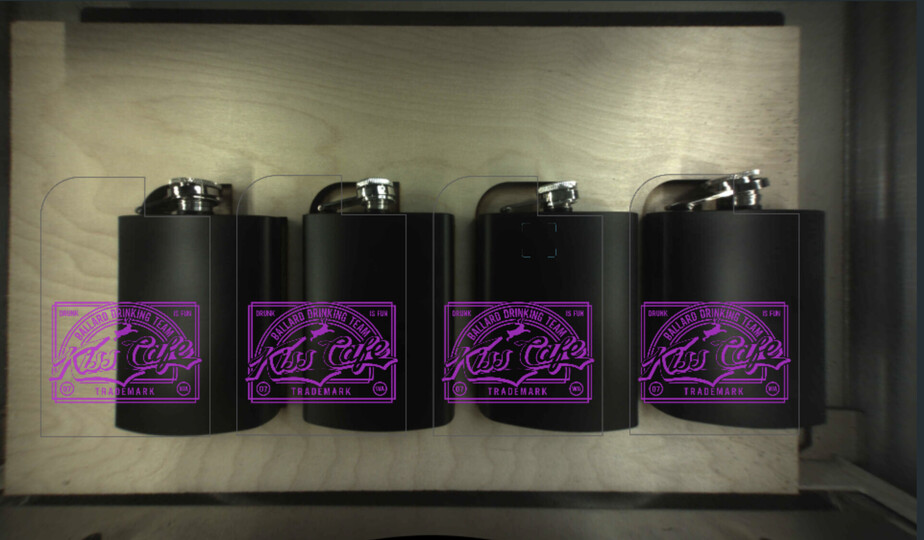
Q: Given how inaccurate the de-warp is of the scanned image, how do I set the focus height correctly? @dklgood suggested that I use set focus on the flask, but the flask in the image is not at all aligned with the artwork in the UI - so I have no idea where the focus was actually set (you can see the square in the image, but who knows what it was really focused on or what the height was). Should I be setting the focus based on where the artwork is, or where the flask shows up on the image? (I tried the latter, but I want to lower the focus value so that I can try to get a cleaner cut).
What I did.
Started with a 12x20 artboard so that I’d have a better reference origin and never have to move the artwork
Built up a stack of 6 x 1/4" boards to make the jig. Squared them against the stop that I made for the crumb tray to stop wiggling. Cut the jig.
Dropped the stack to 3 x 1/4" boards plus the jig on top
Set the flasks in place
Clicked “set focus” on the mid-height of the flask (based on the image)
Pressed print
Got a decent result although the far left and right parts of the image aren’t very clean, so I think I need to change the focus to be a bit lower. I’d love to get that setting firmed up reliably by putting a known value in, but not sure how to “find” it since setting focus doesn’t give you the value that it’s working with to index from.
I suppose I can try to calculate it by adding the stack height including the flask, then subtracting the height of the crumb tray… would using that value as material height get things focused at the right point? It’s a bit confusing in terms of understanding material height vs. engrave focus height vs. set focus height - are these all different ways of setting the same thing?
I wish this product both presented and accepted absolute values more generously rather than hiding behind the “magic”. The magic is great for new users to get good results, but for someone trying to get the machine to do exactly what you want it to, it can be really frustrating. I’m sure everything I want to know is uploaded to GF, but wish I had it all locally and could just save my job settings once I get everything setup and understand what instructions were actually going to the machine for the job.
If you put the corner of the jig at the lower right corner of the metal at the bottom then they will be at the same place every time and looking at the precise placement numbers that are correct and writing that down you can repeatably get the proper place easily and every time.
The first time you will need to use the set focus on the top point to get it right but with the curve it may still be off a bit.
I have the jig at lower left, so indexing is no longer a problem. Focus is however. As you can see from the photos, the XY that it is following (the vector art) is very different than the visual position of the flasks. So, it’s ambiguous to me as to how to set the laser both correctly and repeatedly. My intuition says that I want to set it at the midpoint of the low and high points of the surface, but not sure how to reliably set that.
Is setting (unknown) material height the same as setting focus height?
Made 8 successfully last night as described above. Was hoping to get better “edge” results by manipulating focus.
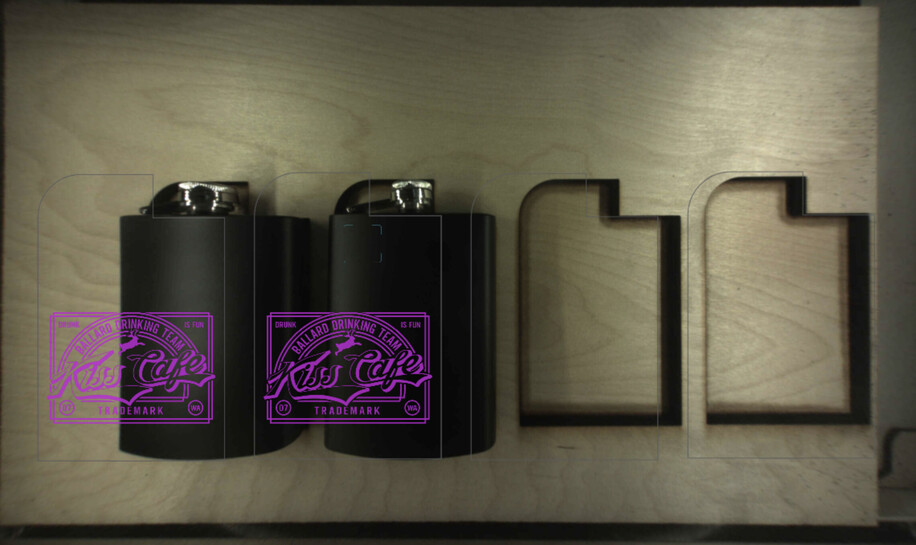
Attempted 2 this AM using the same file (but deleted the artwork for the 2 missing jig positions). Did everything the same as I did last night, except that I spotted a reference to the “red laser” for set focus, so played around trying to get the red to line up for 15 minutes. Eventually, I caved and accepted a near-to-top high point of the laser.
Hit print and ruined both flasks because it decided to offset the artwork differently today than yesterday. Super frustrating. Have no idea why the “X” would have changed. It’s a 12x20 SVG file and the only differences was the removal of two art pieces for the missing flasks. The 4 “jig” outlines were still present. As you can see the visual offset is similar to what I saw yesterday but that did work.
Any advice welcomed. I’m certain there are folks out there doing repeatable work on the machine, but clearly GF “magic” is interfering with my ability to get consistent results. I think the right focus thing to do is to set the focus height by doing the math as suggested in some other forum posts, which I will try next I guess, but I need to be able to rely on the XY not getting fudged up.
Once you have the precise location on both the vector art and the jig you will get the correct engrave at every try. When anything is selected the location can be found by picking the rectangle at the bottom left of the GFUI that will give the specifics of what is selected. not only if it correct but even if not you can measure the result and do the math and use those numbers.
As mentioned getting the correct height on a curve is hard, but the numbers on the precision measure goodie are precise no matter what it looks like and will always cut/engrave at that location.
Once you have the precise location on both the vector art and the jig you will get the correct engrave at every try.
Clearly, not what I’m seeing.
Last night used the jig and the same artfile 4x to check the position on each of the locations, then ran 2x jobs with 4 flasks and everything was correct XY. This morning, ran the same file, the same way, with the same jig (unmoved) and the only thing I did differently was played around with set focus. I can’t see how set focus would affect the XY in any way. I did not move or manipulate the artwork with the GFUI at all. I guess I’ll ask support.
I should not but did you check the precision location? There is a very fancy math that converts location through the fisheye lens to what you see. If that is off then where it thinks a point is at different elevations will be off too. Precise location goes around that problem but a good configure that has measured where pieces are and done the math may be why it works for me. you need a clean sheet of material 11x20 to do a configuration on the crumb tray. after that has been done successfully everything will be more accurate, including set focus.
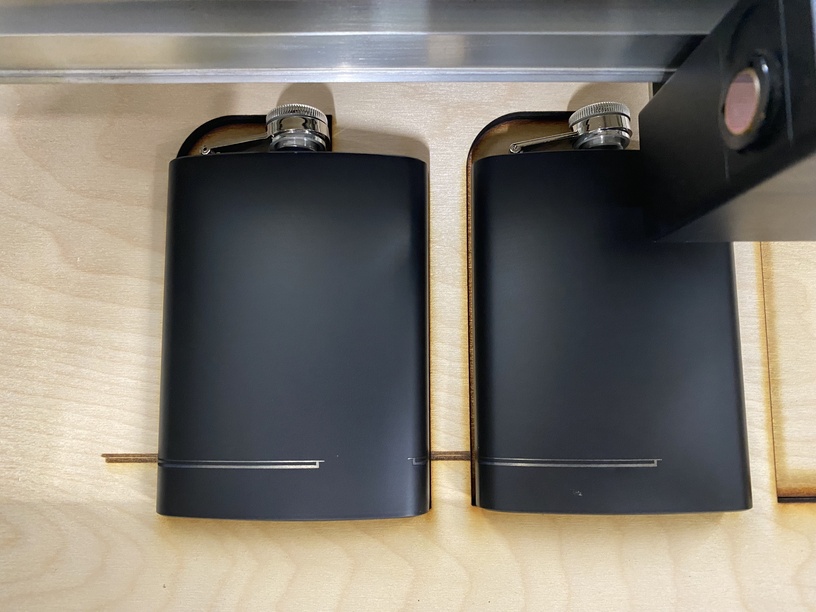
If you look at the images above, you can see I am not relying on the image at all for placement and that the artwork looks wildly off, yet aligned correctly.
I’m using a 12x20 artboard with my SVG and successfully uploaded the SVG (with variation) on 6x engraves yesterday and they were all positioned correctly since I used the same artboard to cut the jig.
What you need is to make sure the camera is right, I misremembered it is calibration not configuration. Click on the link and do it if you haven’t. Otherwise use the Set Focus on the bottle nearest the center and have a double layer of masking on it the set image to score instead of engrave at top speed and about 5 power. This will make a light line affecting only the masking. then you can check the precision placement and add (or subtract) the distance in the precision power “pulldown” and try again. When you have it Highlight everything and wright write down the numbers. Those numbers should be correct every time.