Well, I’m glad I’m not the only one going through a machine every 8 months… seriously. I’ve never had a computer break, a phone break, any electronic device break on me. But Glowforges… I’m waiting on support to get back to me now about my last one breaking last week. Hopefully they respond soon.
It’s possible that your kerf is changing because the power output of the new machine is slightly different. So your settings need to be adjusted a bit.
I have been tinkering with settings all weekend and I’ve dialed it back a bit (not heaps) but the kerf is still way bigger compared to what it was before. I’m still not sure at what I’m at for 2mm material. I offset my 3mm designs with another 0.1mm around to get a tight fit. But this was already offset in the original designs so I’m not sure at how much total I’m at now.
Some basic tech support still showed up to help with routine problems, but the more advanced stuff is going to take longer. GF is not a 24x7 operation.
Hello, @darkdesign I am sorry to hear about the trouble you are seeing with your print results. Based on the Gift of Good Measure print that you ran on Proofgrade, it looks like the Glowforge is performing within specification. It looks like there have been some very helpful tips from other Glowforge users in this thread as well. Varying your settings will be a good next step in getting more consistent cuts.
Another tip I would like to offer is using “Set Focus”. This is a good way to get accurate focusing results. I will leave a helpful article regarding “Set Focus” below.
Since this problem is being seen on materials that were purchased from another company, we can’t offer support for prints that don’t come out as expected. Materials may vary widely from piece to piece, even if they’re created by the same manufacturer. I suggest posting for advice in the Beyond the Manual section of our community. Note that the advice in this section is unsupported and is not reviewed by Glowforge.
Should this happen with a print on Proofgrade materials, please let us know and we’ll help you right away!
Performing within specification. So am I right to conclude that this (3rd) machine I am on now has such different calibration that I will have to review all my settings from the last 4 years on my other 2 machines? And with that all my designs. And that in this case the kerf slope is much more prominent than on my previous 2 machines on which I did not have this occur? As the only variable in this is the Glowforge and not the material. (as I’ve been cutting this same batch of stock for years) I have been cutting exclusively non-proofgrade material in the last 4 years. I still have my crowdfunding free stack of proofgrade as I don’t see the need to use it unless it was for calibrating snap marks or printing the gift of good measure for support purposes. And frankly it’s too expensive to purchase compared to non-proofgrade not even including the ridiculous overseas shipping. There is a reason I never touched the roughly €200 of credits I got for delays of machines. It’s just not worth purchasing.
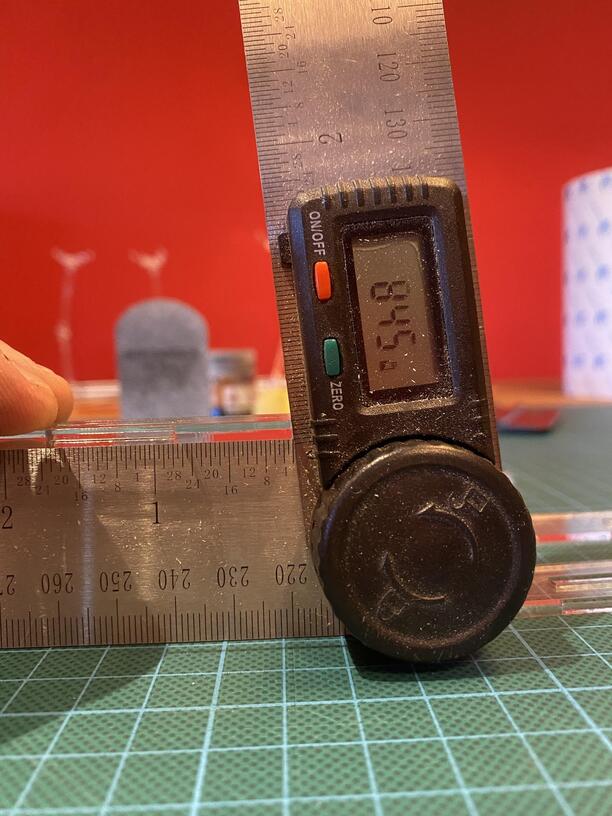
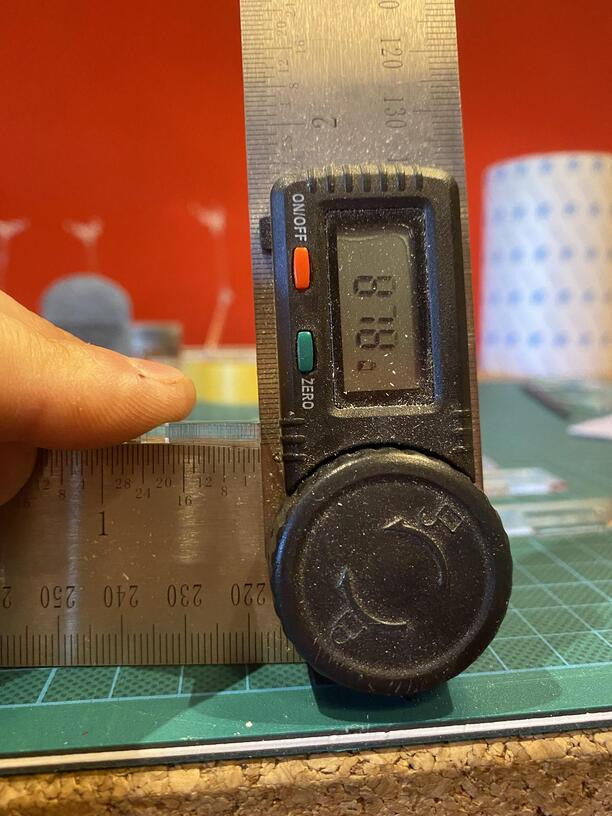
What I would like to know is (and this is because at first the autofocus was not even featured) Why did the autofocus settings cut through on the gift of good measure but when I manually entered the material height as measured with digital calipers calibrated to 1/100 of a millimeter the same settings did not cut through on roughly the same space in the laser. (top-left)
Maybe the biggest reason I’m moving away from Glowforge is the lack of actual tech support for the machine. Enough moral support. And a community full of software teachers. But when there is an actual problem with the machine. The only support offered is ‘send it back!’
You’ve answered your own question, and I had previously stated the same thing six days ago.
Kerf width and angle are not part of the machine specifications. If it cuts using defaults, it is within spec.
Every machine can be different, and potentially by enough to affect (for example) the fit of parts. That’s why you always have to take shared settings and kerf compensation in designs with a grain of salt. They’re not going to work for everyone. Your issue proves that point - same designs and material no longer working as expected.
If you want a machine with that level of precision, the Glowforge is not for you.
I will add, there is one option I’d like to see them start offering - the ability to recalibrate the head itself. If a defective print head is replaced, there is a process for that. I am wondering if it’s possible that might correct focus height (i.e. kerf width) issues. It won’t fix beam angle - that’s fixed by the slant of the carriage plate, and was the difference I also mentioned above between another users’ machine and mine.
I’m sorry for the frustration when getting different results between using Set Focus and manually entering a focus height based on the material thickness. I’ll share detailed notes about this with our product team so we can review our documentation on how to use the manual focus height in combination with other manual settings.
To get the most accurate results, our recommendation when setting up a print is to use Set Focus before printing even when using laser-safe materials from other manufacturers. Set Focus takes a measurement of the distance between your print head and the surface of the material and adjusts the focus based upon that. This helps to account for slight differences between units such as how the crumb tray might be sitting inside the unit, small differences in the crumb tray due to manufacturing tolerances or other factors.
As a next step, please run a test print with material you normally use, run Set Focus and set the focus height in the print step to “auto”. Please let us know if this improves your print results.
This makes for a really good case for changing how the focus height field is presented to users. Rather than a focal height field, which may or may not be accurate due to the differences between machines, etc., a focus offset would allow for, and make sense to the end user, that you want to change focus by X-amount from the material height measurement.
Hi, and thanks for the reply. I’ve been using the ‘set-focus’ since it was introduced. It deleted the step to careful measure the material to a hundreths of a millimeter with digital calipers. And very welcome it was. It was suggested previous that I run a test with autofocus and without it.
I’ve been cutting more acrylic (3mm) as orders trickle in and I’ve been experiencing not only that I have to up the power already (remember this is a refurbished machine of a few weeks old) to cut through the same material; but also the kerf beam is near 30º off a perfect 90º. If I but up the pieces to each other there is a noticeable swing left/ right. Stuff that used to tab in with ease now flops in on one side and barely makes it through on the other side. It’s that bad.
To top that I had not experienced a homing mistake once in the last 4(?) years and this week the machine didn’t properly home and started cutting somewhere different than shown in the UI. Had to emergency stop, reset and watched the machine not home again. I went ahead to turn of the machine and manually helped the machine home to the center camera. After turning on the machine it picked up the regular homing well.
I’ve been discussing all this in our Dutch Glowforge/ lasercutter community and it looks like everyone is having a less then good experience with their glowforge.
Thank you for the additional details. Regarding some of the more recent prints where you ran into an issue with alignment, I extracted the logs to take a look. Was the material being used translucent or clear? The alignment preview for a print is based on the measured height of the material, and materials which are transparent or reflective can sometimes be hard for our system to measure correctly.
I’d like to have our team look further into what you mentioned about the unit’s alignment as well as the trouble cutting through material. Do you happen to have a piece of Glowforge Proofgrade that you could use for a short test? The test print our team would like you to run is only 65mm x 40mm, so it can be run with a scrap of Proofgrade as long as it’s large enough to accommodate the design.
Here are the steps for the test:
Turn off your Glowforge.
Check for small pieces of debris or dust.
Check the lower door to make sure it closes all the way. It may require some force to open, but open it, wipe any dust off the edges, and close it all the way.
Remove the tray and clean any dust or debris from the surface underneath. Pay careful attention to remove all debris from the four dimples where the tray rests.
Check the lid to make sure it closes all the way. Small particles of material, such as dust or debris, can prevent it from closing completely.
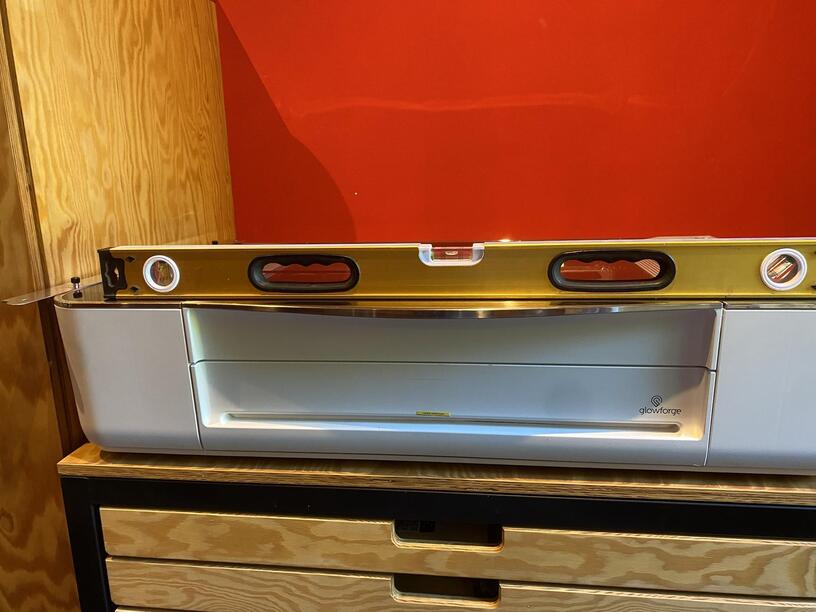
Check the surface your Glowforge is on to make sure it’s flat. Ensure it is not twisted slightly and that there is no debris propping up one side of the machine.
Turn your Glowforge back on.
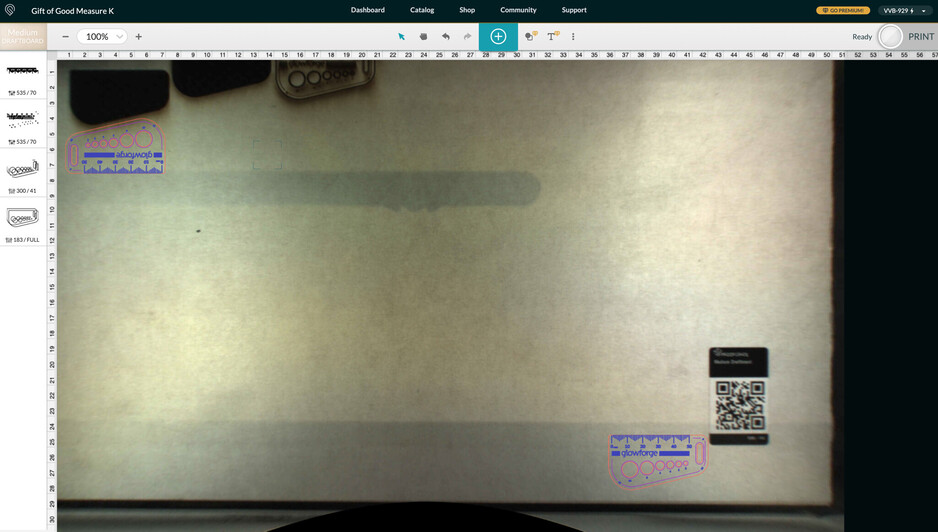
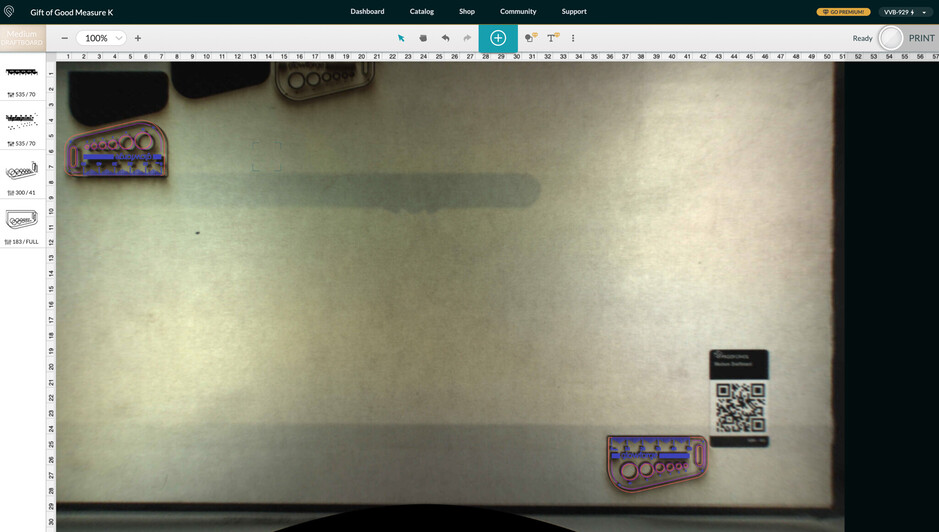
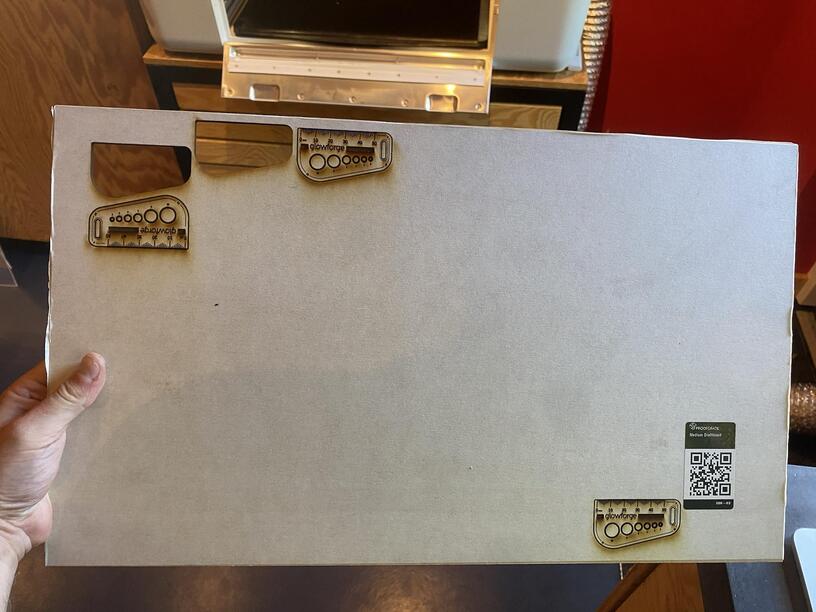
Place Proofgrade material in the part of the of the bed that you are having the most trouble and print the Gift of Good Measure using the default settings.
When the print finishes, leave the lid closed and wait until the fans stop and the picture updates. Without moving your artwork or your material, take a screenshot of the Workspace to show us the difference between the artwork placement and the actual print placement. Make sure to include the rulers in your screenshot and show as much of the bed as possible.
Mac: Press Shift-Command-4 and click and drag a box around your image. You’ll find the screenshot file saved on your desktop.
Windows: Click on the Start Menu and type “snipping tool”. Open the Snipping Tool > New then click and drag a box around your image. Click the Save icon and name and save your file.
Send us the screenshot along with the date and time of the print
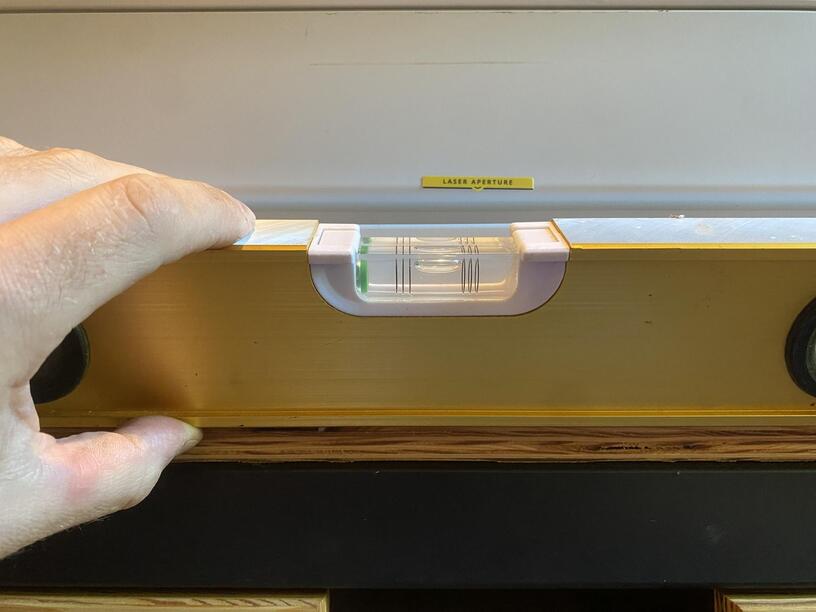
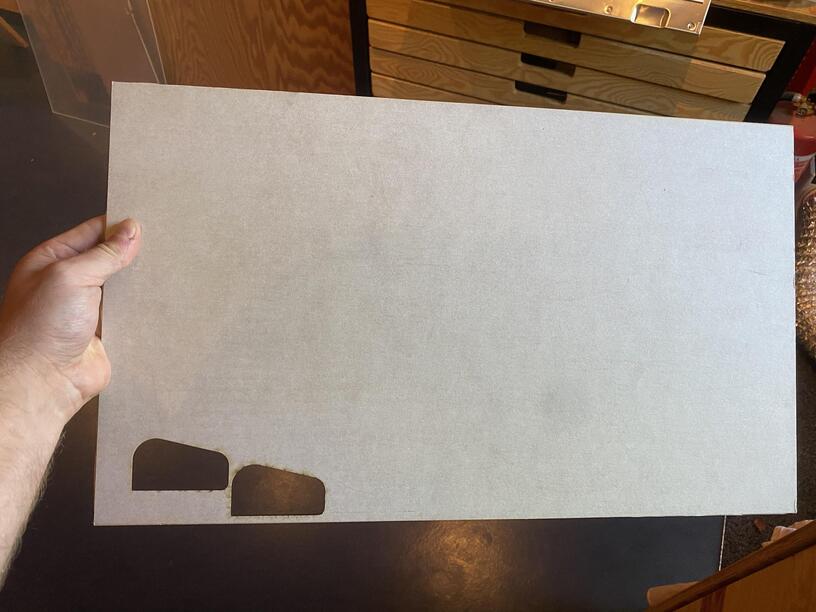
When this test runs, in addition to sending the screenshot, please let me know if it successfully cuts through the material. If possible, please also take a photo of some of your recent prints from the side showing the kerf angle you mentioned. I’ll then review the photos along with the logs from the test and follow up with next steps.
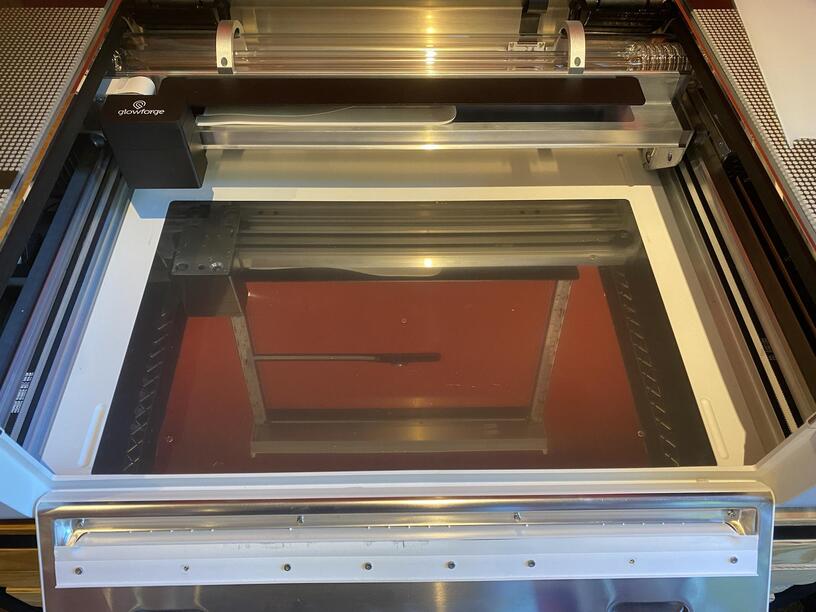
Took out the proofgrade medium draftboard from my last test. It’s still full size board. Funily I have the most problems cutting through in the top left corner but just in case I placed another design in the bottom right corner. (Traditionally the furthest away of the laser source) Job started around 12:16 today tuesday 28th september.
6+7. Without touching anything I took some screenshots:
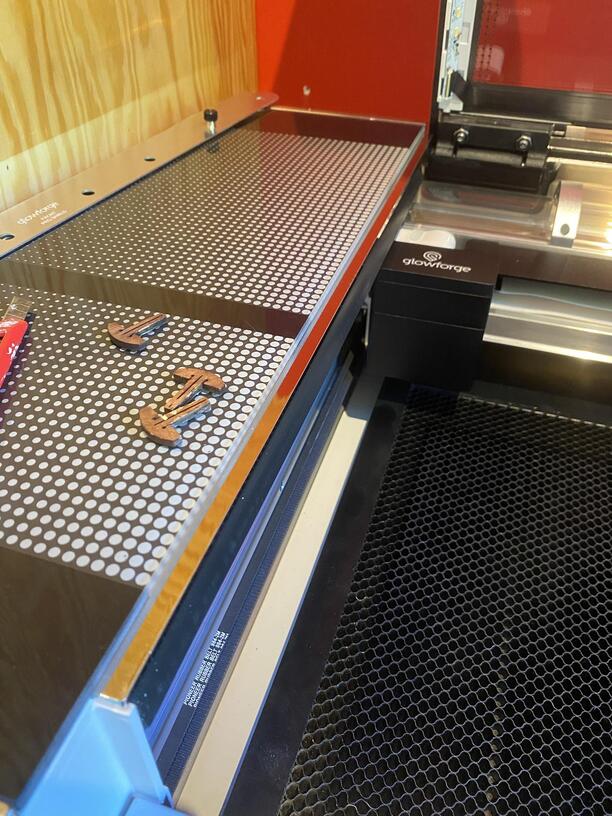
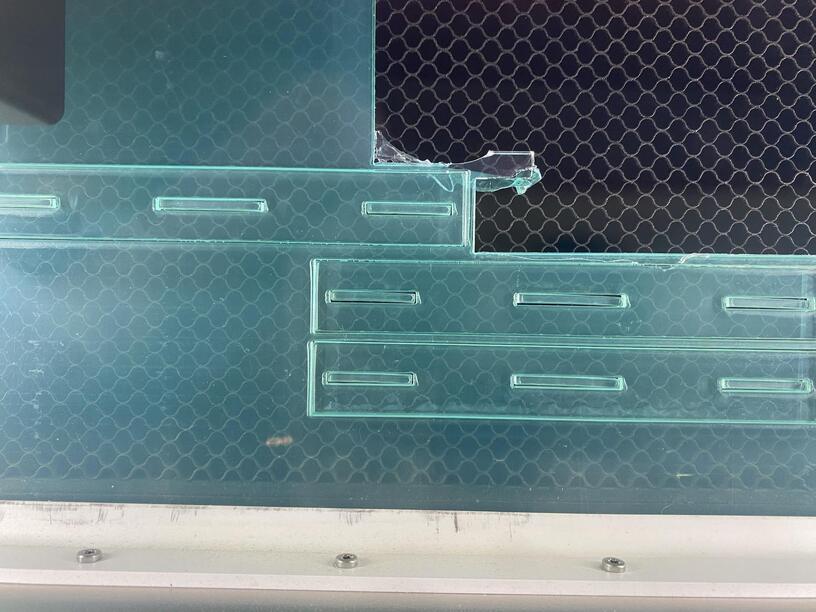
This is what that kerf looks like freshly cut. You can make out that the plastic layer underneath is not cut through all the way. It used to on my old machine on faster settings. I brought back the speed on this machine but it is still not cutting through well enough. (153/full/auto)
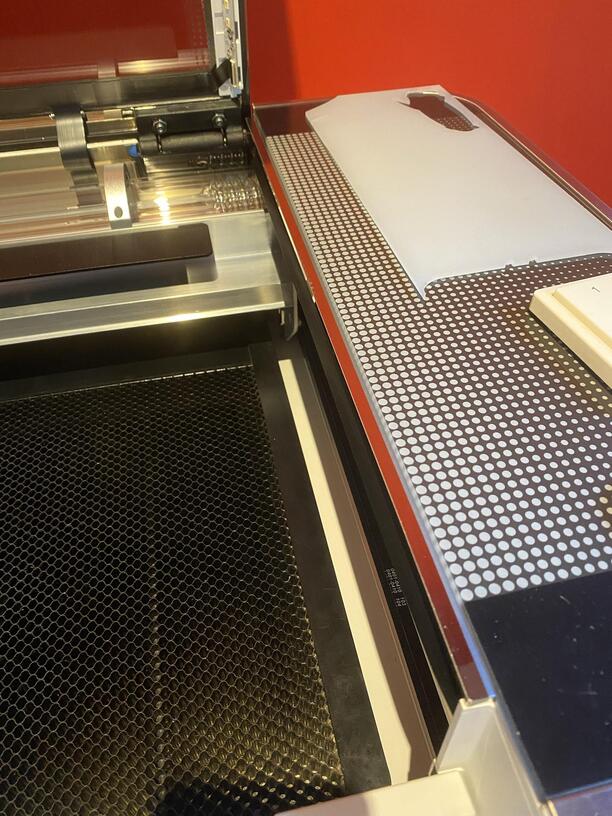
Now this design used to be very stable. Because off the new kerf offset I had to account for another 0.2mm kerf in the design. Put together the whole thing is still very wobbly. on account to how much more kerf and diagonal offset there is in the cut. I can’t sell this.
Thank you for the detailed photos & measurements along with the test results from the Gift of Good Measure test print. I wanted to let you know that our team has received them and we’re looking everything over now. We’ll be in touch again soon!
@darkdesign Looks like we’ve done all we can through this channel, the next step here is going to be grabbing a bit of information, so I’ll be moving the rest of this interaction over to email.