I don’t work with a lot of 1/4" material, so I have no idea how long this might have been going on. From what I’ve read, there is supposed to be a 1/2" clearance between the carriage fan casing and the honeycomb of the crumb tray. Mine is 1/4". I removed the tray to make sure that the area was clean, and looked at the tray to make sure it was level. Bottom area is clear of debri, tray sits nice and tight, tray looks completely level. What could be causing this? My carriage has a very small amount of give, I can lift the back and there will be a bit more clearance, but certainly not enough for the missing 1/4". The laser arm seems to be sitting on the rollers just fine, and the machine works to cut 1/8" material. I popped off the carriage and re-seated it, still only has the 1/4" of clearance. Is there something that could cause this carriage to sag? Could the metal of the fan casing gotten bent? Anyone run into anything like this before?
Photos would probably help identify what’s different about your machine.
I tried, I know it sounds crazy, I only have a really bad camera on my 10 year old phone. I couldn’t get anything that would help.
I’m going to suggest your tray might be in backwards, so the feet aren’t in the recesses in the floor of the machine, causing it to sit up much higher. It’s been seen before.
I just checked and my air assist fan duct is ~0.7" above the top surface of the tray. I’ve cut, iirc, .6" material (not supported but it was an experiment…)
When I first got my machine I made the mistake of putting my tray too far back the first few times I used it (and even had the laser cut into the plastic front some ![]() ) Set correctly, It will drop into the dimples and be the correct height and location.
) Set correctly, It will drop into the dimples and be the correct height and location.
I will triple check this, thank you.
Thank you for the measurements, mine are definitely a lot smaller for some reason.
Nah, unfortunately this isn’t it. I actually turned it around just to see, and to maybe notice any difference in the actual straightness of the crumb tray itself. Looks straight as an arrow and when installed correctly, sits nice and snug in the bed.
Yeah, mine does too - to the point I can remove and replace it and repeat a print, and you can barely tell it’s two prints, it re-seats so precisely.
Sorry, but support is probably going to have to come up with other ideas. Something likely wrong with the carriage/gantry. 1/2 Inch is a significant difference…
It sounds like your carriage plate assembly is not mounted properly, perhaps the wheels are not engaging the rail on which they are supposed to ride? If the carriage plate can be lifted (front to back) with little effort, it’s likely that the V-wheels are not clamping to the aluminum gantry rail they are supposed to be riding on.
As far as I can tell, there’s only one lip in the front and one in the back of the arm to mount the carriage wheels, I was able to hang from the ceiling and see in the back to verify it’s mounted. I don’t see how you could install it incorrectly, I tried a couple positions and it doesn’t move freely or just falls off. The carriage moves freely and does work when I go to cut, it’s just the clearance issue. I took the entire carriage off, it looks fine, nothing looks bent, it’s level. It makes no sense, like the 20 other issues I constantly have with this thing. I think it’s time to chalk the glowforge up as a learning experience and move on to something else.
This is quite a bit of thread without any pictures. Any suggestions without pics to see what is actually going on is just a guess.
Surely you’d buy a $17 camera or $29 13MP android phone to troubleshoot with before tossing a $3000-6000 laser in the trash and spending thousands more on something else?
Nah, this thing has many other issues with the laser tube, the alignment, the actual laser, the fans and errors, the wifi connection has never worked correctly, it doesn’t even cut the glowforge material anymore without a different adjustment every time I reboot, it doesn’t end. The first year was great, it just needs a lot of things replaced at this point, it’s not only because of this current issue alone. Logistically I don’t see it being useful, it’s been quirky and barely working for a really long time.
I’m going to borrow a camera hopefully by friday, I’ll kill this and start a new one or post those here asap if I can get them. I don’t think I’ll be able to get the pictures needed, as where it seats on the back of the arm, you can’t really see that and I’m assuming that will be important. I was just hoping someone else had this happen and maybe it was something simple or easily overlooked. Guess not.
I’ll give you $500.00 for it, cash money, right now! 
Hello! @ryan_barrenger I am sorry to hear about the trouble you are having with clearance. It would be most helpful to grab a few photos. I went through the past history of your prints and did notice that the crumb tray may need to come down a bit. I appreciate you checking this multiple times but if you could give this one more shot I’d appreciate it. I’ll leave a reference photo below-
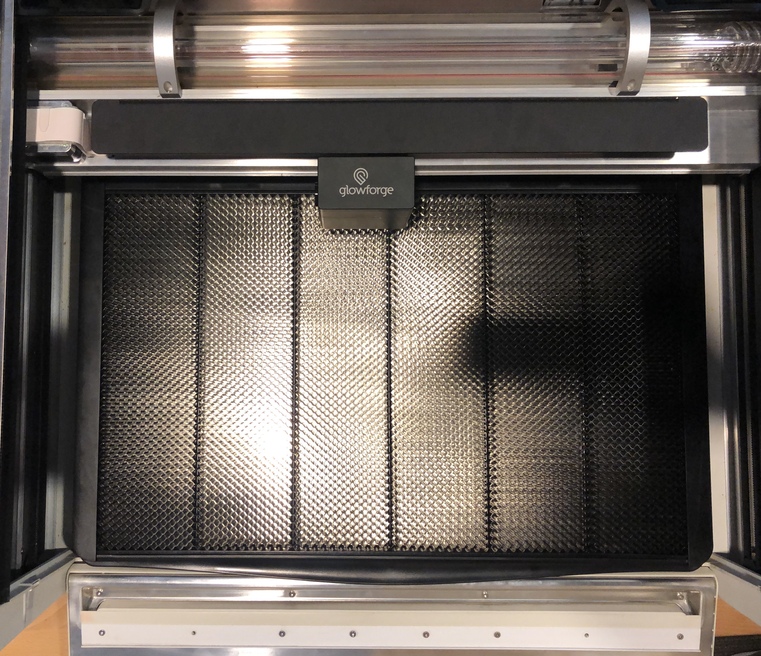
There are four divots that the feet of the crumb tray should settle into. Let me know if this helps.
Otherwise, we will be needing some photos, feel free to send these in whenever you’re ready. No rush
Please send me the following-
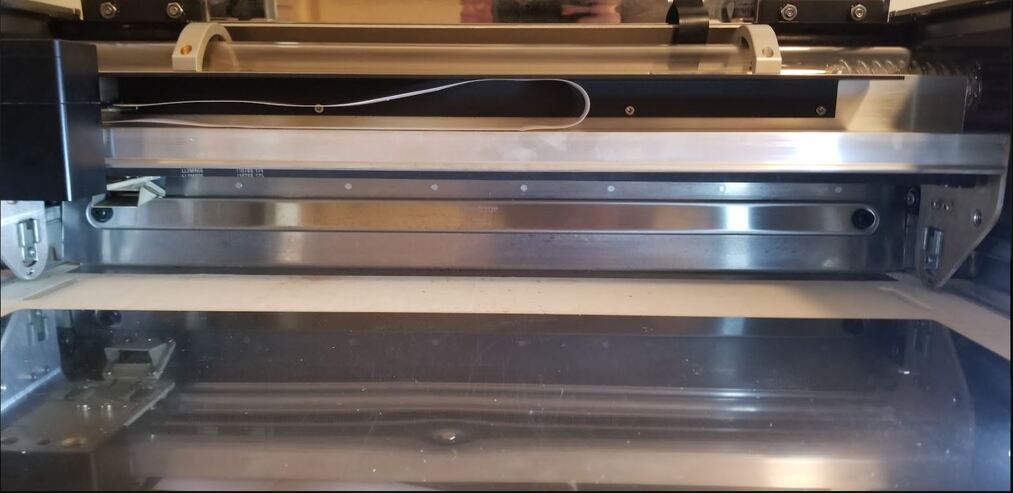
First, power off your Glowforge and remove the crumb tray.
1.The belt under your laser arm with the head pushed to the left:
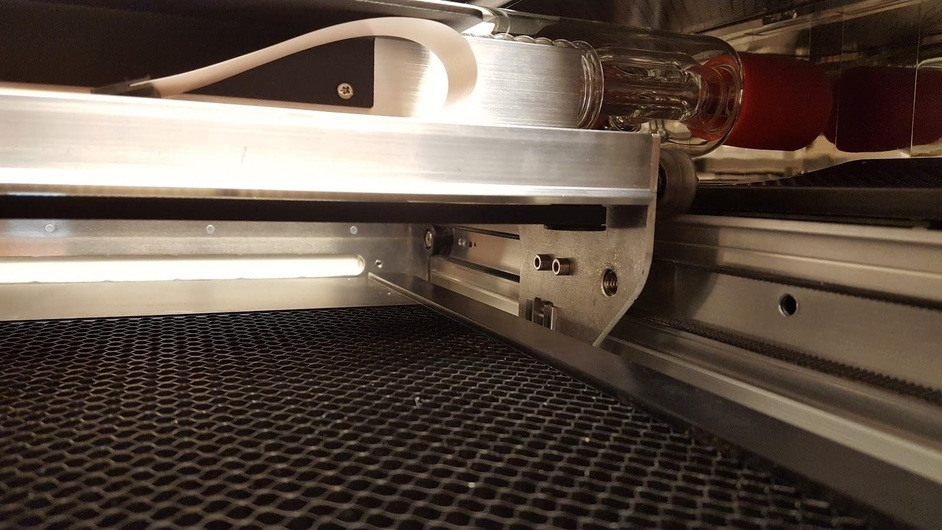
2. The pulley under the laser arm on the right side from the front:
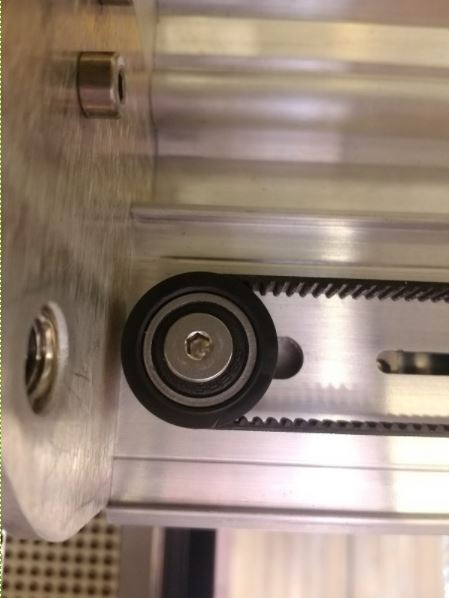
3. The right side pulley under the laser arm from underneath:
Let me know how it goes! Thanks for reaching out!
Attachments

![]()

![]()