I had trouble for a couple of days with the glowforge stopping cuts at the beginning of a job. Today I got an error message saying the air assist fan was not moving at the correct speed. I followed instructions on how to uninstall, clean, and reinstall the air assist and pulley belt
When the belt was back on, I moved the laser head carriage to check that it moved slowly and smoothly, but not loosely. I noticed at that moment that there was a clicking sound, or very clear friction in the belt when moving the carriage left and right.
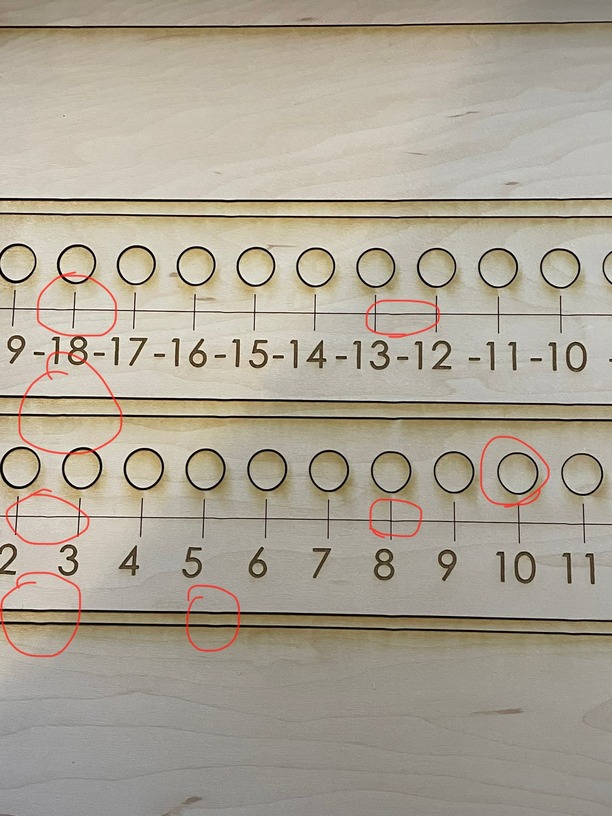
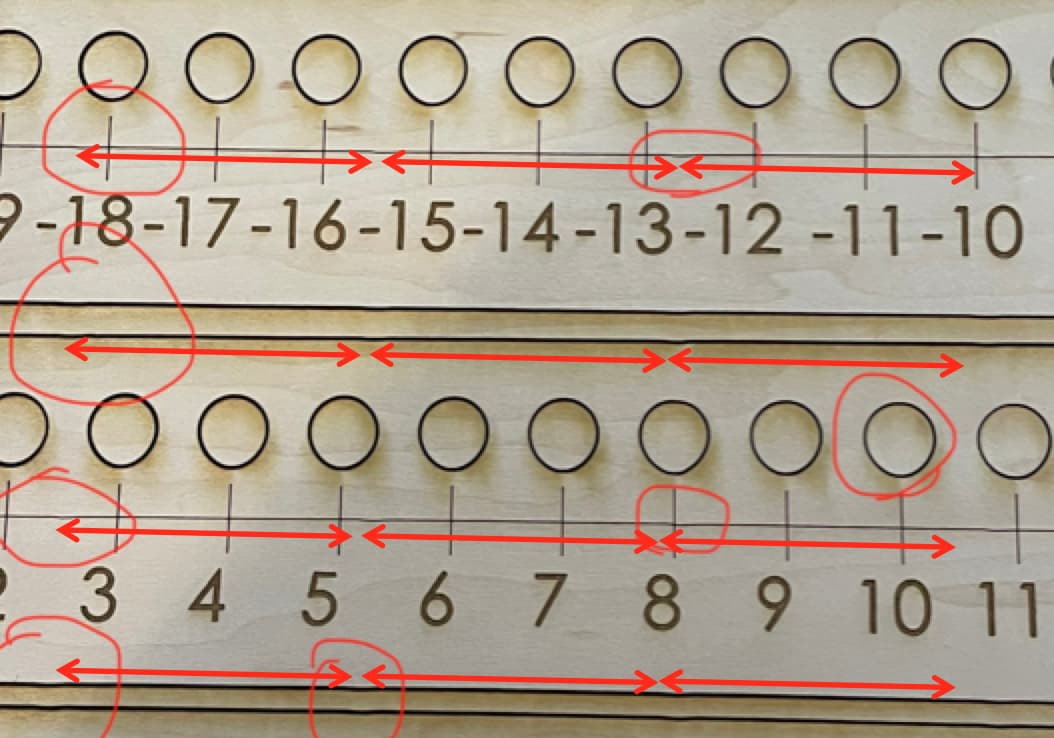
I ran a full cut, and upon close inspection noticed that my cuts have very noticeable proof that the pulley belt that moves the head carriage, left and right, is defected somehow.
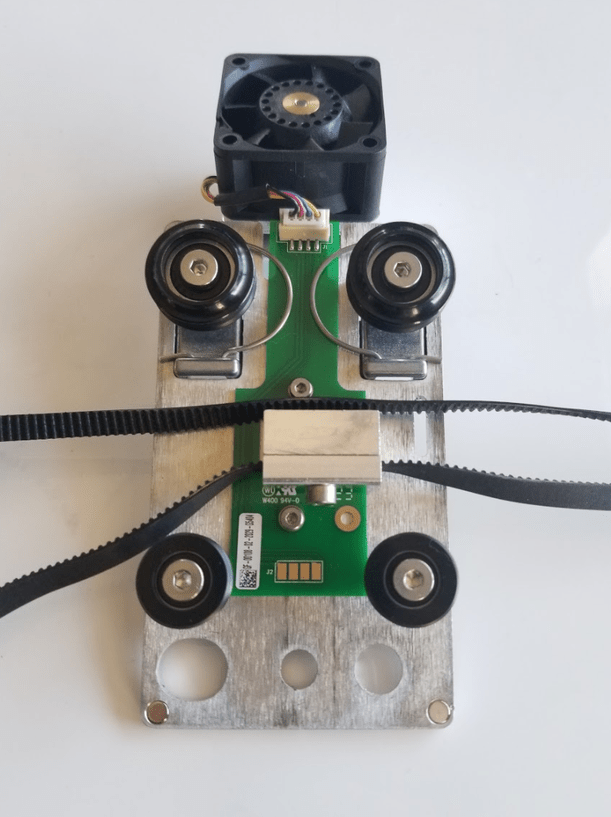
I took off the head, carriage, and belt assembly, and upon further inspection, cannot see anything wrong with any of the components.
I’m at a loss of what to do. I can still run the machine, but my products are subpar.
Is the belt oriented correctly? It should be installed so the teeth of the belt are on the inside, engaging the slots in the wheels. It seems obvious, but I’ve seen several pics on the forum where the teeth were on the outside.
@tfam1230 I am so sorry the your Glowforge printer is saying the Air Assist fan is not moving at the correct speed as well as having your print results are off.
I’d like to take a closer look at your Carriage Plate and V-wheels. Could you please do the following?
The distance between errors seems pretty consistent, which would indicate that the issue is related to either a cracked wheel or a wheel that has some debris stuck on it. It could also be debris stuck to the rail on which the wheels glide, causing the carriage plate to shift position slightly, but in any case, the issue is definitely related to an obstruction/abnormality in the glide path.
As others have said, closely inspect the inner surfaces of the ‘V’ section of the wheels, and run your fingers along the square rail on which they glide, to feel for any bumps or stuck particles.
In the future either post here in P&S or email support - doing both opens duplicate tickets as when they find the duplicate they will close this post and continue via email.
With regard to the Air Assist fan not running at correct speed, are using magnets to hold your material down? If you are, the magnets can, and will, interfere with the fan’s operation. Move magnets out of the way of the print head and air assist fan, or replace them with hold down pins.
I have continued cutting. I took everything off again and cleaned the laser arm rails where the carriage plate runs along. It seemed to improve it a bit. However, I did inspect the v wheels. The v wheel on the right, if you’re looking over the carriage plate when it’s removed, is very loose compared to the v wheel on the left. These are the front v wheels I am referring to. I also noticed the wheels on the left and right sides of the machine. Upon further inspection, the right wheel of the vertical rail is loose compared to the left wheel that runs up and down the arm. I checked these wheels while the machine was off. I’m noticing chattering when the machine is off and I manually move the laser arm up and down. I’m frustrated because it’s less than a year old and I’m already having so many issues with it. Crystal
My name is Alex and I am a colleague of Faryar’s. First, let me say I understand your frustration and it is my goal make sure we you get back to making awesome prints as quickly as possible.
I want to see if you are still experiencing issues with the air assist fan after reconnecting the carriage plate? Many times these errors occur it is either because of a loose connection or that the fan needs to be cleaned. Removing and reinstalling the carriage plate can help solve the air assist alert issue you are experiencing sometimes. If you are still experiencing issue, could you please provide pictures of the air assist fan so I can better diagnose what might be causing the issue?
Also, I see that you inspected the carriage plate for damage and did not see any damage, but did find that the right front v -wheel on the carriage plate was loose. If you would like to tighten this please follow the instructions below:
1. Turn off your Glowforge
2. Open the front door and carefully remove the crumb tray
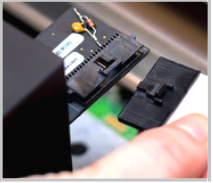
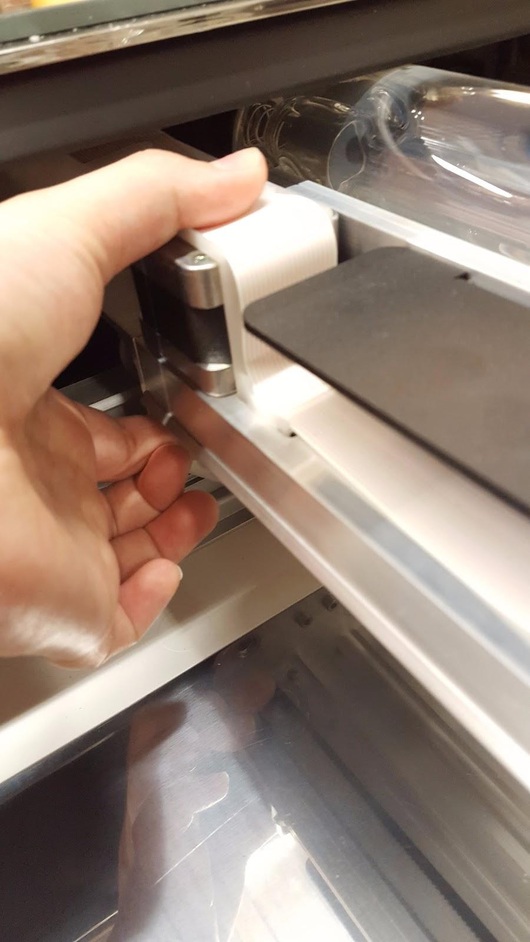
3. Remove the printer head
Holding only the finished black surfaces, grasp the printer head as shown. Pull gently up and back to disengage the magnets and remove the head.
Push down fully on the wire ribbon tab to unplug the wire ribbon from the printer head. Pull the wire ribbon gently away and tuck it into the laser arm.
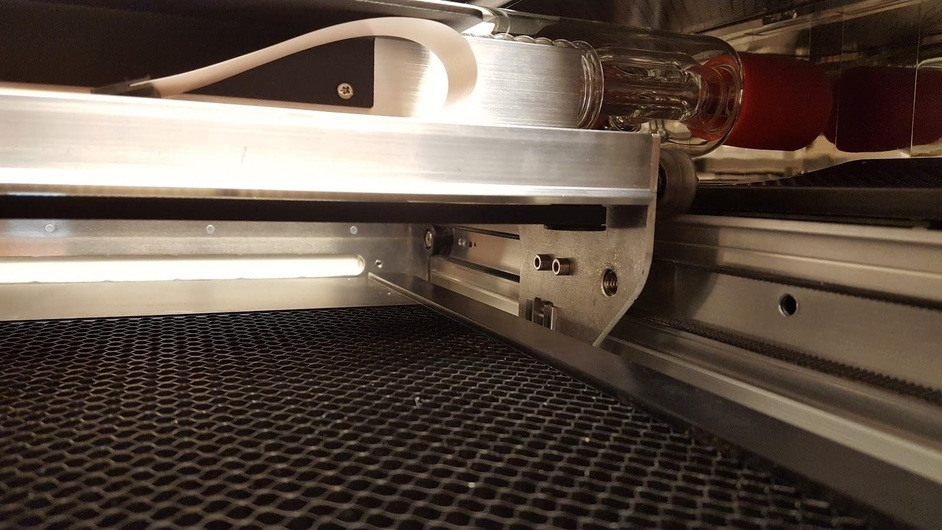
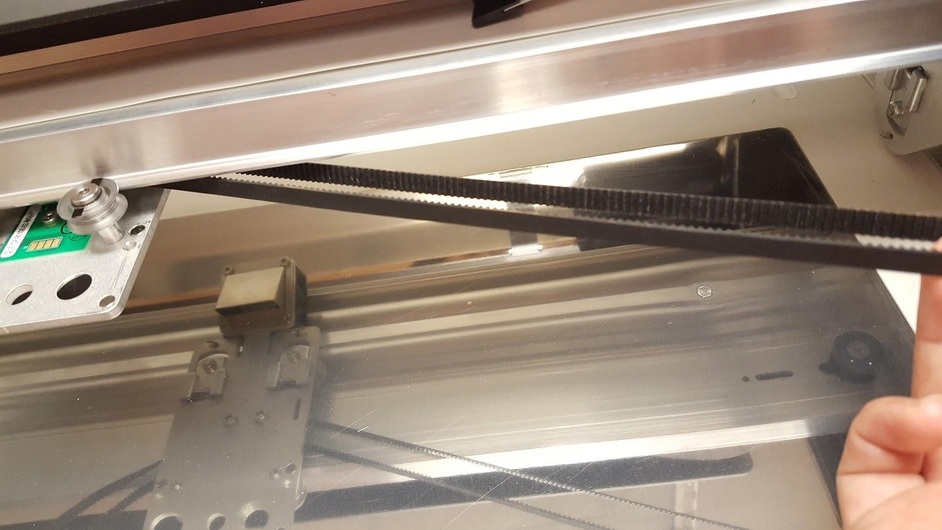
4. Unhook the belt
Push the carriage plate to the center of the laser arm so it’s out of the way
Reach under the laser arm on the right side and feel for a black belt and pulley
Placing your thumb between the belt and the laser arm near the pulley, push down on the belt while sliding the belt to the right towards the pulley. The belt will slide off of the pulley. Don’t be afraid to use pressure.
Unhook the belt from the motor on the left side
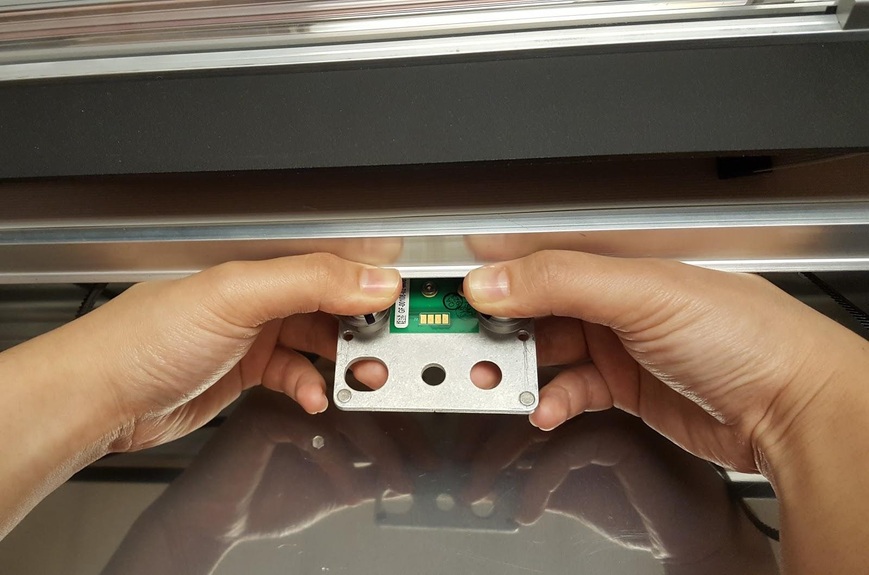
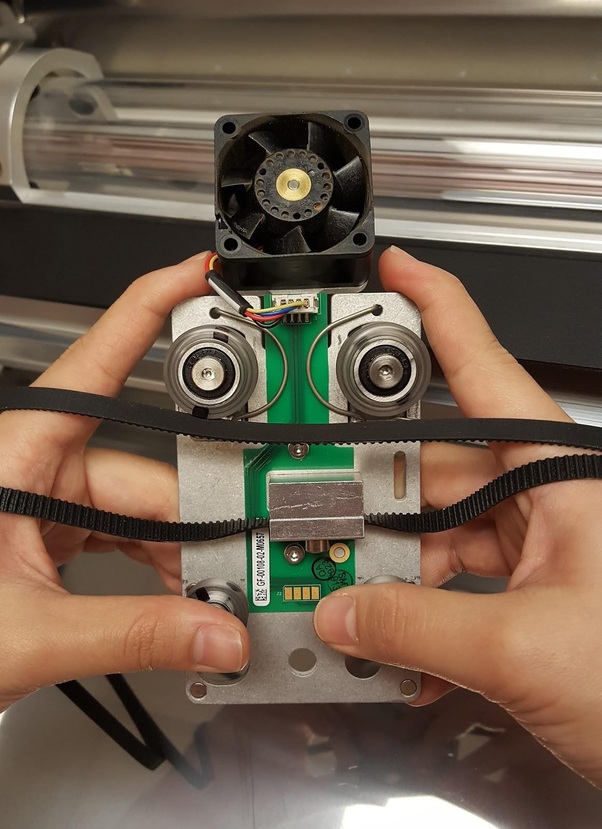
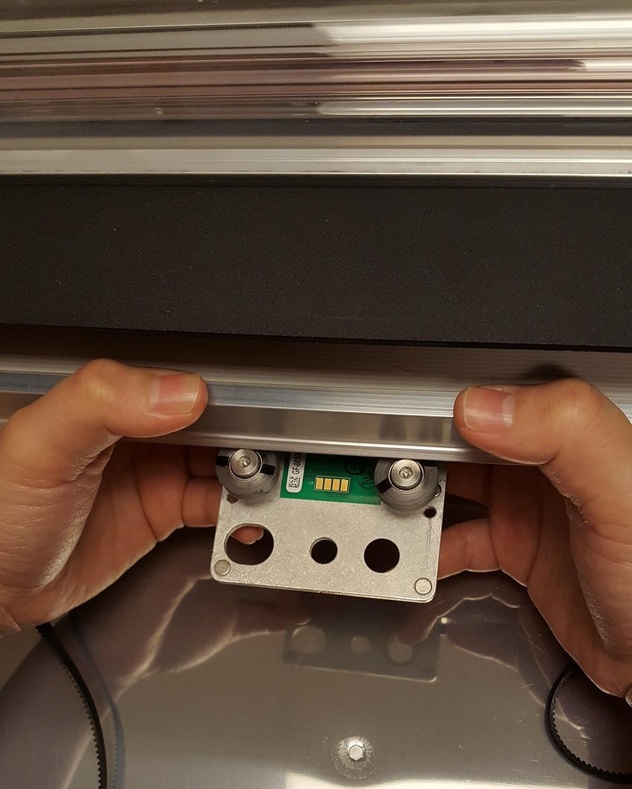
5. Remove the carriage plate
Place both index fingers on the rear corners of the plate and both thumbs on top of the front wheels. Use your other fingers to support the plate. While keeping the laser arm stable with your thumbs, use your index fingers to pull the plate towards you as far as it will go. Then push down with your thumbs to tip the front of the plate down and towards the back of the Glowforge until the plate pops off of the laser arm.
Placing your index fingers on the back corners of the carriage plate and your thumbs on top of the front wheels, hook the rear wheels on the groove under the laser arm. The front wheels should be mostly visible.
Pull the plate forward against the springs until the front wheels clear the laser arm then angle the plate up until the wheels are in line with the rail. Release the plate – it should grasp the rail firmly.
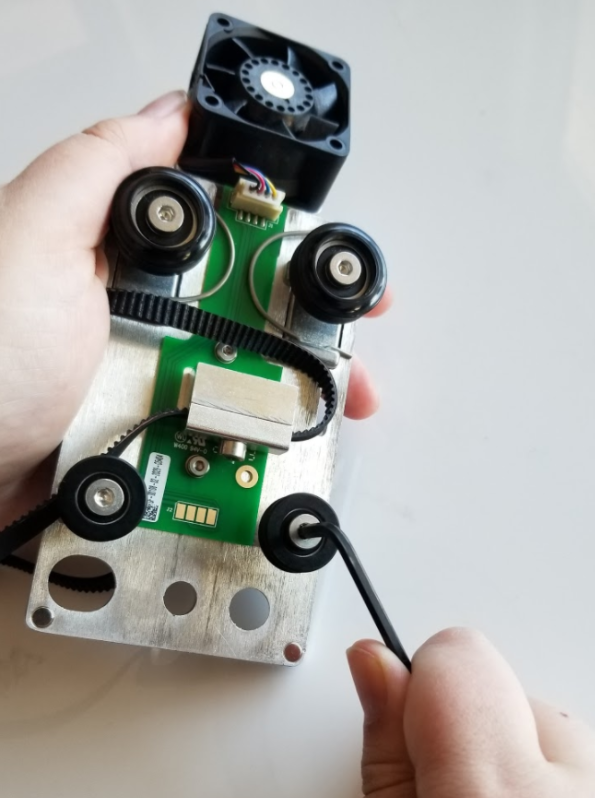
Pick up the right side of the belt and make sure it is not twisted. The outside of the belt should be smooth and the inside should have ridges.
Make sure that the left side of the belt is not twisted and is smooth on the outside and ridged on the inside
Attach the belt on the left side
Using your left hand, set the belt on the front half of the motor (the silver piece on the left-hand side below the laser arm) and support it with your fingers by placing them under the motor. The belt will not be fully on the motor. Use your left thumb and fingers to clamp the belt firmly in place and apply pressure.
Still holding the belt and motor firmly with your left hand, use the pressure from your left fingers to guide the belt clockwise around the pulley as your right hand slowly pushes the carriage plate to the left. The belt should roll onto the pulley until it is secure.
Once the belt is in place, be sure it is taut and does not sag. If it’s quite loose, please take a photo of the belt and send it to support@glowforge.com.
8. Prepare to Print
Gently slide the carriage plate back and forth on the laser arm to ensure that it travels smoothly. If it doesn’t, remove the plate and try again.
Replace the printer head and crumb tray according to these instructions
9. Turn your Glowforge back on.
10. Try a test print.
Let us know how it goes and if you are still experiencing any print issues after doing this.