Lasering Thick Foamcore

While I was working on the Quilt Block Key Holder there were a couple of requests to show how I was testing the results of various power and speed settings on the core, and it’s interesting enough to see what goes on inside.

Couple of things to be aware of when you’re lasering thick foamcore:

1. Watch it when you do. Do not leave it unattended under ANY circumstances.

The foam inside the paper backings melts, and it can actually burn with real flames inside the closed paper when you are working on path junctions where the air can get down to it from a previous cut. The air assist cannot put that out…it can’t reach it through the surrounding foam.


.

.

.

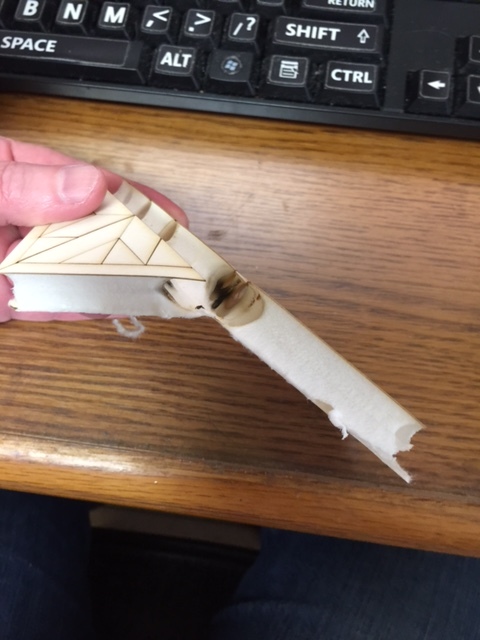
Each of those is an example where the foam was secretly burning inside the core, on fairly low power settings, because there was air feeding in from previous cuts. I came pretty close to losing control of it and not even realizing. The surface paper was hiding the flames. (It was glowing brightly with flickers of flame coming out of the holes…be careful. Even with low power settings.

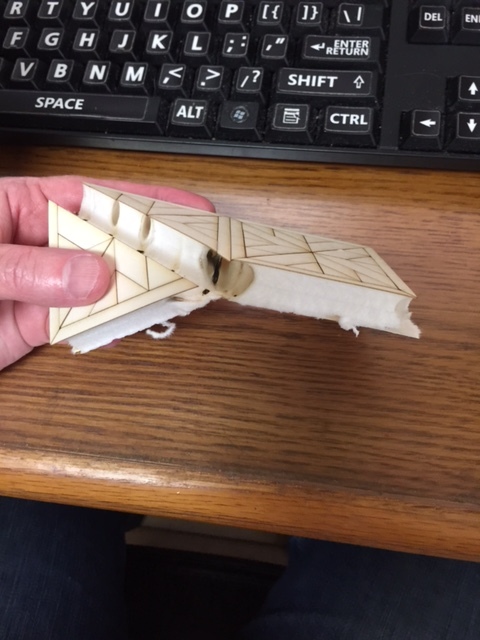
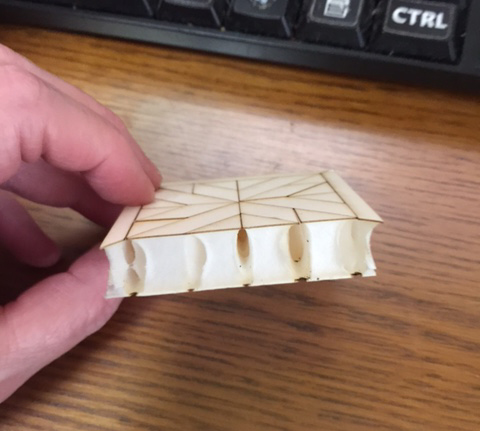
2. You can see that the interior damage caused by the laser is MUCH greater than what you see on the surface of the foamcore. It’s very hard to cut all the way through half inch foamcore without carving a big honking hole in the foam first. (And I did experiment with different focal points as well as power and speed settings.)

The problem is, the higher power settings needed to punch all the way through the half inch foamcore tend to melt and torch the foam inside and dissipate out rather than going down. It just eats more foam away instead of continuing down. (And runs a real risk of fire.)

So for cutting through the back paper, it really works better to just run an Exacto knife around the easy-to-follow path that the surface lasering leaves.

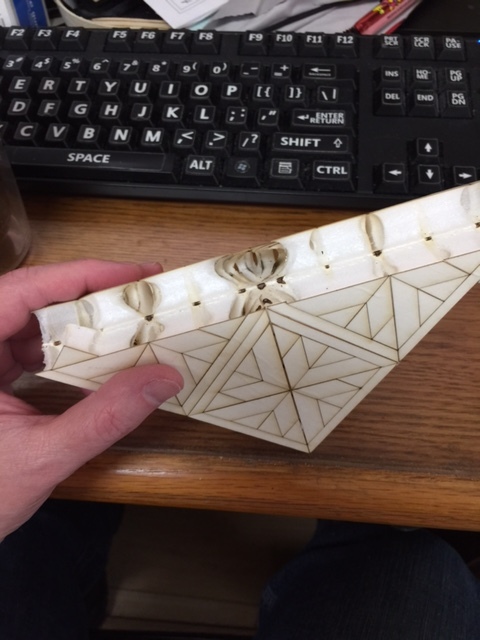
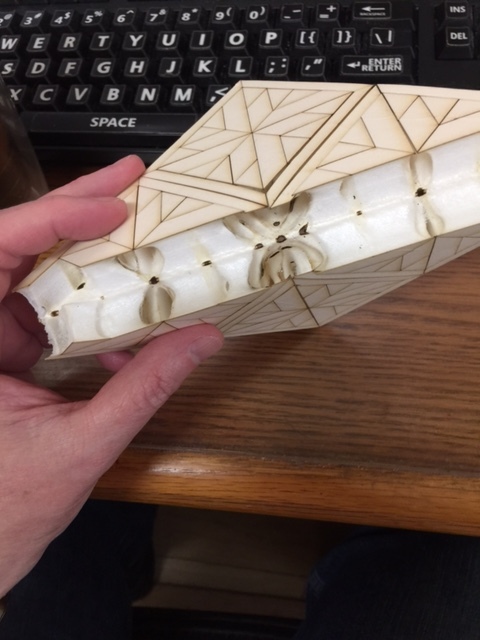
Some very light settings leave a very big hole in the foam:

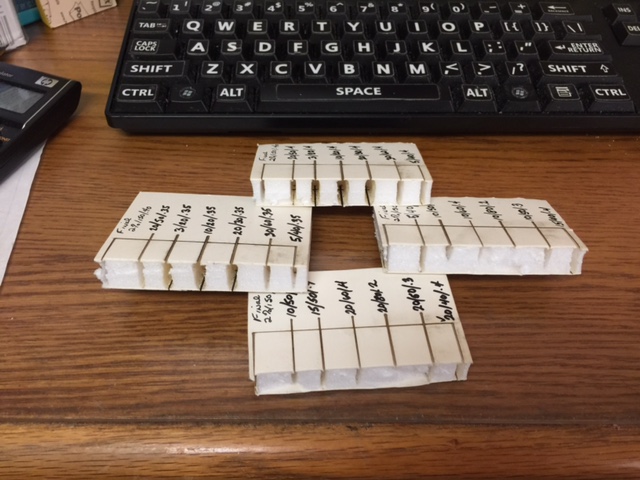
Okay, so for testing, I just created a little file that had a bunch of single lines, each one a different color, so that I could set each line up with different power, speed and focal point settings.

Once the cuts were completed, I sliced right down the middle of the cuts (with a blade, not the laser) to look at the profile each power and speed setting made in the foam.

I jotted the settings down next to each line, and I’ll just keep those little squares of foam for reference.

(By the way - i know these are going to change with the final machine settings, so I’ll run a final set once i get my forever machine. If you want to recreate the test, you 'll need to create some props to set the thick foamcore on - this particular kind is too tall for the crumb tray. Try to get some foamcore under 0.433 inches thick if you want to just use the tray.)

That’s it! :grin:

Edit: Note…do NOT try to use the settings showing on those foam blocks, the scale has changed significantly and you will create a :fire:

60 Likes

Thanks. This is super useful.

9 Likes

First!.. ok fine Second!

Actually I just want to make sure I get the settings from your Pro unit once you have it.

5 Likes

I’m hoping the lower power settings don’t chew away quite so much foam inside…I’ll post them once I re-test.

6 Likes

Thanks for this! I haven’t tried the 1/2" stuff but have used 1/4". I always have my wet rag and fire extinguisher at the ready.

4 Likes

I had the same issues with the 1/2" cardboard. It really flames on the higher setting and lower settings can flame up inside the corrugations. Super useful documentation. Thanks

8 Likes

Mmmmm … vanilla ice cream sandwiches. Oh wait, that’s foam core?! :confused: :smirk: I totally must be hungry.

Thanks for the test, great information.

Now off to find some ice cream sandwiches in my secret hiding place in the freezer in the basement.

8 Likes

I’ll put foam core on the list of things to not laser, at least for cutting anyway. Marking the top layer possibly. It would be great if they made a foamcore with compatible core material.

2 Likes

You might be able to cut through thinner foamcore without any problem. (The half inch thick stuff is problematic.)

2 Likes

Have you tried this on some 3/16" foam core? I like to make custom foam core inserts for my board games and my Glowforge could REALLY help me in that part of the hobby.

What kind of settings do you think could cut that with minimal or even no foam melt? I was planning on just going 1% power at 100% speed to start and test from there… but I wanted to also look into possible engraves into 3/16" foam core (labeled token trays and such)… any insight on possibilities?

Thanks!

Ditto… won’t be going in my laser either. Bad enough trying to cut through one material, but two dissimilar materials? At once?

If I absolutely need foam core, I’d be better off cutting the foam separate from the paper cover and gluing it together afterwards. You could streamline production of a number of shapes in one go by leaving tabs connecting the shapes to the waste material sheets that can easily be broken apart after gluing two sheets of foam/paper together.

2 Likes

It’s definitely going to be a minimal power setting with high speed, but I can’t tell yet what it’s going to be since the power settings are being dialed down. The settings I have now for instance are not going to be the same after they have finished, even for the half inch thick foam core.

Best thing is to run some tests on the actual material once everything gets finalized. :slight_smile:

1 Like

i bet the low power settings will fix a lot of these problems. in the meantime, i think the biggest issue is using the really thick stuff. thinner things work great in a laser on lower power - you get clean cuts with a nice concave scalloped edge on the foam. we had a guy at the local makerspace that used the laser a lot to cut foamcore for gliders.

2 Likes

another truly gorgeous project and great write up! Thanks for taking the time, once again, for all that detail.

I’m inspired again. There are tons of quilting and intarsia patterns that could be adapted for this. I’m hoping that once your “forever” machine arrives and you get the settings all dialed in, you’ll submit a pattern (or 20!) to for publication in the Catalog!

I can see this intarsia hedgie modified to be done in foam core with fabric:

11 Likes

Yes! :smiley:

1 Like

I haven’t done any in the GF because the power settings are pretty hot. I have done 1/4" on other 40 & 60W CO2 lasers and don’t get any of the melt & flame @jules is seeing. I use 1/4" for architectural models scoring to cut through the top layer & foam but not all the way through so they bend & fold.

Looking forward to the GF 2-sided registration enhancements to make it easier to line up the front & back scores & engraves. It’s a pain to jig each model otherwise.

4 Likes

That’s one of the things I want to do the most, to enhance the process of doing FliteTest planes :grinning:

3 Likes

Any update to this? Better power settings to use? I would love to benefit from your wisdom if you have updated settings and not burn my house down. :slight_smile:

Ohhhhhh, I’m sorry…I haven’t re-run them…I wound up tossing the thick foamcore out during a cleaning spree, and haven’t restocked yet…:roll_eyes:

You’ll need to test…just be careful and keep an eye on it when you run it. You are going to need to use it without the tray if it’s over .43" thick - that cowcatcher thing on the head can hang up on thicker foamcore and jump the gantry off the tracks.

If you should happen to come up with some good settings though, if you want to post them here I can add them up top for the next folks who want to try it.

Okay. I’ll play with it and report back - will probably be a while, I’m
still learning the ropes.

Also in completely unrelated news is there a "how to intervene and
hopefully save your glowforge if you think your material is on fire"
tutorial?