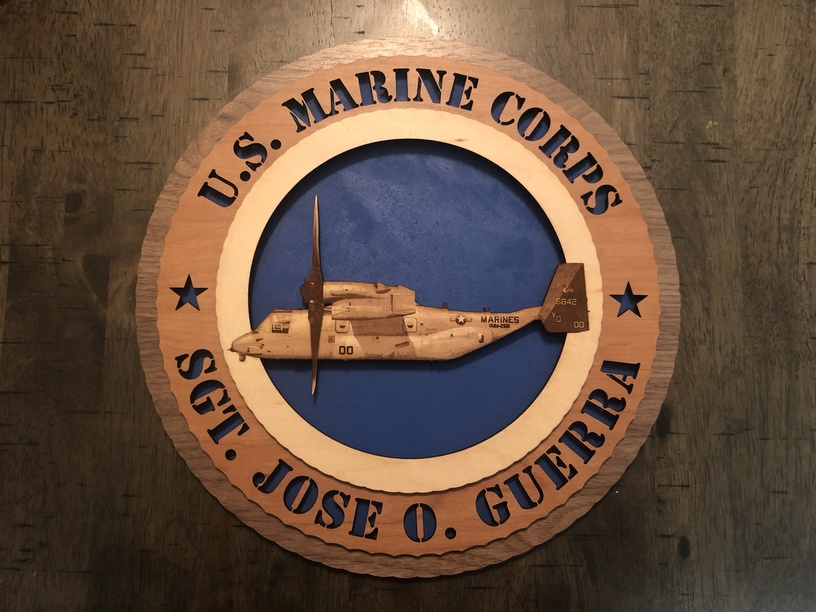
Been working on my photo engraves. They were coming out grainy at first but look much better now. I used all proofgrade materials here. Draftboard, walnut, cherry and maple.
42 Likes
Lovely! How large is this piece?
2 Likes
It’s 10.75”
2 Likes
Wow - the helicopter seriously looks like it is a carved relief. Nicely done!
6 Likes
Thank you! I’m definitely pleased with how it came out.
2 Likes
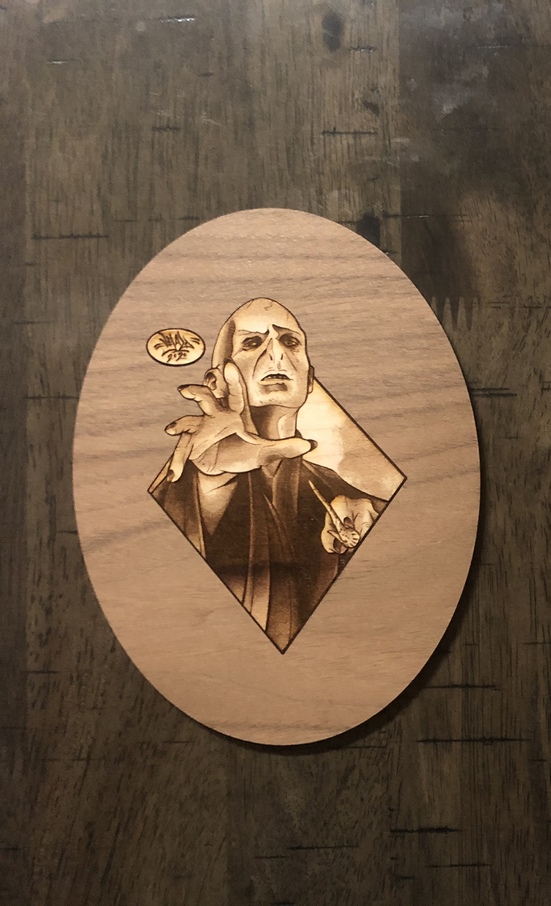
My wife’s brother is a tattoo artist and drew this picture that I engraved on PG maple and inlayed into PG walnut. I used the same settings as the other image.
15 Likes
Really nice work!
2 Likes
Yep, both are excellent! 
2 Likes
Wow - I still haven’t ventured into photo engraves. You’re setting the bar pretty high!
1 Like
Oh trust me. My first photo engraves weren’t all that great. It was a lot of trial and error and a lot of hours of running engraves before I learned how to edit the photos and then set the parameters on the Glowforge UI. Here are my photoshop/illustrator procedures: I use photoshop and create a photoshop file first so I can save all my settings to mess around with before saving as a png in case I have to go back and make changes. I crop the image to cover just around the part I want to engrave first. I zoom in and get as close as I can to the edges of the part I want to engrave. Then adjust your image size to your desired height and width and set the resolution to 600 ppi. That part is important. After that go to the settings and convert to grayscale. Next you want to add 2 adjustment layers. One for brightness/contrast and one for levels. On the levels adjustment layer you’re going to see a graph with 3 adjustable triangle shaped handles. you want to drag the outer triangles in to the edge of the graph on each side unless the graph runs to the edge. In that case leave one or both alone. Then go to your brightness/contrast layer and increase the brightness if needed. You want some good contrast and brightness without washout.
Feel free to experiment with this finished photo edit. This is what your contrast and brightness should look like. Next you use a combination of the quick select tool and the select and mask menu to trace the edges of your engrave. After messing with the settings under select and mask and you are satisfied with your outline, output to selection. Use the quick select tool to right click the outline and click on “make work path.” Select the whole work path with the selection tool and copy paste into illustrator. Choose the import as a path option. Then go back to photoshop and ctrl+z to change it back to a selection. Open the select and mask menu again, but this time output to a layer mask. Save the file at this point before continuing. After saving, right click on your layers and flatten the image, then save as a png. Go back to illustrator and file place your png. The photo and the outline should be the exact same size. Layer your vector over the photo and make sure to lock the photo in place in illustrator so it doesn’t move. Zoom in and edit your vector with the pencil tool so that it is just over the edges of the engrave and looks smooth. Lay out any sign shapes or cutouts you want and use the shape builder tool to get creative. Now the important part is to save as an svg and in the options make sure to embed the image. Do not link the image. Also make sure the option to preserve illustrator editing capabilities is UNCHECKED. if either of these two settings is not set right when saving, the glowforge UI will not accept it. Then in the Glowforge UI, I use 1000/100, convert to dots on the grayscale option, pattern density 0-80, maximize quality, 450 LPI, 1 pass and 0.13 focus height for PG materials. (My autofocus doesn’t always work too well on some materials so I set this manually when I can.) Sorry if there are any typos! I don’t feel like proof reading all of that lol, but feel free to ask questions!
20 Likes
And make sure to remove the mask from your PG maple before engraving!
1 Like
These are fabulous instructions, but we’re only allowed to discuss non-PG settings in the Beyond the Manual section. Would you mind posting this there and then deleting it from here? You can even link to this post in the BtM one and that way they stay linked!
What great instructions - I’ll be sure to try them out! Thanks!
Yes I definitely can try to figure out how to move it over. I apologize. I wasn’t sure if it had to be in that category only if I use non PG materials or if it’s for PG materials with manual settings as well.
1 Like
They don’t actually care about materials - just the settings. So if you engraved on the bark of your backyard tree that you pulled off with your own fingers with the PG maple settings that’d be just fine - but if you did it with power x/speed y they want it in BtM 
1 Like
Beautiful work! That military attention to detail is really showing through
2 Likes
Lol well I figured out how to move it already.
1 Like
Oh - I wasn’t referring to your original post - just the response where you gave settings. I mean, moving the whole thing is fine too
1 Like
Oh wow, you are the photo engraving guru—those are just amazing! Thanks for the process help, it’s something I struggle with as I hardly ever do photo engraves.
1 Like
Oh and one last tip. After engraving, use a damp cloth to very carefully clean up the parts that weren’t lasered. Don’t touch the engraved parts because they are super fragile. Give it some time to dry and then give it a light coat or two of Rust-oleum clear satin enamel. This helps strengthen the engrave a little bit so that the darkest engrave parts aren’t too fragile. If any of those bits scratch off, it reveals the lighter material underneath and easily ruins your work.
2 Likes