I now have a side of 5-7oz burgundy latigo leather(*) lying on my basement floor. I’ve already done a quick keychain project to see whether the can hack it, and it’s clear that it can. The residual smell wasn’t even that bad.
So my journey toward designing and constructing my own laptop bag is now underway.
My question for y’all is, before I start carving up this magnificent hide, what materials should I build my prototype with? Wool felt? It doesn’t need to be strong enough to survive more than a little experimentation; I just want something cheap, that cuts well, and has some heft to it.
= If anyone is about to lecture me about latigo being chrome-tanned because that’s what it says on Wikipedia, Tandy’s latigo is veg-tanned. I triple-checked.
i have no idea how this lasers (probably fine, it’s a paper product, but not sure if there are additives), but it’s supposed to have a similar look/feel to leather.
Felt is a great sub for leather when prototyping. It doesn’t even have to be the expensive wool felt. If you get a thickness close to your latigo you’ll have the best results.
Good topic. I just went for it with my small purse design since I was using the concepts I learned building the clutch from the catalog. I need to pick up some felt.
On a side note I found out that my Mom sent me some gift Tandy cardsand the USPS delivered them to the wrong address.
Kraft Tex cuts and engraves well. I used it to make Very simple Wallets to give to a friend’s kids with cash for their holiday vacation trip. Engraved the front and put their ID on the inside ( engraved name, city, state and a lego drawing for their photo). They loved their first wallet.
I often use split leather for prototyping. It’s typically affordable, and since it is leather, it behaves just like the real thing. In a perfect world, you’ll want the weight of your split to be fairly close to the same weight as the leather you’ll use for your final draft. Springfield leather has some at a decent price ($20/30 - 35 sq ft) right now.
I definitely would go with split leather (preferably!!) not felt or a vinyl or fabric-type material. Why? You want to test on something that is going to 1) act like leather in the Glowforge - that usually means an animal based protein (leather or wool felt) or perhaps something like Kraft Tex AND 2) Sew like leather during construction - that means leather or vinyl.
Vinyl won’t act like leather in the glowforge and felt and Kraft Tex do not act like leather during sewing (leather requires a different type and size of needle and possibly thread than felt and Fraft Tex and you cannot rip out seams and resew leather without leaving holes, which you can do with felt).
Thus, your best bet is an inexpensive form of leather - split leather fits that bill.
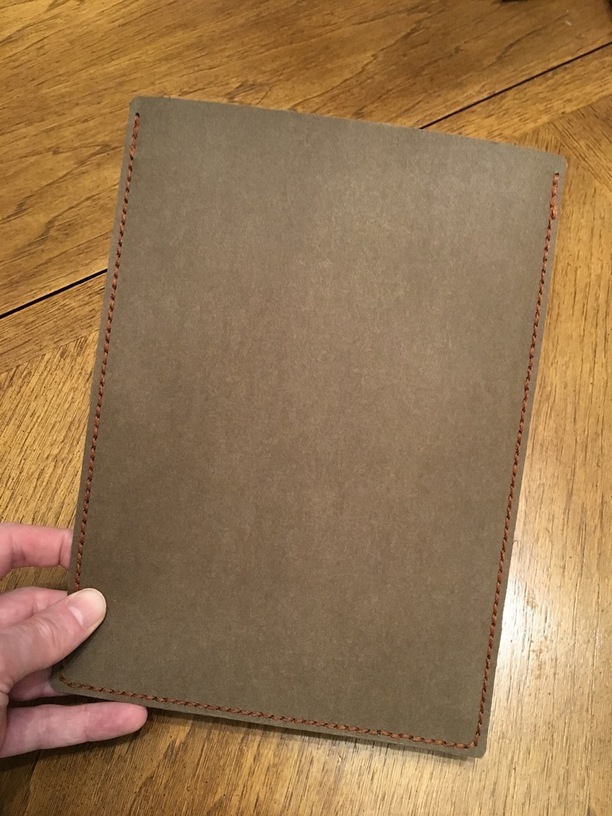
I thought an iPad case would give me the implementation experience I want for the final bag, and give me something I can use if I didn’t blow it. I designed a case with about a quarter-inch of room in Illustrator, and then printed a prototype in Kraft-Tex:
This was super-easy, and seems sturdy enough that I could have stopped there. (I didn’t soak it, which apparently is what gives it the distressed leather feel, so it basically feels like a really strong cardstock sleeve.)
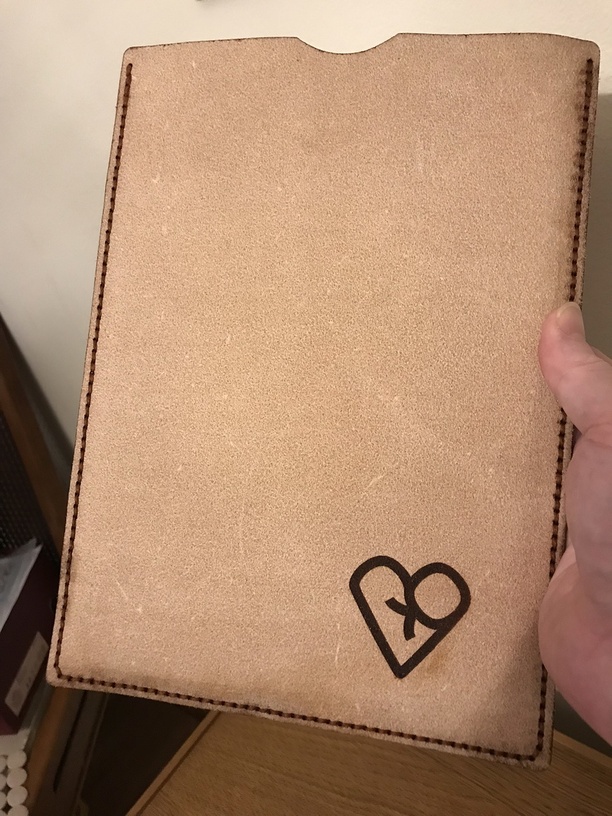
But then my split leather arrived! I soaked the leather before cutting, blew up the design 5% in Illustrator to compensate, covered the cut lines with blue tape, added a tab for easy access and a personal logo. Then I tried it on the Proofgrade thick natural leather setting and… it didn’t cut through. So I closed it up and did another pass, sans the engrave. That more than did the trick…
…though as you can see around the edges, the charring on the edges and in the holes was noticeable. You can actually tell I stitched it from left to right because the thread is orange on the left side and brown on the right.
Things I learned:
Wetting down the leather does cut down on the smoke/odor, and also helps the leather sit flat, but I’m thinking it also means you’ll need to go slower and/or with more pews than you would with dry leather.
I could have cut a swatch beforehand to make sure it’ll go through in one pass. That might have spared me some charring. I’ll do that with the final piece.
Saddle stitching is super-easy, but equally tedious. I did these with two 5-ish-foot-long strands of waxed thread, and it took me just shy of an hour for each.
The final piece will probably be about 3% larger than the baseline to account for shrinkage.
Using a skive (it’s a razor blade with a handle made for pulling toward you) is great for slimming the edges down and/or evening out the thickness of the leather.
I may just lightly score the holes in the final piece, and punch them through manually, to avoid spreading the char around. Open to ideas on fixing that before or after stitching.
 can hack it, and it’s clear that it can. The residual smell wasn’t even that bad.
 Felt is a great sub for leather when prototyping. It doesn’t even have to be the expensive wool felt. If you get a thickness close to your latigo you’ll have the best results.