I posted in a different thread, but it’s visible in my pic here as well - see the rectangle at the bottom?
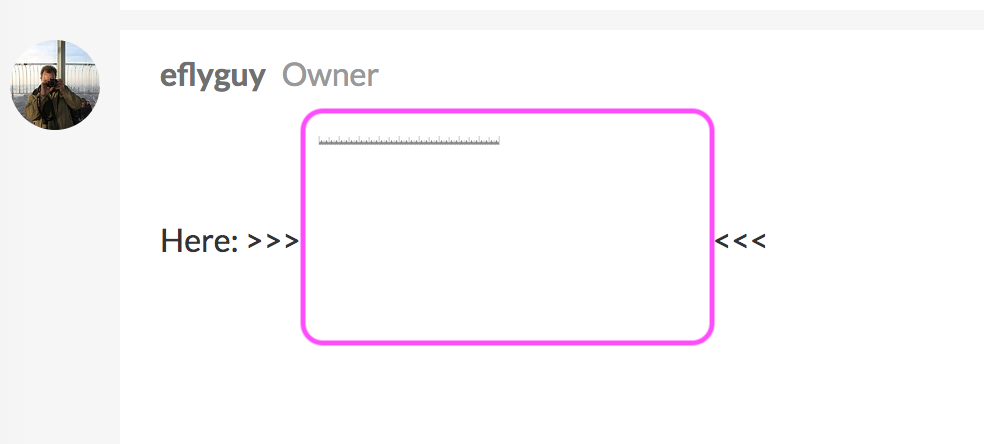
Those rulers around the perimeter were scored using the GF UI marks for spacing. That rectangle was a prior test where I had positioned the right edge perfectly on the 10" (center) mark in the UI, and it cut exactly there, even though the resulting camera image was off.
The rulers now allow me to easily place material exactly where the GF will be working, regardless of what the camera image shows.
I wanted to add - if you look at the top right corner, my GF camera image is over 1/2" off L-R in that corner, and also seriously “warped” on the lower edges.
I was reading about how some are reporting alignment challenges happening towards the outside edges but getting better accuracy when placing designs directly under the camera. Guessing this means they might be showing the bed on the interface from a single image taken. I was also reading about how the new Dremel takes images by moving the camera to 9 sections of the bed and then stitching the images together on the interface. I was thinking about how we are given control to use manual settings on non proofgrade and thinking there might also be a way to manually toggle accuracy in alignment with sliding up the number of scan images. This would provide the trade off that users decide. Increase the scan time with multiple images specified and resulting alignment increases Or opt for default alignment from single bed image because the design alignment is a non issue in some cases. The control might be a nice user option but perhaps the glowforge team is well underway on a different path for addressing it.
yeah, I mean I would hope they are working on it, but for now, I wish there was a sighting option. I have been trying to “calibrate” mine based on the setup @eflyguy showed, but I’m not getting anywhere fast. @eflyguy did you just make the file by adding lines at tick marks? How did you align it with the base? Thanks for any ideas.
If you align things in the GF UI to what the camera is showing you, it will likely be off. That’s what my first picture shows. The purple designs ended up being all over the material after scoring.
If you align them instead to the rulers in the UI, it will be exactly where you expect it to be, every time. This, of course, assumes you know where on the actual bed the ruler marks should be!
So if you make “rulers” that mirror the ones in the UI (by putting design lines at every tick in the UI ruler), then using those for alignment will always be accurate. I used the outside of a piece of 12x20" material to score the marks into those “rulers”, it’s a near-perfect fit onto the tray when pulled down against the lower edge, so repeatable if I remove it.
I didn’t actually create a bunch of lines in the GF UI- I did it in Inkscape, then moved and scaled in the UI to match the ruler marks.
Does this work for you across materials with different thickness? I am not sure why but I cannot brain today. Thanks for your helpful response. I’m going to see what I can make in illustrator today and then when the cold air returns I can try lasering some
I’ve used various materials but nothing thicker than 1/4" - I haven’t actually tested the alignment with different thicknesses because it’s never been an issue, but next time I fire it up I’ll try to see if the height makes a difference. I am pretty sure it would on the camera image, but that’s the point of my rulers, I don’t use that for alignment, but instead my rulers.
Thanks! my machine is currently out of commission (and I am in a pretty mad mood about it), but if support is able to get me back online I’m going to re-make your file. I had just finished aligning everything in the UI when it disappeared…
Yes - if you align and scale that pattern with to the rulers in the UI, then after scoring, anything you line up with with the UI rulers will be exactly where you expect it to be - relative to the ones on the bed.
The camera is way off, but the machine always knows where the beam is, and that is very accurate and always repeatable (unless they change something in the software).
Oh, I see it now. I guess you would import the jpeg into Inkscape and convert to svg file? I’m new at all of this so probably sound like I don’t know what I’m talking about … and I don’t.

 <<<
<<<