Received Glowforge basic today in UK. All looks intact, though hole in bottom of box and two handles missing. Setup went well, got to tutorial ruler print and the camera, including refresh shows below, extremely blurry image. Please advise. [blurry-camera] edit: yup, crumb tray in place, in its “little dimples”. Appreciate the suggestion, always good to check the obvious Three of us here to check process. [glowf-bed] edit: Honestly I hadnt cleaned the lens, simply cos I didnt …
Still ran into the calibration failed after this last attempt.
There is another camera on the bottom of the head, next to the lens opening. Have you tried cleaning the two transparent “windows” there? This has solved the “clean the lid camera” problem for several people. (@kevinmcvey, maybe that error message needs to be tweaked a bit?)
So any updates on my problem? If I satrt another thread, they close it saying to post in this HUGE, unruley beast of a thread. My calibration is terrible…
I’m a little confused about ‘set focus’. Calibrating improved my overall accuracy a lot, but it’s still less accurate in some spots than others – center is perfect, corners are a little off. Even when I use set focus and click it in the center of the material.
Unless I use set focus directly in the center of each little target, in which case it’s oh-my-gosh unbelievably accurate. Like, look at this one from the bottom right (where my machine tends to be the least accurate).
And this is the least accurate one still! The rest are so scarily accurate that it doesn’t even look like I cut anything afterwards. Like this one from the center. Holy precision, Batman!
But… I don’t understand set focus. How I did these was to set focus for one, individually, and then print them each one at a time. Is that how it works? Or can I put five things in the layout and set focus on each of them and them print them all at once. Does that make any sense? Does clicking set focus in a second spot give the glowforge more information… or does it just override and replace the last measurement it took?
This is not a big deal either way – just curious if you can take multiple measurements or not.
If you only take one measurement at a time, is it better to take it from the center or from the least accurate part of the bed?
The calibration does fix much of the being off, but only in sections. It’s like its making multiple maps(of each GF mark) during calibration and picks which dewarp map to use based on where you want it to focus. But, complete guess.
But the overall accuracy is the same, just we had to do much guessing to figure out how the warped camera would place the images before, now it’ll correct the warp in a spot, place your image, then move to a new spot. It’ll change the focus viewpoint but the accuracy doesn’t change.
That’s the correct way to get the improved calibration where you want it. What the new process did was create a depth map of your machine’s bed relative to the head. That’s why using flat stock was so important. If there was any warp, the map of your machine will have that warp reflected in it so if you had a high corner, the machine calc will think that part of the bed was high.
@rpegg did a really nice write-up of how to use the Set Focus for best results.
Set focus measures the approximate spot you tell it to go to.
Not every machine is perfectly flat, not every crumb tray is perfectly flat, not every material (especially) is perfectly flat and created at exact tolerances.
The set focus helps to rule out variables from all of those and measures at the spot you want to print it.
Have you tried re-running it? Just mask over the same board, you don’t have to use a new one. Make sure it’s flat, and all the way to the front of the honeycomb. Clean the lid camera and the camera on the bottom of the head (not the lens – well, you can clean that too, but also clean the little windows on each side of it – one of those is the head camera) and try it again. I’m guessing there was something off the first time – some warp in the material, or it wasn’t all the way to the front, or too much external light for it to focus accurately, or the lid wasn’t seated right, or there was a fragment in one of the dimples causing the honeycomb tray to be canted, etc. etc. etc.
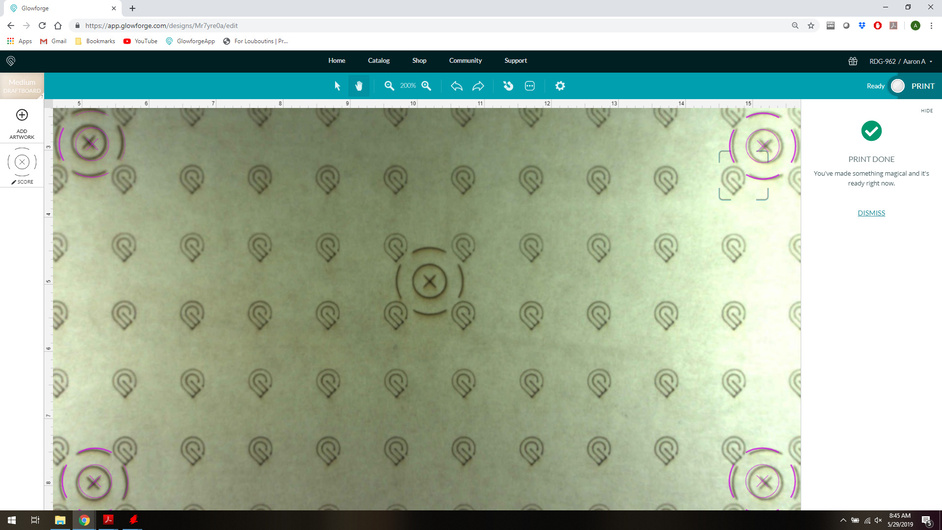
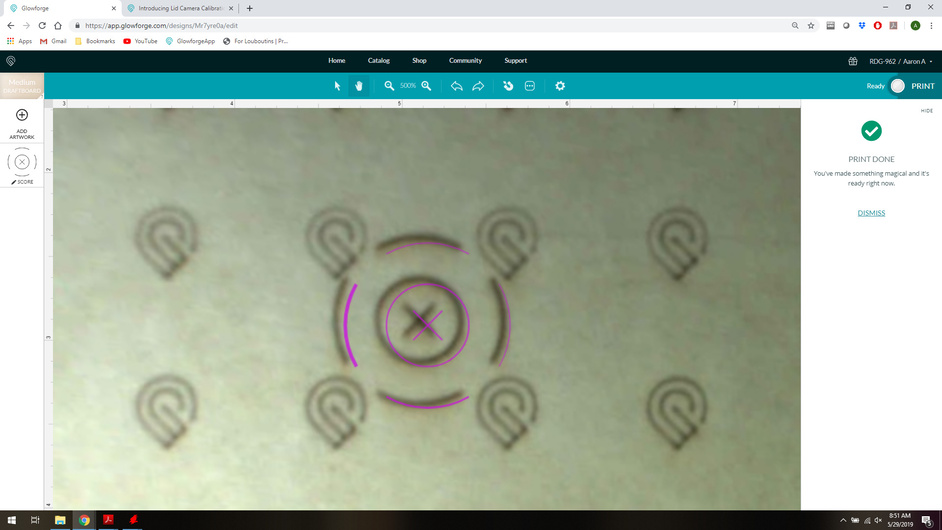
After another run, and while it is much better than before, it is far from perfect. I am between 125 and 250mil offset now. If I only cut a small object, it is closer since I can focus there, but if I want to do something bigger, the warp is real. Here each of the first 5 targets I did in the corners and middle, they were close since I did them one at a time, and focused on each. Not perfect, but pretty close. Then I did 4 copies of the targets, and you can see that the errors go towards the center. Not sure I can trust material with it only accurate in the dead center, so I am going to still be cutting up cardboard for locating every single print…
Here is the bed with the four targets at once:
Set Focus only works on one spot at a time, so the way you did it first is correct – focus, score one target, focus, score next target, etc. Doing all four at once will still cause some offset, since there’s sure to be a little variance across the surface of the board.
Thanks for letting us know about this. Could you please contact us at support@glowforge.com with more details about the bump in your crumb tray, including photos if possible? We’ll be happy to help. Thank you in advance.
Hi @alindblade. I’m sorry to hear that you’ve had so much trouble with your calibration. I’m looking into this now and I’ll follow up soon with more information. Thanks for your patience.
Pre-calibration, I needed to move my designs 3-5 arrow clicks left or right, and 5-7 clicks up or down, to get them to land on target (depending on bed placement).
Post-calibration, I need to move my designs 0,0 clicks (maybe one click in the bottom left corner), or about as perfect as I could ask for. This machine has reached a whole new level of utility and usability.
Thanks Dan and the Glowforge team. Ran the calibration and test on all four corners and center and its pretty dead on. For a lid camera accuracy I am very happy with the results! Great work!
When you refresh the bed, does it refresh based on the last focus point? Example: When I was testing the corners, I moved the image, refreshed the bed, the imagined jumped, relined up the image, focused, imaged jumped again, relined the imaged, focused, this time good, cut and was spot on.
The Set Focus S/W has evolved a little in the past few weeks, so I can’t be sure without checking. I believe if you refresh, or lift the lid that the Set Focus value will be lost and the Preview image will revert. So using Set Focus before adjusting the design to get the Preview accurate is best. You might also want to make sure the red laser spot falls on the correct position when using Set Focus just to make sure it didn’t miss the material. I tend to use the Set Focus multiple times to tweak the design placement.
We’re upgrading! Now that CC has graduated to full release in Latest Improvements, I’m going to close this thread. You can continue discussing and giving feedback on CC here:
Also new: if your alignment is more than 1/4" off, you can get support using Camera Calibraiton to fix it from CS through the usual avenues (support@glowforge.com or a new post in Problems and Support).
Meanwhile, I’m going to edit and lock this topic so folks don’t accidentally post here for support.
Thanks for all you help testing to make this awesome!


![[blurry-camera]](/uploads/db6859/original/3X/3/d/3d5cc56c15c0037e80d78388ec00cd886bb6a3e6.jpg)
![[glowf-bed]](/uploads/db6859/original/3X/c/5/c5a61cdeef7e1091582e206f36fdc62fc4bc500d.jpeg)