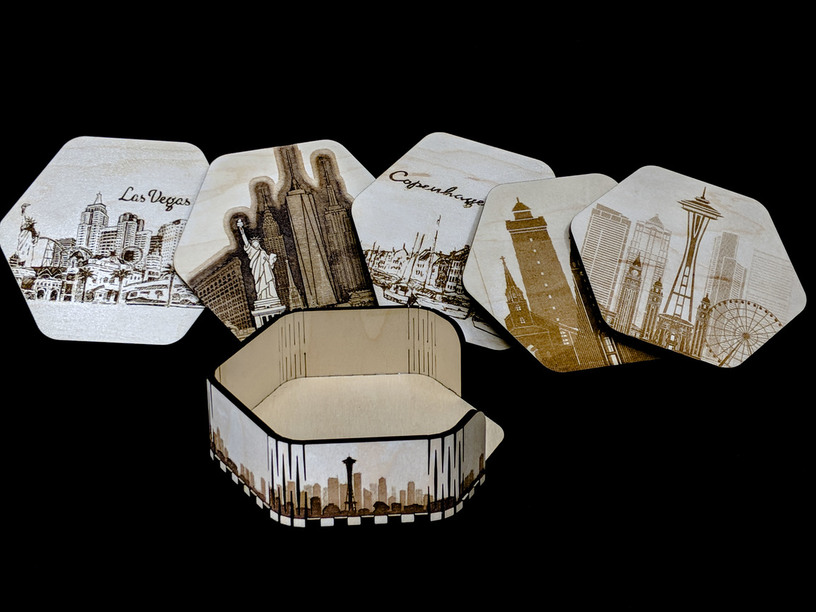
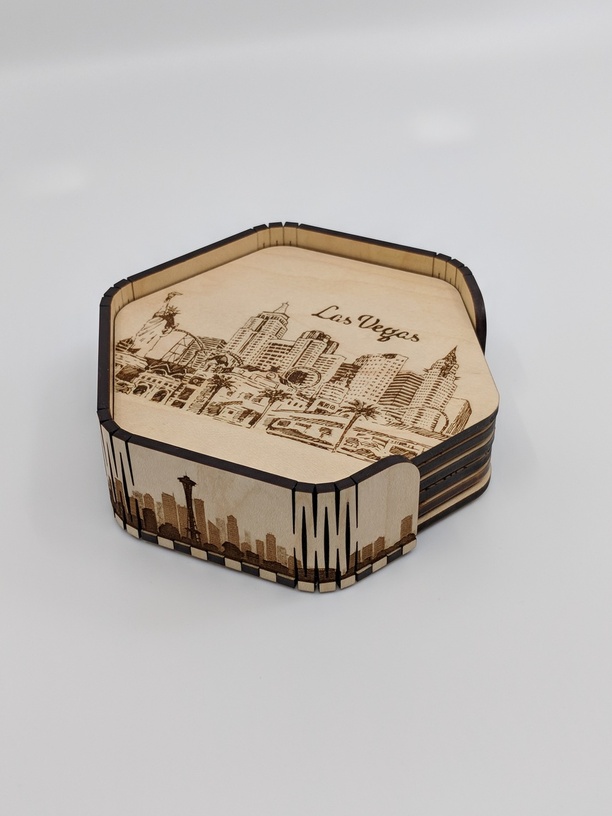
I designed a coaster holder that was a stack of the concentric hexagons, but there were two problems. I wanted to engrave something on the outside of the holder and since I was putting felt on the bottom of the coasters they’d sit at different thicknesses :-). Plus, I wanted some reason to play with laser kerf bending (or something similar to it since it’s made of cuts all the way through instead).
The SVGs for 3.5mm material (I used this on medium PG maple ply) is attached here. ATTENTION If you make this you have to cut the wraparound so that the grain runs across it aligned with the kerf cuts for the bends. This is challenging because it is longer that the 11" we have to cut in that direction so I rotated it on the bed, but that means you need to also rotate your material. :
The images I used, I got from vectorstock and as you can see about half way through making them, I switched artists inexplicably, so the result is fairly eclectic:
I have a parametric design in Fusion 360, but something about it really chokes up 360. Maybe it’s the nested rectangular patterns or maybe it’s having that with the projections, but in any case, any change at the moment causes 360 to hang for three or four seconds on my fairly beefy (32Gb RAM), but a few years old PC, so to share the parametric design I need to work on it some more.
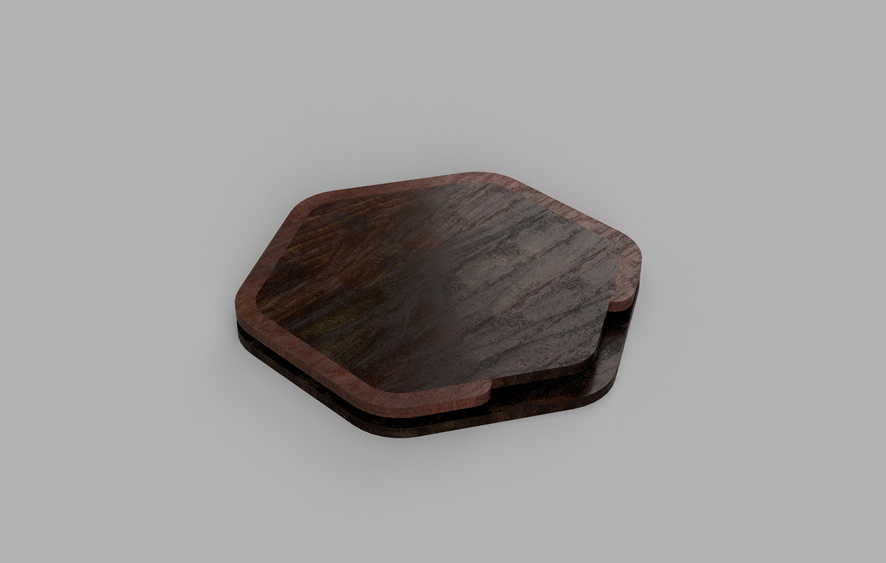
The stacking holder that I didn’t make would look something like this:
Oh yeah. When you’re gluing up the wrap around holder, you’ll need something to keep the springiness of the hinges from pulling the walls slanted. I 3D printed a slightly larger coaster to wedge in there, but you could cut one from scrap draftboard maybe.
Great post - and thanks for sharing the cut files. You will save a lot of folks a lot of time with that; especially the novice user who can use your work to see how things are done and spring forward from there.
I have made a few coasters myself, but have yet to seal or otherwise make them waterproof/resistant. How do you treat yours once they’re done?
I don’t get tired of coasters here. they are like handing an art student a card and two colors and telling them to see what they can do. You’d think they’d all start to look alike but they don’t. These are inspiring.
I put three coats of Shellac on most of them, but since the MDF seems to drink the stuff on the deep engrave of New York, I put maybe six coats. Sometimes I did a little sanding with 180 grit.
Second - is there a trick to get the PG Maple ply to not crack at the joints? I’ve cut several of these and they all suffer from some breakage when I’m bending around the base. I’m obviously doing something wrong, but then again I just got my Pro TODAY. So now I want to cut everything!!!
I think the kicker is that the joint has to move farther to get into place than it will be stretched sitting there. So I kind of thought about it as bending it to ending state and sliding the bottom on from underneath (rather than wrapping it around). Though I did one corner at a time, I tried to slide it on the base from above rather than from the outside, if that makes any sense.
It does make sense, although after 4 tries I keep breaking it no matter what I do. I might try to steam the wood and soften it before I try again. But that info does help so thanks!
Oh shoot. I think I know what the problem is. You have to have the grain run along the cuts for it to hold together, you can’t have the cuts cross the grain. Since we’re still limited to 11", I had to rotate the design. In my case that meant I stuck the ProofGrade in the slot in portrait mode. I do this generally for my first cut anyway so that I can put it closer to the edge. For folks with basics, you’ll need to cut a piece off of a ProofGrade sheet so you can rotate it and have it run the other way.
I’m sorry I didn’t say so at the beginning. It was so automatic for me that I’d forgotten I’d taken that step.