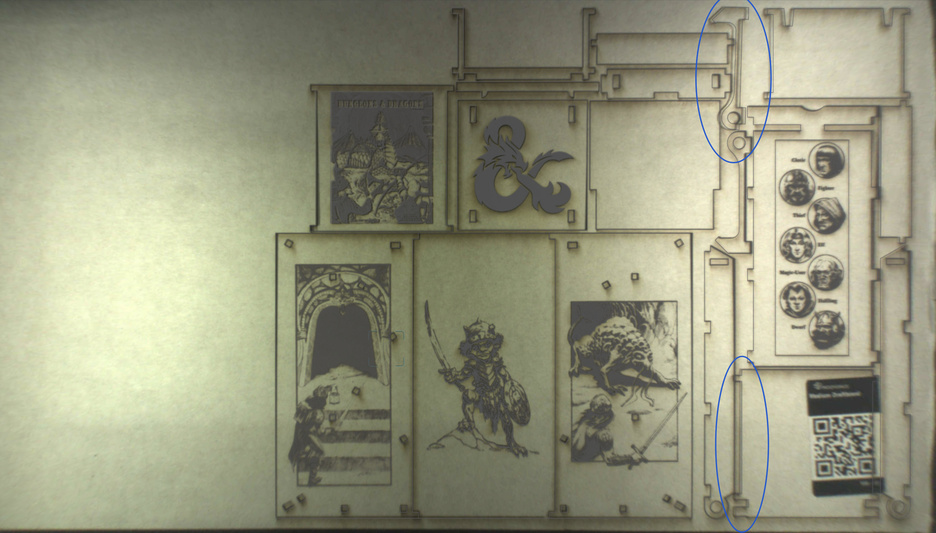
I just received my machine back from GF for repair last week and it is not cutting correctly. Each print I am doing is taking a little over an hour and I am doing prints that I have done a hundred time. The machine is messing up every time and wasting Proofgrade material. It works fine on the left of the machine but keeps messing up from the middle to the right of the work area. I recalibrated the machine last night, wasted another piece of Proofgrade material doing so because that didn’t do anything to fix the issue. Shouldn’t it be calibrated as part of the testing during the repair I paid for? I tested the machine when I got it back by doing the “Good Measure” print and it seemed ok. The last image shows a couple of tests I did to see how off the camera is. The upper right was off and you can see where the lower left is showing off. Any thoughts on what to do would be greatly appreciated.

I am not seeing an issue there. If you use the set distance before you place the designs, they should be pretty accurate.
If you need a second pass and you have everything the same, both material and design. then the alignment will be perfect, even if they do not look perfect.
If you are using MDF, it has become obvious over time that it swells with water from humidity and thus does not cut with the same power as when it was new and therefore needs a boost in power by slowing the speed 10 or more or more power, or another pass.
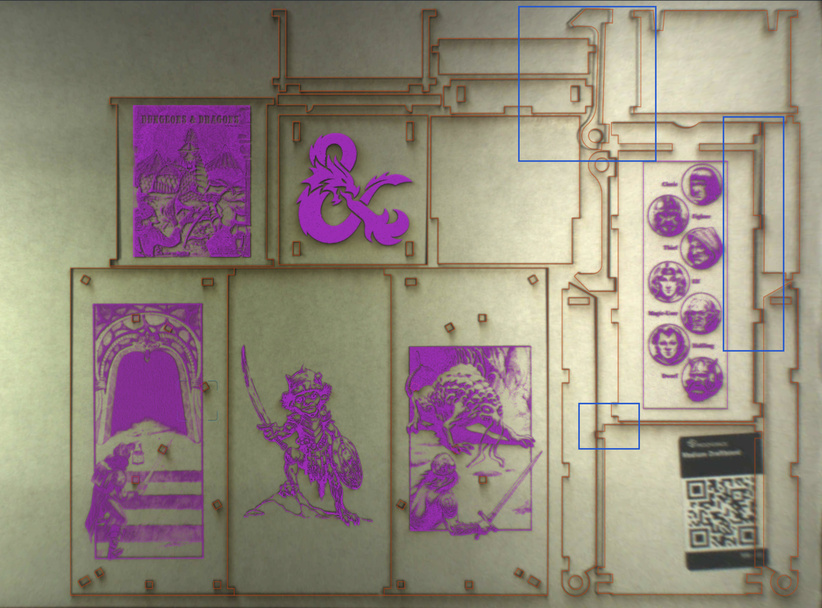
I don’t need to do the set distance when using proofgrade material, that is the reason for using GF’s material. But that has nothing to do with why images would shift while cutting compared to what the program is showing where it is going to cut. If you look at the images the lines are overlapping when the cut is being made which is not how the design is. Look at the objects being cut out in the upper right hand portion of the images above. I attached images again but this time I marked the areas that are definitely noticeable. Unfinished lines, circle not centered lines objects overlapping
.
I do and it still helps. not as big a distance but some. If the cut shifts in the middle of cutting, then that is a different problem, usually related to how tight the belt is.
Basically what I’m trying to explain is this is all one job. The orange lines show where the whole project will cut at one time but the machine is not following all of the lines when cutting. Imagine you send a job to the machine to cut two squares right next to each other and the preview shows that it will do exactly that. But, when it cuts it cuts one of the squares partially on top of the other one. This is what is happening on the right side of my work area.
Which belt? Since this just came back from repair I feel like they could not have ran much of a test on it.
The belt that shifts, will be the one that is not tight enough for what you are doing. This can happen if the fan piece hits something (in which no belt is tight enough) or when the print head suddenly changes direction. This is variable and can add up throwing the head a tiny bit differently from where the computer thinks it is.
Mine got this bad a while back. It was 3 passes on the same design…

I have two machines and I can tell you right now your asking to much of the Glow Forge .
When you cutting lines that close to each other your going to need to make room for some camera shift when going from 1 part to another. I dont think there is anything wrong with the machine that software updates wont solve at some point.
My machine didn’t have this problem before it went in for repair.
Just so I am clear were talking about lining things up under the camera correctly and the camera has a shift so nothing ends up where you thought it would be correct ?
It looks like it possibly hit something. Turn off the machine and slowly move the head left to right…see if you feel any resistance about where it jumped out of position. Drop the front door, get down at eye level, and watch to see the ribbon as it moves while you shift it. Check the tracks under the laser arm and make sure there is no debris on buildup on it. Clean them thoroughly while you’re at it. Make sure the white ribbon cable isn’t twisted or kinked.
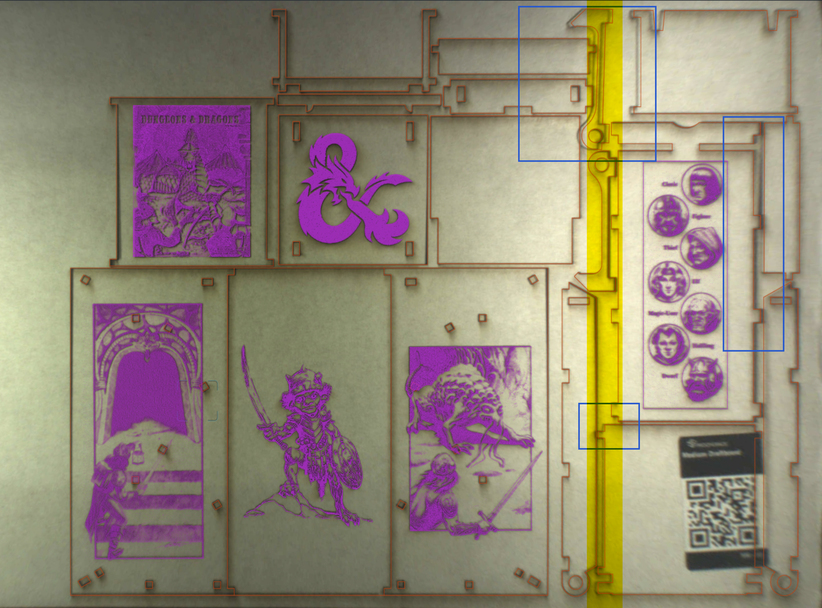
Everything along one vertical line shifted…that looks like it hit or might have gotten snagged on something.
Definitely check to make sure the ribbon isn’t twisted or kinked or hanging up on a loose screw at the back of the gantry. And you might need to check the condition of the wheels on the carriage plate, but I’d check the other things first.
It’s not twisted or getting hung up on anything that I can tell. Removed the carriage and the wheels are fine. Cleaned them anyway along with the rail…only printed a handful of jobs so not real dirty. Did notice two kinks in the ribbon which I noticed when we unpacked the machine when it came back to us. These didn’t seem to be causing the machine to get stuck though. I’ll try and watch it cut tomorrow to see if I can see where it messes up.
A couple of notes - it won’t fix your problem, but just observations.
-
set focus: even being Proofgrade, set focus is a great tool to use. Before every print, the machine does an auto focus scan anyways. Set Focus moves that operation up in the order of things. The camera display/overlay is based off of the entered material height. Set Focus will update this value based on the distance from the head to the material, which is more accurate than actual thickness due to manufacturing tolerances in many components, swelling of material from absorbing humidity, and so on. If you’ve ever noticed that the design placement shifts a little bit when it does the autofocus scan, that’s because it picked up a different than expected value when it scanned the height. Set focus eliminates this.
-
the original post was a little hard to figure out what was going on because we don’t know for sure what the design is supposed to look like, so identifying the problems is a bit harder. Subsequent photos showing the problem helped a bunch.
The Glowforge doesn’t receive any feedback as to where the head physically is. It centers it at power on, and then everything after that is just calculated from the motion plans sent to the machine. For example, if you grab the head and move it 1” to the right, it will never know and everything will subsequently be off that amount until it’s rebooted.
This can have a trickle down effect that will allow the head to move too far to the right, and hit the movement boundaries. Using the 1” number earlier: if you had an object placed at the 19.5” mark, but the head was an inch off, it would really be going to 20.5”, hit the boundary, and be off a little less based on whatever it lost.
@jules is on the right track, I think, with the head having lost steps for some reason. It’s just a matter of figuring out why. It could be belt tension, etc. It looks like it occurred mid cut which rules out the head being moved manually. And it looks like the first part of the job cut pretty accurately compared to the overlay, which would also indicate a mid job issue.
I would probably just use the board you ran the calibration on, and run a few Gift of Good Measures, using just the score operation and engrave operation (to make it a little faster). Place one around the middle, and then another at the far bottom right of the board, and watch it run.
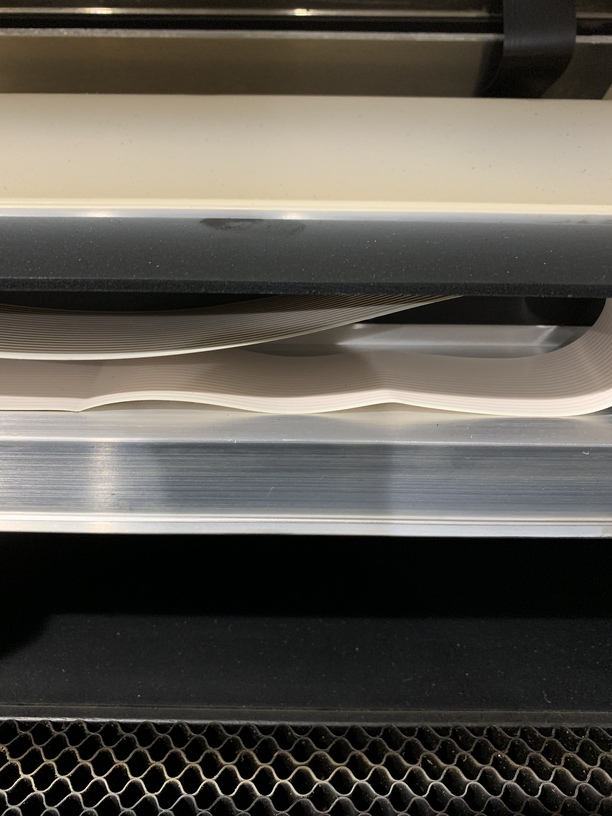
So think I have this figured out and I am glad GF has not locked this thread so that others might learn. When my machine went in for the costly repairs it appears that the techs moved the wheel on the right for the belt that the head carriage moves back and forth on. They moved it in towards the center of the machine this causing the head to not have its full range of motion. I have a video showing when it goes out of whack but there really is no need for it since I have these pics of where the wheel used to be clearly visible by the outline of residue. I am curious if someone could tell me what is the model of their belt because I am curious if they put too small of a belt on and that’s why they moved the wheel. I also now need to figure out how to move that wheel. I will say I am not happy that GF clearly did not test this machine very well after what I paid to have this thing fixed. Search here I come to find out how to adjust the wheel. image|666x500
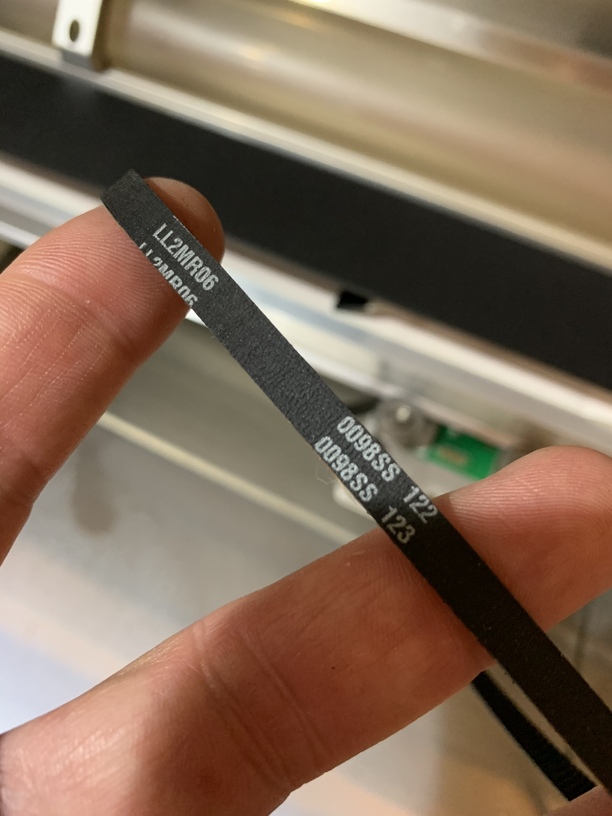
The wheel on the right is just a tension wheel for the x-axis belt. I say just, but it’s pretty important. Loose enough and it will skip steps.
It could be doing this on the initial high speed run to check focus and you’d probably not realize it.
It just needs a 3mm hex wrench. Loosen slightly (do not back it way out), and then push the wheel over to where the belt is taut and tighten it back up.
Oh no! I’m so sorry to hear you’re experiencing trouble after your repair. Thank you for posting the picture of the belt and for including the troubleshooting steps you’ve already performed. I’ve reviewed the photo you’ve attached and can confirm that it’s the right belt. Sometimes the belt loosens and needs to be tightened. Here’s the instructions on how to adjust the belt. If you’re still experiencing issues after making adjustments, please let us know!
The problem wasn’t that the belt was too lose. The problem was that no matter how tight I made the belt I couldn’t get the pulley over far enough for the carriage to not hit it. I ended up adjusting the belt in the holder on the carriage so I had a little bit more slack and this was able to correct the carriage hitting the pulley.
Kind of tangential, but it will help you with future jobs to know this: Set Focus centers the fisheye lens correction at the spot you select, in order to give you the best possible visual alignment at that location. This allows you to place pieces of your design exactly where you want them. You can use it in several locations, to place several pieces precisely, before hitting Print.
Hi @loccusst! Thank you for letting us know that you were able to adjust the belt to get back up and printing.
However, based on your report, I want to make sure that there isn’t an issue with the pulley that holds the tension of the belt. If the pulley is damaged, this could cause additional trouble with your print results.
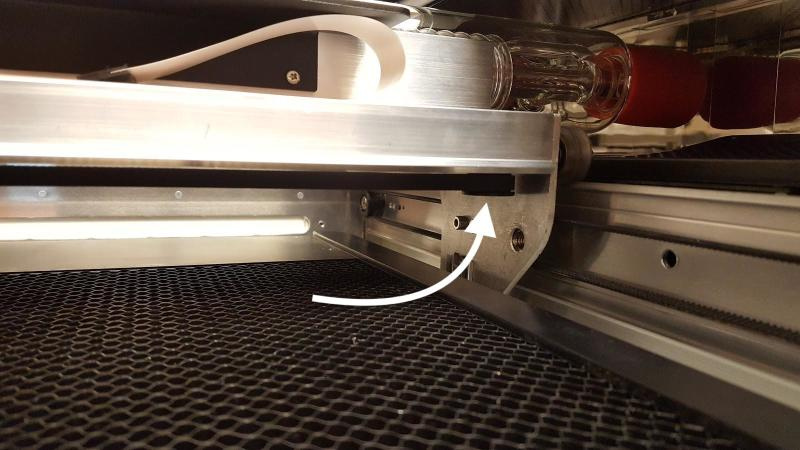
What you are describing sounds like the black plastic piece may have slipped down off of the metal bearing.
Could you please check under the laser arm and see if the metal bearing is visible between the black plastic and the laser arm?
Please let me know what you find. If you’d like me to take a look, post a photo like my example above and I can advise if it needs to be replaced.
I just a got a chance to take a look and the pulley is fine. It has not slipped down and spins freely.