Machine not scanning, gets stuck in the center, issues with bed image refreshing

Hello!
I recently purchased a glow forge Pro. I’m not super tech savvy so any help is appreciated! I attempted emailing support but since it’s a holiday hopefully I can find someone here that can help? Here is a copy of the email I sent.

I’m finally getting the hang of my machine then all of the sudden after a successful day of making things, the alignment went completely off. I was using a proof grade product and it started cutting so off that I have lines where it tried to cut my drip tray. I immediately turned it off and wiped down the cameras

When it was scanning the bed like I was getting ready to make a new print it started making these loud grumbling type sounds? I don’t know another word to explain them. So I opened the lid to make sure that the proof grade material was in the correct spot or nothing had fallen in there and it was moving it while the laser was moving
I’ve cleaned the head/cameras/mirror there are no scratch marks, multiple times
Emptied the drip bed
Unplugged from the wall, reset internet connection
Waited a few hours, next day to see if it would come back on
Tried restarting multiple times
I did notice that the barcode looked blurry when this started to happen
I use the Zeiss cleaners as recommended
I cleaned out the bed under the drip tray (there were a few crumbs)
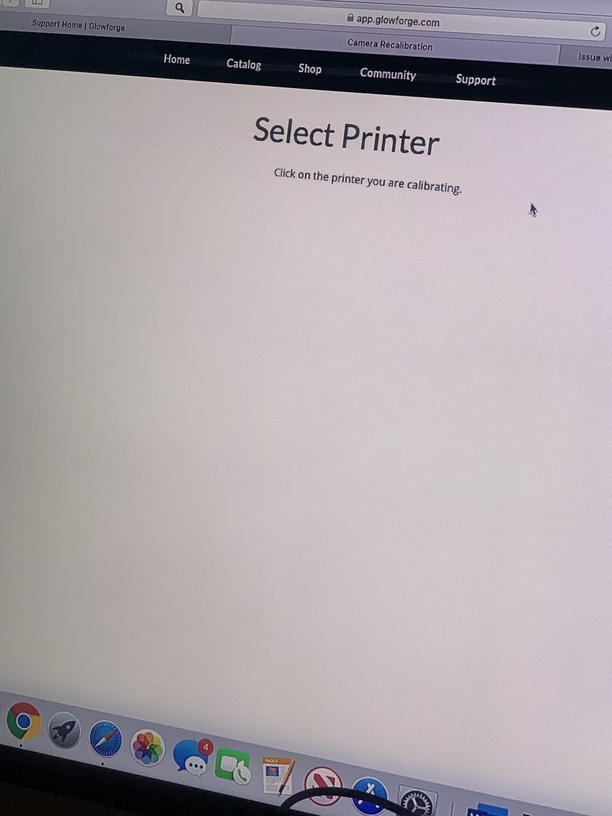
I tried to do the calibration process. After the first page telling you to clean, use draft board without the label showing, when I go to the next screen it says to click on the printer I want to calibrate but nothing is there, just those words and all white.

I don’t know what else to do? Please help!

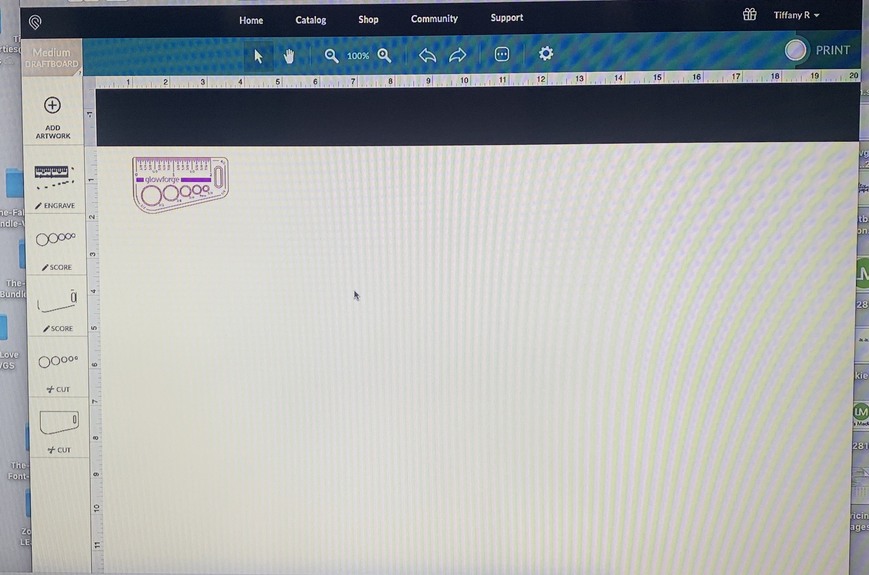
Also, I’m new to all of this type of technology- is there a way I can reset the head to be able to see the whole piece of material while I’m laying out my designs to make? Obviously if its larger and needs the pass thru slot I won’t but I can’t figure out how to see the whole bed vs part of it, maybe it’s related to the issue I’m already having? Also often times my screen is stuck on the white bed image and I have to refresh multiple times to get it to show the correct bed image, sometimes turn the machine off and back on or restart my computer. I use proof grade most of the time.

Any help is much appreciated! I tried reading thru all of the solutions on the community /support page. Maybe I’m missing something? glowforge error pics.docx (1.2 MB)

Okay…I might have seen what happened there…couple of things.

1. First you need to open the lid, pull open the front drop-down door, and shift the tray forward until the little feet seat themselves in the dimples in the bottom. It’s sitting too far back, i can tell from your picture…too much curve is showing on the front tray handle. That should snug up into a recess in the drop-down door.

2. Second thing - make sure that when you place the material on the tray, you do not let any part of the material overlap the plastic edges on either side of the tray.

You have to keep the material only on the metal grid part of the tray. (If you think about it, you don’t want the laser firing into plastic. ) If the material extends over onto the plastic part, the wheels from the laser arm can catch on it and that causes the arm to get stuck and the stepper motors to grind/grumble. (We call it grinding.) That can throw off alignment big time.

So what you need to do to start is make sure the tray is seated down in the dimples, and do not place material anywhere except on the grid portion of the tray.

3. (You can quit cleaning the lenses now - they haven’t been in use enough to experience any buildup yet.) :smile:

One thing I do want to caution you about - be gentle when you are cleaning lenses, and do it as little as possible. I clean them about once a quarter. And if the lid camera is loose or turns when you wipe it, you need to notify support immediately. That is supposed to be glued in place to keep the focus set. If it turns, they’ll want to know.

4. To calibrate the machine, you need to put a sheet of draftboard inside the bed of the unit first. Follow the instructions here, placement of the material on the tray is important:

https://app.glowforge.com/maintenance/camera-recalibrator

Where you are getting the all white screen, if you look in the upper right hand corner under your name, it gives you instructions. It wants you to Select the Material. (Since it can’t see the QR code underneath.)

Click on Unknown in the lefthand column, and use the little search magnifying glass to select Medium Draftboard. Then continue forward. There is a video of the Calibration process here that you might want to watch first before attempting it.

5. By the way, the little Red Dot on top of the gift next to your name on the Dashboard means that there’s a Glowforge freebie file waiting for you. Click on the red dot on the Dashboard gift to download it. :wink:

6. You can’t. There is an overlay deliberately placed by Glowforge that keeps people from placing their designs anywhere except on the cutting area of the bed. You cannot cut all the way to the left or right side of a sheet unless you turn the material 90° and feed it through the Passthrough slot. (It’s very useful for that though.)

5 Likes

Oh my thank you so much!!

I did the first step. I inputted the tray correctly and make sure the draftboard was upside down and fit in the corners

Part of the issue “finding the printer” is my MacBook doesn’t show the whole page so I used my phone and tried with iPad for calibration. Which worked much better. The machine started the calibration process each time and after about 10 mins it would stop and I would get the message in the attached pic.

I didn’t wipe the lens again like it said :slight_smile:

Ty for tip on free files, who knew!

Any other suggestions?

I really appreciated your help with my topic!!

I suggest wiping the lid camera lens as suggested. Next I suggest trying to cut the Gift of Good Measure on proofgrade draftboard with proofgrade settings so we can see whether your machine is cutting/engraving/scoring ok and in the right place. If that works, then move on to camera calibration. If the Gift of Good Measure prints incorrectly, take pictures because support will need them. Good luck and let us know what happens.

Really all you need to do is just follow the instructions that they list there if you want to try again. (You can give a quick wipe to the lid camera, but if it turns, stop and let us know here.)

After you wipe the lens gently, turn off the machine. Then turn it back on and you can try again. Please make sure to have the material pulled all the way towards the front of the tray, so that the honeycomb grid is completely covered.

Thank you for this- this is what I saw when I tried doing it…

It starts off normal then get stuck in the center in the same Spot of the first Picture I posted. I tried attaching a video and it didn’t work

I can’t calibrate from chrome Or safari on MacBook, I can start the process on my iPhone and iPad then it gives me that error I posted earlier. This is all the screen shows in both platforms - iPhone and iPad shows normal.

Okay, quit worrying about the Lid Camera ReCalibration routine for the moment. Try just printing the Gift of Good Measure first. Just like it shows in the instructions here:

Once you have printed the Gift of Good Measure, take a screen shot before moving the material or taking it out so we can see how it actually did with alignment. If your machine is new, it might not need to be recalibrated yet.

I suspect that the reason your print went out of alignment was because the material extended up onto the tray side, and or possibly that the tray wasn’t seated properly in the dimples. We need to see how your alignment looks before you run the Recalibration.

1 Like

Hi, thank you for your continued help!

Gift of good measure was the first thing I made when I got my machine. No issues at that time. I’m not a pro but i’ve Cut many items since then. The picture I posted of the design with white background is what happened (of gift of good measure, if it didn’t post I can resend), the machine is getting stuck in the middle like the pic I posted and it’s not picking up the bed area, it stays white or picks up nothing at all. No matter how many times I hit refresh. When the machine gets turned on and it does it’s process and moves across the bed, then gets stuck in the middle and moves back and forth few times then it goes to “sleep” for an a example and doesn’t do anything after

I did not have the tray locked in properly I did so today after I was given that advice, ty for the help with that

I am not able to get the system to show the bed or to cut/engrave anything- I tried a variety of projects and the machine did the same thing every time. I took a 2

Min video of the issue so someone could see what i’m Talking about. If there is somewhere I could send it then maybe it would make more sense

Okay, it might be locked up from some of the earlier issues you had.

Try this:

  1. Turn off the Glowforge machine.
  2. Turn off the computer.
  3. Unplug the router.
  4. Wait 1 minute.
  5. Plug the router back in and let it fully restart.
  6. Turn on the computer and let it fully restart.
  7. Turn on the Glowforge and let it completely finish the startup calibration routine.
  8. Log into https://app.glowforge.com/ and check the status of the machine in the upper right corner. Just click on the Glowforge name.

I am so sorry to hear about the trouble with calibration. Thanks for letting us know all of the troubleshooting you have already done. I have followed up with your next steps by email, so I am going to close this thread.