I have’t attempted a mid bed print yet as I have only done three so far.
Wondering what you’re getting at with this. I mean, the head moves across the bed, so the laser is always firing straight down regardless of its position. Are you suspecting the gantry or tray are warped?
1 Like
And I did have it held down with magnets though they weren’t really necessary and I also ran my hand over the crumbtray but felt nothing unusual.
Warpage of the  material, but the OP mentioned that magnets were used, so maybe not so much.
1 Like
it was pretty flat to begin with
1 Like
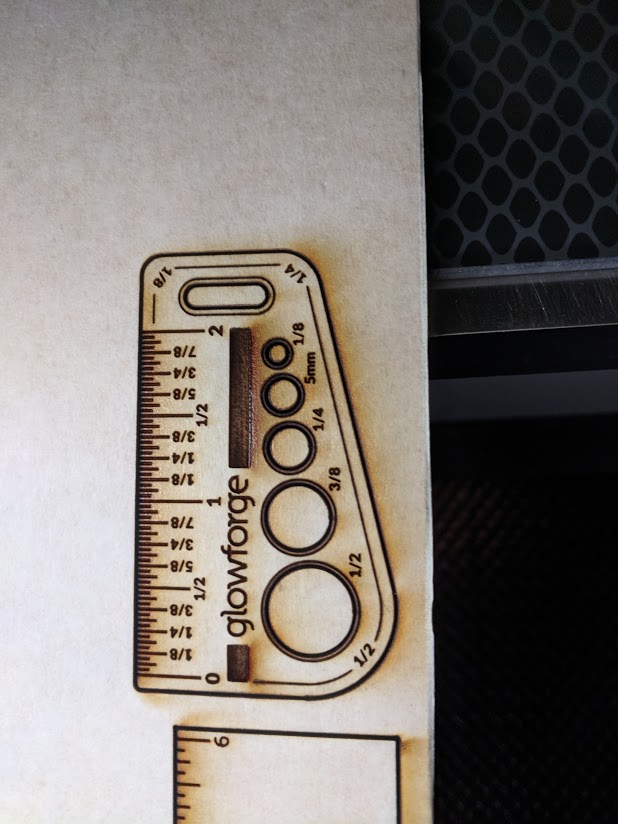
guess who can’t follow directions. I printed the ruler and I was asked to print the gift of good measure. So that’s printing right now.
Thanks for taking the time to run these tests and provide the photos. I’ve let the team know and we’re looking into it now.
Your Glowforge unit’s laser is powerful, yet it can be stopped by a tiny amount of dirt or damage to the lens or windows. If something gets between the laser light and your materials, they won’t cut through. Here’s how to check for damage and clean your lens and windows at the same time.
-
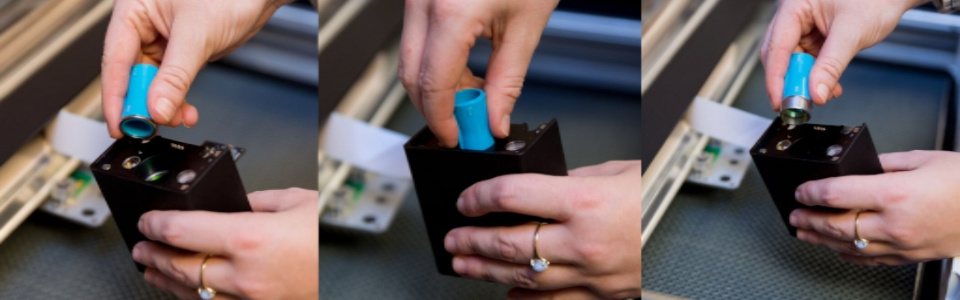
Remove printer head
Turn off your Glowforge. Grasp the printer head as shown, and pull gently up and back to disengage the magnets and remove it.
-
Remove lens and check for scratches or dirt.
Gently insert the lens tool into bottom of the head with the “Remove” arrow pointing in. When you hear the magnet click, withdraw the tool and the lens.

Look at the lens on the tool. It should be resting on top of the tool like a bowl, with the top open and with the orange-colored optics on the bottom. If it’s upside down, it won’t work properly.
Gently slide the lens off the lens tool. Be careful to touch only the metal ring to avoid fingerprints on the lens.
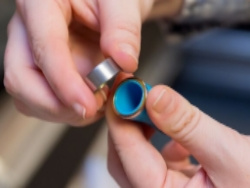
Check the lens for fingerprints, dirt or scratches. If you see a scratch, you can order a new one at shop.glowforge.com.
Wipe both sides with a Zeiss lens wipe.
- Put the Lens Back In
If the lens appears clean, you can put it back.
Flip the lens tool until the “Install” arrow points up.
Set the lens down on the lens tool. The open side goes away from the blue plastic, so it looks like a bowl on top of the tool.
Slide the lens tool up into the printer head until the magnet clicks, then remove the tool.
-
Replace Printer Head
Review instructions for snapping in your printer head, then put the head back on. -
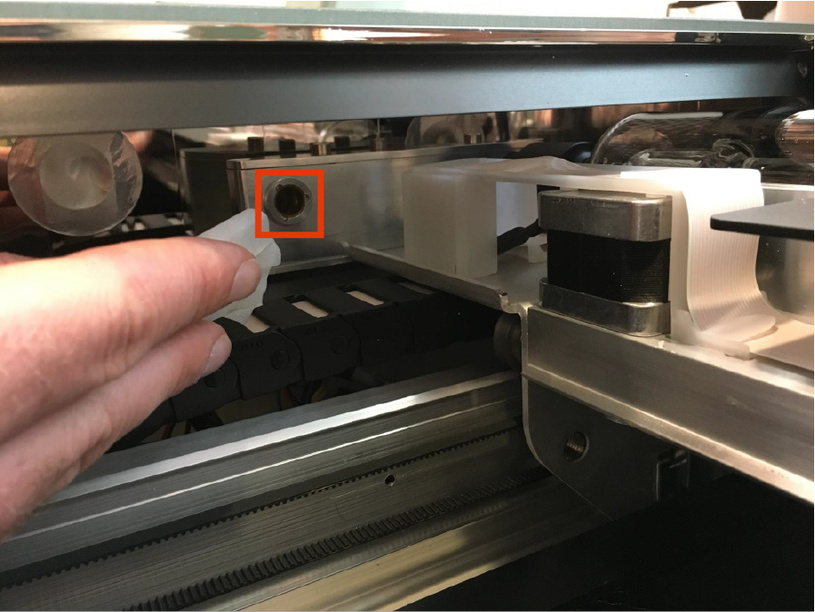
Inspect the Head Window and the Laser Window
Check the windows for damage. You can find one window on the left side of the printer head, and another just over the left rail. Shining a bright flashlight at an angle onto the window may help you to see more clearly.
If you see damage, let us know.
Otherwise, wipe the window clean with a Zeiss wipe.
Once you’ve inspected and cleaned, could you please run a print? Also, could you try printing on another material, such as Hardwood, and let me know if the same problem occurs?
1 Like
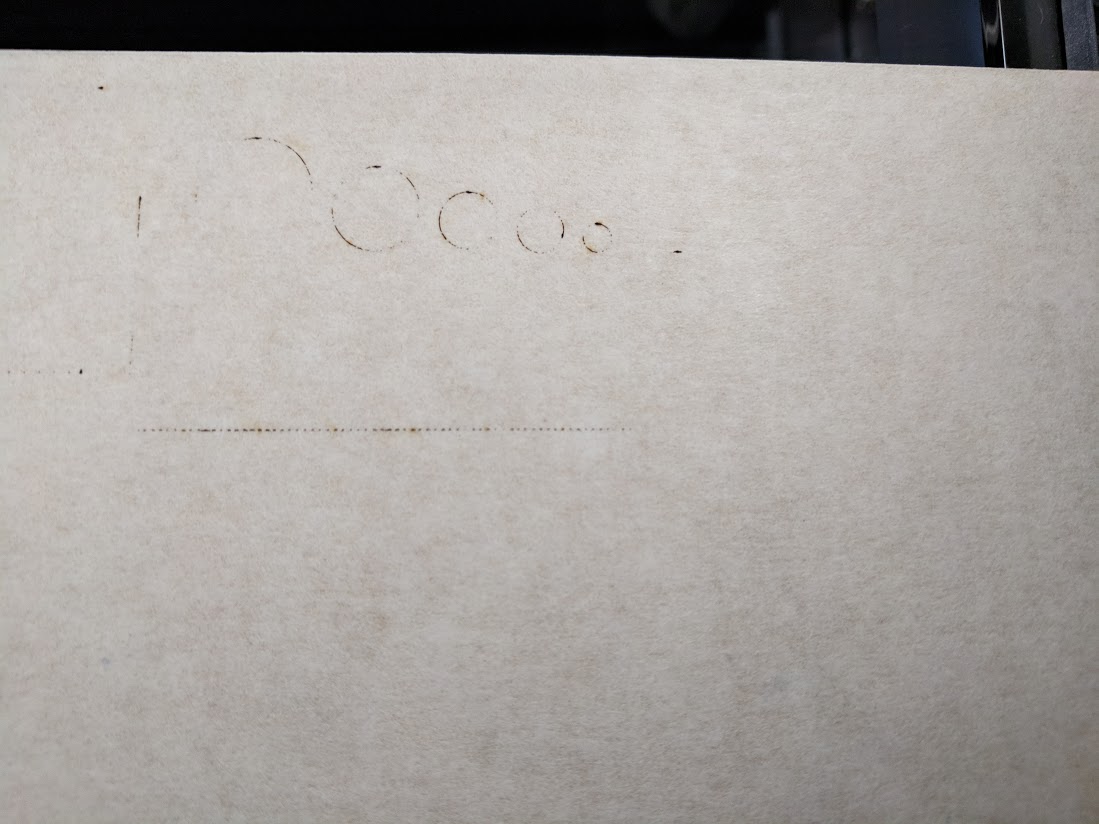
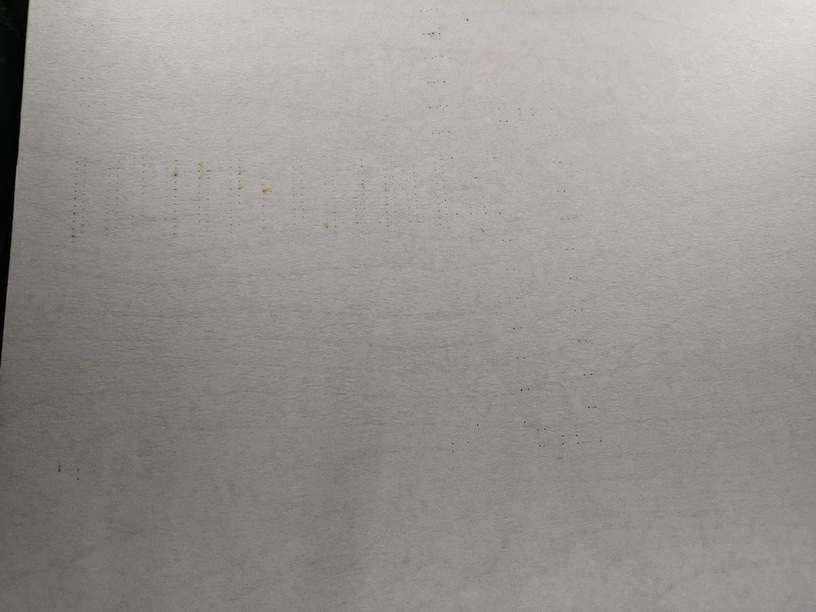
Ok, so I cleaned it even though it didn’t appear dirty. And I wasted a wipe because the cut I did on the maple didn’t cut through.
1 Like
I am currently dealing with the same problem
1 Like
same story over here 
1 Like
Feels to me that this is a settings/software change somewhere in the backend. I’ve noted this with draftboard, acrylic and the leather, where it’s taking multiple passes to get a cut to go all the way through. This is a pretty new issue I’d say as I’ve had many successful cuts in the past.
I’m bummed because I have wasted so much material because it didn’t cut through and lining up the cuts after the fact is very difficult. The cameras are ever so slightly off especially on the edge. So I don’t know how to rescue the material.
This doesn’t solve the issue of it not cutting through, but, get something thin and flat, or even some good sticky tape in a pinch, hold the “base material” gently, and pick the cut material up. You should see real quick if it made it through. I know some people use dental picks, etc. I’ve even used a thin-bladed knife to just pick the piece up for jigs that I don’t want to take in/out.\
As for not cutting through, how cold is it in your place? Curious because it seems like a lot of workspaces are pretty cold right now or are in unheated areas… been a while since I’ve seen it, but just like getting too hot, power drops off (not as drastically) below a certain temp. Are you at the minimum recommended 60 degrees? The machine will run colder than that but I’m guessing performance could change.
1 Like
I’m using it in my heated basement and yes it’s > 60°F
I haven’t attempted cutting anything for 3 days when my problem came up and I ran tests/emailed support. Have you heard or seen any change? @jskinger @joker?
No change yet. I’m using manual settings for now until they tell me what’s wrong. I have been unsuccessful in salvaging my previous work so I don’t want to waste any more material.
For cuts I have just switched it to manual and generally just bump the speed down by 40-50). You could also have it do a 2 pass cut instead of the default 1. It’s generally working great otherwise and I’ve been doing a bunch of production for projects but those PG cut settings are wonky. No reason to stop working on stuff, just make that minor adjustment.
1 Like
Thank you so much for your patience. It looks like your unit is experiencing an issue that we can’t resolve remotely. I want you to have a reliable unit, so I’m recommending we replace this one. I’ll be in touch via email to sort out the details. I’m so sorry for the bad news.