Hello there! I am fairly new to the Glowforge, I have only had it about a month. Most of my prior experience comes from a Universal Laser branded laser cutter.
My glowforge has had some problem recently with things that I cut not lining up with the camera which appears to be a common problem after searching the forums, I have tried the camera calibration to no avail.
The camera placement is a highly needed feature for me because I am lining up my files to a certain item. For example, I laser engraved a name on to the handle of a wooden spatula, even though it was lined up withing the GUI when it engraved the name was running way off the spatula.
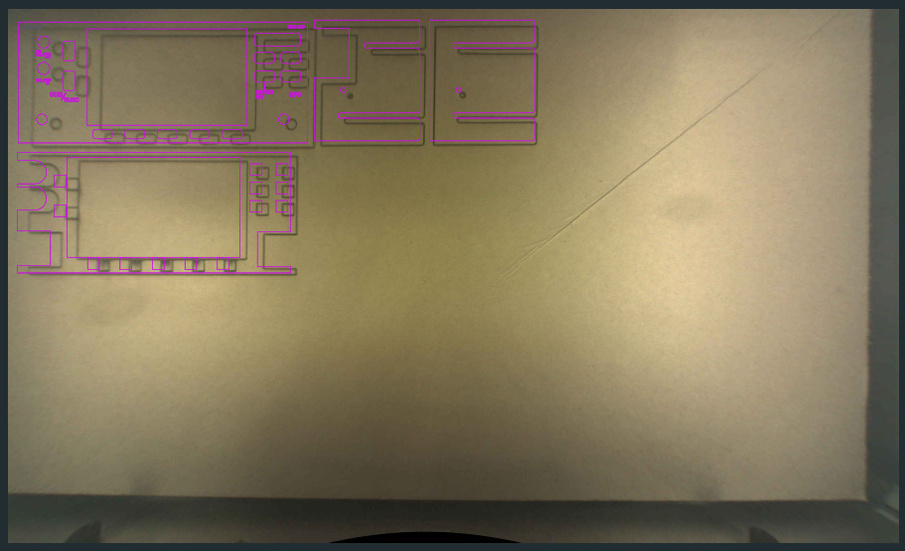
I am attaching an example of the post bed image for a file that one of my student’s cut. You can see where the image was supposed to line up versus where it cut.
I have also noticed that in addition to the camera misalignment, my files seem to be engraving/cutting and an uphill angle. For example, the test celebration, notice the bottom left is way close to the edge of the draft board than the bottom right side is. The crumb tray and draft board are positioned correctly and it is still printing at this angle.
The uphill angle thing you’ll want to make sure your gantry is square. I don’t have the link for doing that but just search the forum for squaring the ganty and you should find the procedure. Looks like it might be the issue.
@kanati and @dklgood have given great advice on straightening up the gantry. (That would be the first thing to get squared away.)Sorry for the pun.
Regarding the alignment:
There is a distortion caused by the fisheye effect of the lid camera. We have to adjust for it out at the edges of the bed. (It tends to be less obvious immediately under the lid camera.)
In short…you’ll want to run the Camera Calibration (which you have done) then use the Set Focus tool at the edge of the bed to ensure you are getting correct placement there. (Place the design after you run Set Focus, because the view there is corrected after you run it.)
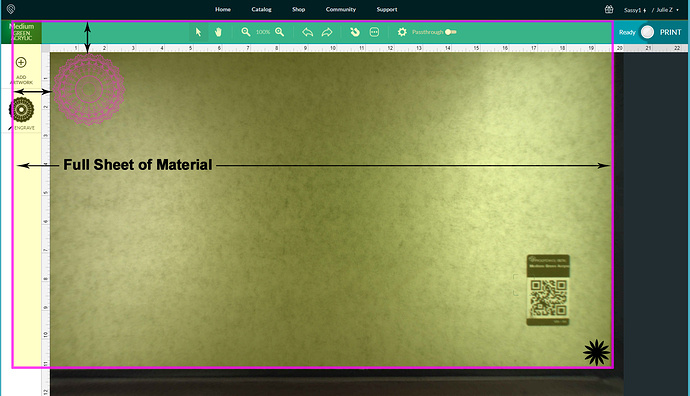
One other issue that confuses a lot of new users is how the material is displayed on the bed. You might think you are placing the design at the left edge of the material, but there is a hidden inch of material under the thumbnail column and an inch or so at the top. You can’t access those areas with the head so they are not displayed. If you want to efficiently use a whole sheet of material, work out from the lower right corner. (Where the Black Star is located) Make sure the metal gridded area is completely covered with material. There’s a diagram below that shows the setup:
And for your last issue regarding trying to print on a skinny handle - you are going to have trouble doing that unless you make special preparations, because the auto-focus is not likely to land on the handle when you process the job. It takes one shot at it when you start the job and the little red laser dot has to land on the handle, or it will give incorrect readings for the placement and focus.
When you use Set Focus, if you watch the head come out, look underneath the head and you will see a little red laser dot appear on the material for a fraction of a second. That is the laser taking a height measurement. If the dot lands on the handle you’re fine. If not, use Set Focus again in a slightly different place on the handle until the dot lands on the handle, and not close to an edge. That will ensure proper placement.
Is the handle of the spatula the same thickness all the way or is it tapered? If it is tapered I would lay the long axis of the handle directly below the camera to minimise distortion caused by the lens.
Thanks for the answer @Jules, that’s right. I’m going to close this thread - if you run into any other trouble, go ahead and post a new topic. Thanks for letting us know about this!