I’ve been following along the curve that is learning…and having a ball. I graduated myself from using wood only, to acrylic…which I love. For some reason, I’m still hung up on trying embossing powder on everything…so of course it went without saying that acrylic would be the next victim. I also sent this to support with a couple other little things, just in case they care.
••••••
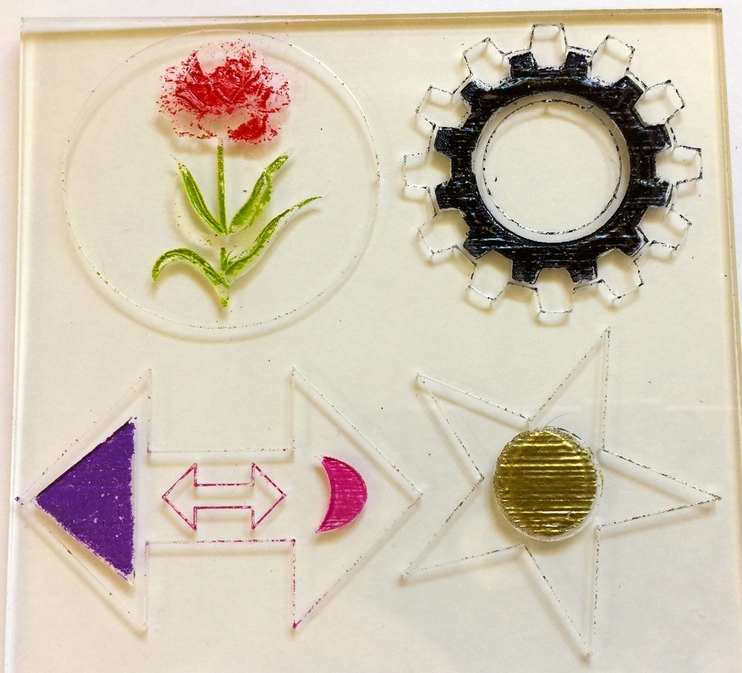
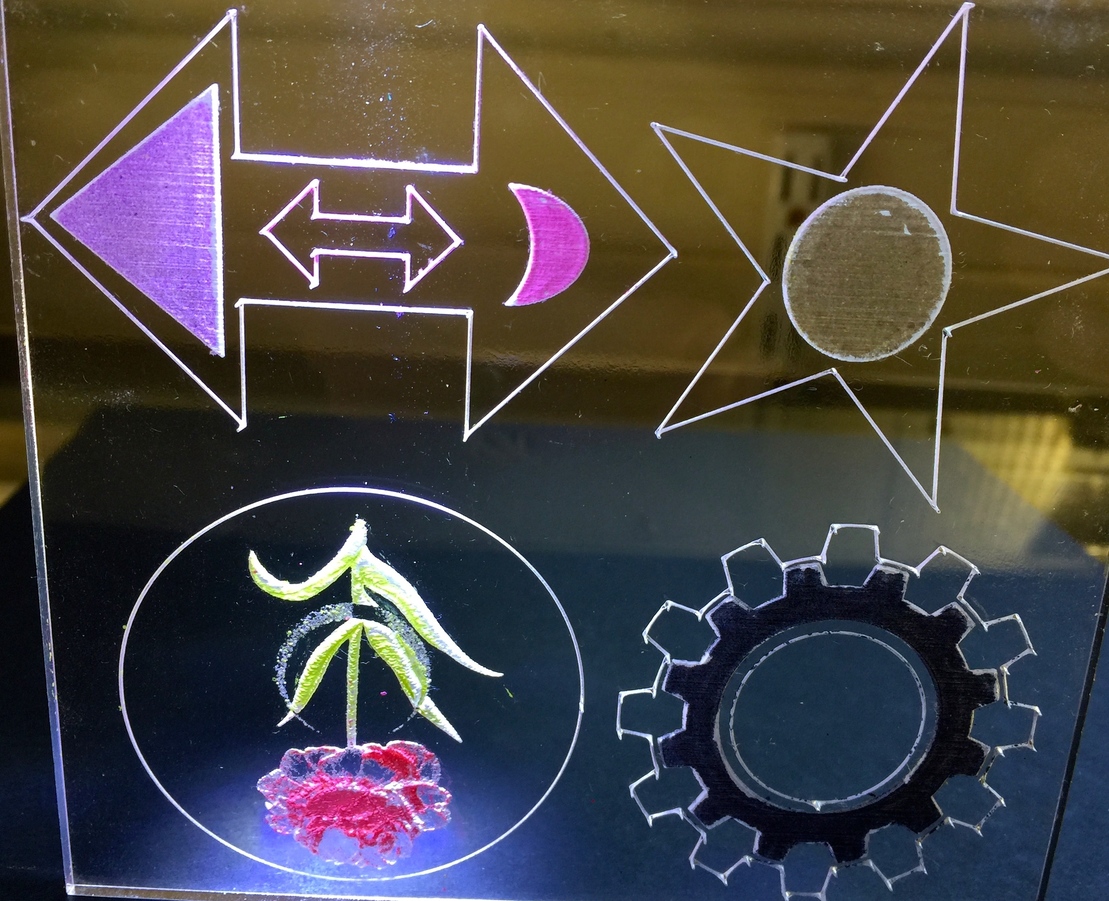
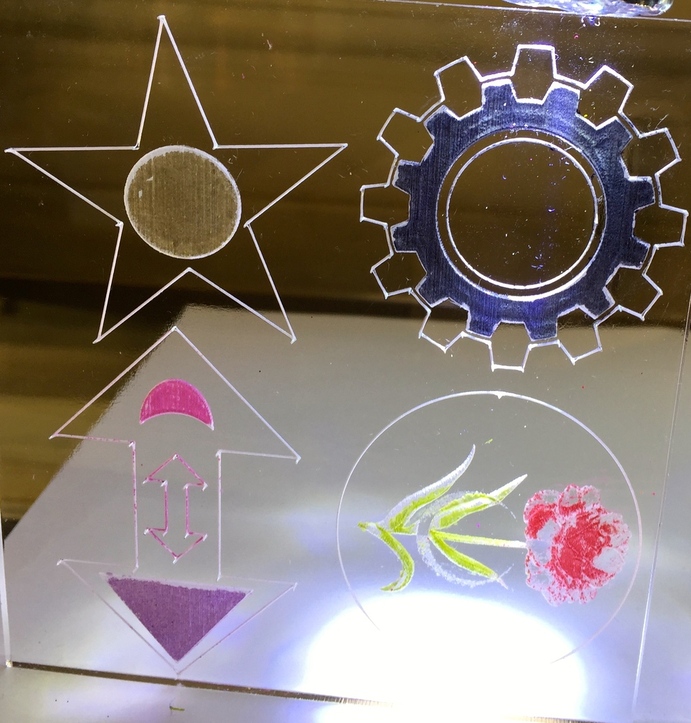
I made a little test square with various types of images on it. The little artifact ‘outcroppings’ are sort of strange on the points of the star and the arrow…I don’t get that.
As far as embossing powder working on acrylic….not so much…especially viewing it face on. Since it’s melted plastic, it’s too easy to scrape off when weeding the masking. And the LPI really show. On the other hand, it could look pretty neat viewing it from the back.
face forward;
The flower engraving is a no-go all the way, any way you look at it.
I love watching your progression and I think I’m going to love acrylic too. I thought the embossing powder might flake off, but glad to have it confirmed. I think I won’t waste any powder on it and will go straight to some of the acrylic paint techniques I’ve seen. Interesting about the little artifacts to, wonder what it is?
Oh hey, I heard a good little tip and thought about you and your acrylic adventures earlier. I was reading a laser group and someone asked about keeping acrylic from getting that haze that needs cleaned off sometimes, especially around the edges. Apparently using a light coating of cooking oil before cutting works wonders to keep the acrylic really clear. Just the spray stuff out of a can seems to work well then clean off when done.
Fun to experiment though, right?!
Nice try with the powder. I think Pro Color Fill is what will work out for you. I know I look forward to using it on acrylic myself.
I looked more closely at what I labeled as artifacts. Difficult to explain…they aren’t sticking out horizontally from the score lines as it appears in the photos, but are actually vertical, where the laser slows down to go around the corner/point. The are noticeable only if you hold the acrylic at a slight angle rather than facing you straight on…or if the light hits it at just the right angle.
Do you thnk it might be like a ‘splash’, where the molten acrylic has bounced upwards, and solidified, as the laser beam has past on ?
It might be significant that the laser has slowed down at that point.
I think they are just where the score gets deeper when it slows down to take a corner. You can only see it because the material is transparent. It is a known problem that we have been told will be solved sometime.
Well, I don’t know…I quite liked the rose–there was some nice shading there! Your etched circles look fantastic! And I have to agree with you–I’m finding unexpected pleasure in working with acrylic.
Try defocusing the laser. In acrylic you get pretty crisply defined engraving passes with a laser. To soften this effect I often defocus the laser. On the GF you’d do that by changing the focus height to be something larger than your material. Say, .260 for quarter inch stock. This will result in the beam spreading a bit wider where it hits the material and it will overlap on engrave passes like paint brush strokes. Then the individual edges of each pass get engraved away.
You may have to boost power a hair to get the depth you want as you’ll be delivering the power specified somewhat higher than before so when it hits the material it’s slightly less than it would be if it was focused on the material.
Thank you! This is precisely the kind of information I need to acquire. Going to copy/paste it onto my little cheat sheet. Invaluable to me.
Not sure though…how does LPI translate into inches/centimeters? I know it means lines per inch, but how did you arrive at the number .260 for 1/4" stock? This was 1/8" acrylic. Gees…can’t tell math isn’t a strong point for me, eh?[quote=“jamesdhatch, post:12, topic:7520”]
Say, .260 for quarter inch stock
[/quote]
1/8" should be 0.125" (1 divided by 8) except it may be sold as 1/8" but really be less than that. Acrylic comes in bunches of thicknesses that can be rounded up or down by the sales folks. So you need to measure it. Wood is often the same - my 1/8" plywood is actually 3mm or 0.118" and not the expected 0.125". I guessed you might be using quarter inch but eighth inch is the same concept.
You can try 0.130" or 0.135" as your focus height to see how much that smooths the engrave.
You don’t need to worry about the LPI setting just because you’re changing the focus. The LPI setting just affects how many lines (back & forth rastering of the engrave) - the higher the LPI setting, the more lines.
Well, duh…V8 slap on the forehead. I did know that much…just wasn’t reading it right. And, for some reason I was thinking that focus correlated to LPI, so that changing the LPI would affect the focus. I did know that the more LPI, the finer the engrave, but for the rest of it…OK…wrong.
There might be a rough formula for how much to defocus for a particular LPI.
The spacing of the lines is 1/LPI. If the beam was that size you would get the lines just touching. For a smooth surface you probably want it to be about twice as wide so it half overlaps the line each side.
We know the beam starts out at about 0.2" about 2" above where it focuses to 0.008". If we assume a straight sided cone (which it isn’t) then the width above the focal point would be ~ 0.008 + h * 0.2 / 2.
So 2 / LPI = 0.008 + h / 10.
h = 20 / LPI - 0.08
I don’t think @Xabbess stated the LPI, but I have heard 160 mentioned. That would give h = 0.045". I.e. the extra height to add to the material thickness would be 0.045".
I don’t have a laser to test my theory (sore point) but perhaps one of the PRU owners could try it. As the laser beam is a bit hour glass shaped then it might be a too low because it is straighter near the focus point.
I wonder why they are such strange numbers. Probably multiples of the stepper motor resolution. It’s a shame they don’t match standard printer and scanner resolutions but those would probably give aliasing, so it is better use an integer multiple of the motor step and resample the image to match.
To test the theory it would be good to try a few of the lower value ones. 10 LPI seems ridiculous though. To match my theory you would need to remove the lens and use the full beam width. Or remove the crumb tray and get 2" below the focus.
I wonder if the Glowforge software is already trying to do this. If you engrave at 10 LPI do you get 0.008" lines 0.1" apart or does it defocus automatically?