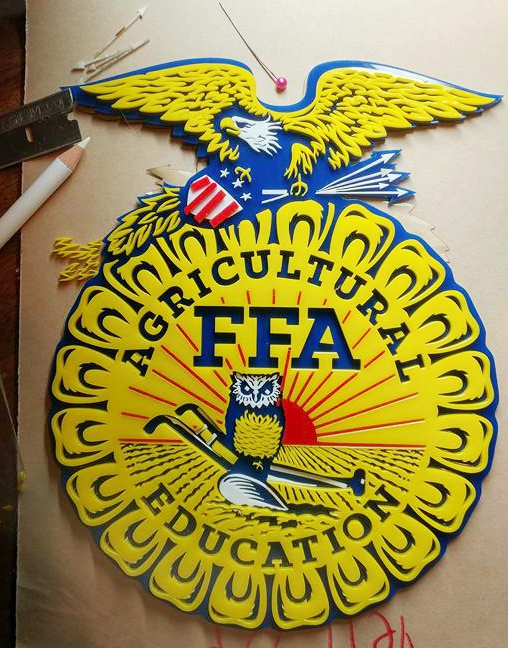
I really should think these things through as my method of make something, then tinker with it, re-design and then make it again etc. gets expensive I didn’t realize how thin and tiny some of these pieces were going to be and now I don’t know how to stick it all together. I can’t see how gluing all those itty pieces will work. Any ideas/suggestions on how to make this work? I can re-cut pieces or redesign things if need be.
I’ve been thinking about engraving the blue back plate with maybe 3 passes for a deep recess to stick the pieces in. I don’t know if I could get the plate I already have cut lined up correctly, but I could make a new one. I also have the blue in a hefty 1/4" acrylic which might work well.
Maybe paint some of the smaller white pieces instead of using the acrylic pieces? It wouldn’t have the same depth, but might be a lot easier. I could engrave the white pieces and backfill with paint as well.
I’ve not done acrylic work, so those who have will need to bear with me, but I’d change your workflow.
Start with using a yellow acrylic since that is the predominant color. Do a light outline cut of the design onto it, then use blue, red and white acrylic paints like a paint by numbers. The cut design should act like a drip border to keep the paints within the lines.
Wow, what a gorgeous piece! If you decide to stick with this method of doing it, after you cut the tiny pieces, carefully press some masking over them while still in the bed, to keep them together and in order. Maybe you are already doing that.
cut a template from thin card stock and lay it it down(over size the holes a bit), Glue with resinbond, put a small puddle on a sheet of glass and use tweezers to dip the pieces in the puddle, shake of any drips, give it maybe 3 or 4 seconds and stick it down in place.
you may only need the template in a few spots, or not at all if your eye is good.
I had thought about yellow first, but it would make for a lot more pieces. All the blue corn, wing and dirt pieces would have to be glued and I thought it’d be tough to get the corn just right. I figured one giant yellow piece would be easier.
I’ve found engraving to be the best, though you don’t need to do so many passes, one pass with the dark proofgrade option will give you plenty of depth to snap things into place. Though you will want to take some scrap and adjust for kerf otherwise your cut pieces won’t fit into the engrave correctly if you just cut and engrave with the same file.
From there you’re just adding dabs of acrylic bonding everywhere.
If you don’t want to take the time to bond everything, you could cut the background instead of engraving it then everything would slide into place and you could glue that to a backing.
If it’s cut out from multiple pieces, you could cut a guide out of MDF (or draftboard).
Then put all the pieces in the guide, tape them down with painter’s tape. Flip the guide around. Put some glue on the pieces you need to glue. Flip it back up and put it in place. Once the glue is set, remove the guide. Just make sure your glue does not “bleed” onto the guide, otherwise you won’t be able to remove it.
Looks really close to me, I’m used to the old school methods, so I would probably just muddle on through it. Magnification and patience would be requisite.
I like the guide ideas, but either way accurate placement is needed because the solvent or glue will mar the surrounding surface if you had to re position the pieces slightly. Of course you would probably be the only person to notice it.
Very nice work!
If you use tape or another overlay to keep everything aligned when you have the pieces off of the blue backing for glue-up, you could potentially use a hard silicone glue roller (they sell them at Blick and other art supply stores, as well as online if you look up “glue roller” or “brayer”) to apply a really thin layer of whatever adhesive you want to use to the back of all of the pieces at once, with less of a drip risk. Particularly if you use a paint tray or something like it to pre-roll your roller in the glue, to thin the layer out before you apply it.
 I didn’t realize how thin and tiny some of these pieces were going to be and now I don’t know how to stick it all together. I can’t see how gluing all those itty pieces will work. Any ideas/suggestions on how to make this work? I can re-cut pieces or redesign things if need be.