Ok I am very new to this…Please forgive if this has been asked…(I swear I searched for 15 min to see if I could find the answer) I printed the Transport Caddy from the catalog on medium Maple plywood and the joints are so tight I cannot get them to fit. Is there an easy way to fix this with the pieces I have cut? Sanding??? Or do I need to go in and change the design? I Have only done catalog things so far and most have fit great. The Santa Compass from the catalog that I did has the same issue and I gave up on that one and chalked it up to “User Error” .
Thank you so much… any help appreciated!!
2 Likes
If you want to use the parts you have cut, then you need to sand or file to get them to fit.
A cheap needle-file set comes in handy.
8 Likes
I have used sandpaper, a needle file, or even a nail file to ease the corners where they go together. That way the parts are lined up and with pressure, they will slide by each other rather than crush the parts.
Then I use clamps to push as you have far more control than something like a leather hammer.
1 Like
I have had both success and failure with the following methods for overly tight joints.
use a bench vise to squeeze the joint together after aligning it as best you can by hand.
use a light hammer to pound the joint together after aligning it as best you can by hand. bonus points for protecting the material with a rag. I use the hammer method with baltic birch more often than I care to admit, It works well most of the time and mangles the joint on rare occasions.
The silver lining is that the joint will be tight and not likely to need glue.
2 Likes
For next time you can run a small test piece to see if the joints will fit before you run the whole thing - and if you find they’re just a bit too tight, running the cut a second time frequently gets you the extra space you need without need of a file ![]()
BUT - to be clear - if you were using PG wood on a catalog design and it didn’t work - write to support@glowforge.com because they will likely credit you for the material. The whole point of PG is that it’s supposed to work perfectly, but the nature of natural materials means sometimes it doesn’t, and that’s when their guarantee comes in!
The term you’re looking for as a forum search is “kerf”.
5 Likes
I forgot those - I keep some of those on-hand near my machine as well.
3 Likes
thank you … I will!!! and I appreciate the advice.
3 Likes
I had one design that I thought was too tight of a fit.
But a wooden mallet convinced the piece that it indeed was meant to fit.
9 Likes
Why do I use clamps and not hammers sometimes, releasing and recompressing from a different angle and/or a second clamp. Even if it does not need glue I still use it unless I can see a need to take it apart, as particularly with wood what is tight one moment might be loose in another due to changes in humidity.
1 Like
If you are going to make boxes or things with joints or slots. You need a set of calipers to measure the thickness of the wood you are using. Then you can adjust your design to fit. I usually add 0.1mm to account for kerf. Makes for an easy fit but you will need glue. You can only sand so much before you loose the laminate.
1 Like
I should add, I print test pieces like this on every sheet (even of the same material), I have files for every type of material I commonly use when a tight fit is needed. The top and bottom notches are for the width of a tab (5mm here), and the ones on the sides are for material thickness.
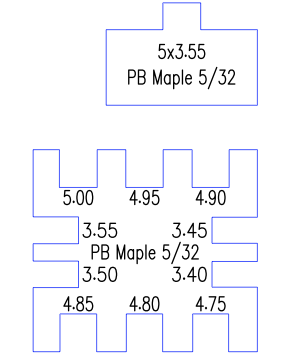
(PB is PureBond ply from THD - I have used that more than anything else the past couple of years…)
8 Likes
Thank you so very much. I am just printing from catalog right now… But I would LOVE to learn how to make my own designs and boxes. Maybe after the new year I can find some video classes that could teach me. Thank you again. ![]()
3 Likes