@stephen1 posted in the “IKEA Glowforge Table Hack w/ Drilling Template and Leg Clamps” thread that he wasn’t close to an IKEA and shipping is expensive, so he wondered about alternatives from Home Depot or Lowes to build a table to support the Glowforge laser and store materials. IKEA Glowforge Table Hack w/ Drilling Template and Leg Clamps - #40 by stephen1
I’d previously sought a solution to that, so thought I’d dash off a quick response. LOL. Get a coffee in a big mug.
TL;DR Nothing directly comparable to the IKEA Linnmon table top / Capita leg hack is available at Lowes or Home Depot, but they do have materials to roll your own. If you want greater flexibility in overall size and shelf spacing, or can’t get the IKEA items, options and instructions follow.
And no, I did not build this for my laser. I mainly used Sektion kitchen cabinets from the As-Is area at IKEA, along with Linnmon table tops and an office surplus worktop. Advantages include mostly enclosed storage (could be fully enclosed), ability to add drawers for tools and hardware, and easier access to smaller sheets of material while still accommodating large ones (up to the full size of the small Linnmon table top, 39 3/8" x 23 5/8). Someday I’ll get that posted too!
To answer Stephen’s question, I’ve never seen anything at Lowe’s or Home Depot in Canada that’s as inexpensive or rigid as the smallest Linnmon table top from IKEA. The least expensive tabletop either home center carries is something like this:
https://www.homedepot.ca/product/alexandria-moulding-3-4-inch-30-inch-x-60-inch-white-melamine-table-top-handy-panel/1000418581
It is too wide to support at only the corners the way the IKEA hack does, if you load the shelf with plywood it will likely sag. And it will cost you $200 or more anyway.
There are a some alternatives for shelf material:
-
Laminated panel. Sometimes available in 24" width. Might need a light sanding, probably want to apply a finish such as polyurethane. Something like (this one is only 12"w though): https://www.homedepot.ca/product/hdg-12-x-72-inch-laminated-whitewood-panel/1000140872
-
Melamine panel. Best price is to get the store to cut down a 4’x8’ panel, though they do sell smaller pre-cut “handi-panels”. If the shelf is wider than 40" then supports such as a 1x2 on edge running side-to-side under the shelf are almost certainly required to prevent sag. Bracing the top to support the Glowforge weight would definitely be wise. https://www.homedepot.ca/product/uniboard-3-4-inch-4x8-melamine-white/1000117180. For a finished look, apply iron-on edge banding. https://www.homedepot.ca/search?q=edge%20banding#!q=edge%20banding
-
Found panels. Lots of options here. Office surplus store nearby? See if they have old work tops from cubicle systems - that’s the rock solid top of my GF table. Habitat ReStore or other building surplus outlet - hollow core slab doors to cut down (essentially same construction as the Linnmon table tops). How to Trim a Hollow-Core Door to Height - Fine Homebuilding.
Actually, if you want an extra wide unit with no trimming, use full doors and add a third pair of legs at the mid-point. You may be able to get a door without the doorknob hole predrilled, if not just put it at the back. https://www.homedepot.ca/product/masonite-24-inch-x-80-inch-primed-hardboard-door-slab/1000136672
You never know what else you’ll spot at the ReStore, might be something else suitable. Lots of these doors out on the curb when people do renos, too.
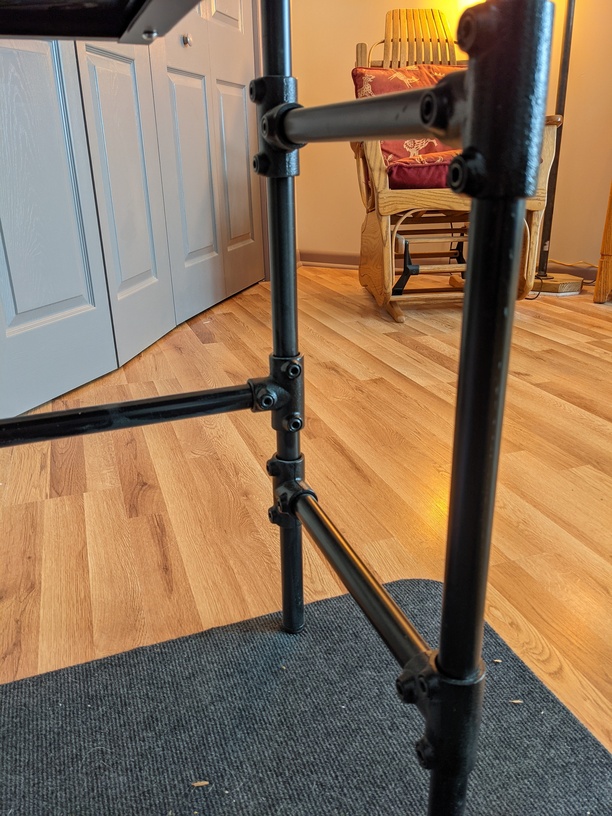
And an alternative for the legs, which will work fine with the Linnmon tops as well, is to use threaded rod to pull the shelves together, and plastic pipe or metal tubing (or something forged!) to hold them apart at the desired distance. I mentioned the idea once before but there’s more detail below. My Glowforge Table - #23 by whitehill
A picture of the base concept, without the tubes to hide the threaded rod: Easy Flexy Rack
-
Decide how many shelves the unit will have, and the spacing between shelves. Unlike the Capita legs, any spacing is possible. I wouldn’t go less than 3 inches, or it can be hard to reach in to grab material. Add up the thickness of the shelves, the spaces between them, and the height of the feet or casters to get the height of the top surface.
Depth of 24" is suitable for both the Glowforge laser and the materials used.
Two factors to consider for width.
First, the greater the span between supports and the heavier the load, the more the shelf will sag. The Linnmon tabletops work at 40" wide (less how much the legs are inset from the ends) because they use torsion box construction. A simple shelf of 3/4" solid wood, plywood, or MDF/particle board will sag more (solid wood better to MDF/PB worse). Here is a great article to help you design adequately strong shelves. Note figures G and H are why I suggest a minimum pipe diameter of 1.5" in the instructions below.
Build Stronger, Sag-Proof Shelves | Popular Woodworking Magazine
Second, if materials are placed with the 20" or 24" dimension running front to back, then their width is likely 12". So it makes sense for the distance between legs to be slightly more than multiples of this, e.g., 25" fits two sheets but 23" only fits one. -
Once you have shelf material, buy or scrounge the following materials:
- 4 pieces of 5/16" or larger diameter threaded rod, length equals the distance from the bottom of the lowest shelf to the bottom of the top shelf, plus the height of two nuts and washers. If any shelves are spaced more than 8" apart, up the diameter of the threaded rod to 3/8". https://www.homedepot.ca/product/paulin-5-16-18-x-36-inch-stainless-steel-threaded-rod-unc/1000126800.
- 4 nuts for each shelf, including the top. Make sure they are the same diameter and thread as the rod! https://www.homedepot.ca/product/paulin-5-16-inch-18-finished-hex-nut-zinc-plated-grade-2-unc/1000131117
- A washer for each nut. https://www.homedepot.ca/product/paulin-5-16-inch-plain-steel-washers-zinc-plated/1000131518
- #8 steel screws. 24 of them. Length will depend on the thickness of the material you use for the nut capture stacks- see step 4.
- Enough 1.5" actual outside diameter (or larger) plastic pipe to cover up the threaded rod, so about 4 times the height of the unit not including the feet. Larger diameter will make the unit more rigid; going less than 1.5" may not be rigid enough. I’m suggesting plastic pipe for low price, ease of cutting, and because it’s paintable. Note pipe sizes are nominal, so you better measure to get the actual dimensions. https://www.homedepot.ca/product/ipex-homerite-products-cell-core-1-5-inch-x-12-ft-abs-pipe/1000120764
 You could also use the GF to make finger-jointed square tubes out of plywood, and engrave designs on them!
-
Cut the pipe to make the spacers. Each piece will be as long as the space from the top of one shelf to the bottom of the one above it. E.g., if the space between shelves is 6", cut 4 pieces each 6" long. Make sure the ends are cut square. Check your setup and technique if using a power saw, as pipe can catch and spin.
Or, crank up the GF and do your custom square tubes, out of plywood for strength. Include a top and bottom both with a centered hole slighter bigger than the diameter of your threaded rod. Make the top a snug fit but don’t attach it to the tube - it serves as the donuts and nut caps mentioned below. The bottom can be attached, even finger-jointed, but then should be inset a touch from the end of the tube. For the rest of the instructions, just adapt the procedures to your custom tubes.
Plastic pipe or custom forged tube, finish it the way you want. Lots of info on the web about painting plastic. -
Make the following:
-
Donuts to center the pipe on the rod. If using pipe, measure its inside diameter. Cut out of plywood or draftboard 8 donuts for each space between shelves (each space has 4 pieces of pipe, one at each corner, and each pipe will use 2 pieces, one at each end). These donuts are simply 2 concentric circle cuts. Make the outside diameter a smidge smaller than the inside diameter of the pipe - it shouldn’t be loose. Make the inner circle slightly larger than the diameter of the threaded rod - set it the same size as a drill bit you have, as you’ll be drilling matching holes later. So for 5/16" rod make the hole 3/8". Cut one test piece first, and make sure it fits snugly in the tube while the rod passes through it freely.
-
Nut capture stacks to attach the rod to the top shelf. Measure the thickness of the nuts, and the distance from one point of the hex to the opposite point.
Copy one instance of your donut design and modify it to include 6 equally spaced screw holes. Size them for #8 steel screws - 0.110" diameter will allow the screw to grab but be easy to drive. Do not use drywall screws as they are not strong enough. You will need to cut four of these “nut caps”.
Copy one of them. Replace the center circle with a hexagon the same size as the nut. Cut a test piece - the nut should fit in easily but not loosely. When the fit is good, copy it to make as many as required for the nut capture stacks. You’ll need 4 times the number of pieces it takes to exceed the thickness of the nut. For example, the nut is 0.266" thick and you are using nominal 1/8" material which is actually 0.120". Two pieces are only 0.240" thick, so you will need three of these pieces, times 4, so 12 total. The pieces will look much like the first picture in this thread, except the outer shape will fit inside your tubes. Lets make some knobs -
Now determine the length of screw that will attach the donuts. Add the thickness of one nut cap piece, the thicknesses of the hexagonal cut-out pieces required to fully capture the nut (3 thicknesses, in the example just given) and the thickness of the top shelf. You will subtract 0.25" from the total to ensure the screw does not go through the top. Assume we are using 1/8" (0.120) donut material, and 3/4" (0.75) shelf material, but are doubling up the top to support the GF. So 1 donut, 3 hex donuts, 2 shelves, minus 1/4". That’s 0.120+(30.120)+(20.75)-0.25= 2.57". Screws from 2-1/4" to 2-1/2" would work - both lengths engage both layers of the top.
-
To finish this step, make a template to drill the shelves consistently. Along these lines:http://www.ourhomefromscratch.com/2013/04/simple-homemade-jig-for-cabinet-door-pulls/
Start with a copy of the nut cap (i.e., the donut with screw holes). Keep the screw holes and the small center hole where the rod passes through. Remove the circle that is the diameter of the inside of the pipe. Add a centered circle the size of the measured outside diameter (OD) of the pipe. The template must be at least this big so that the pipe doesn’t stick out past the shelf edge. Add a square or rectangle centered on this circle of the size you desire, then remove the circle. For example, if the OD of the pipe is 1.5", and you want it set in 0.25" from the front and side of the shelf, add a square 2" across. Your choice whether to add a fence to the template edges, for more positive registration, as shown in the link. If you finger joint it to the template, remember to account for the length of the fingers. Final template will have 6 screw holes, the rod hole, and the outside rectangle, all cuts. Test drill some holes on scrap using it, to ensure it’s what you want.
-
First assembly. Yay! Time to glue up as many of the hex cut-out pieces as are needed to capture the nut (that was 3 in the example above).
Place the top shelf upside down on the floor with something underneath it so the top surface isn’t scratched. Next, put a 1/8" drill bit in your drill and use the template to drill the screw holes at each corner. Use a depth stop or tape flag so that you don’t drill all the way through the top! Prevent over-drilling | WOOD Magazine
Gather the #8 screws, proper screwdriver, 4 nut caps and all the hex cut-out pieces. Spread a good wood or craft glue on one side of a hex-cut-out piece and stick another on to it, lining up the screw holes (use toothpicks or skewers to maintain rough alignment - perfection not required yet). Spread glue on that piece and add the last one. You should have a stack of 3 pieces with glue between each, and a hex hole that goes clean through. Spread glue on the face of the last piece, and set that glue side down over the screw holes in one corner of the top, using the toothpicks to roughly align all the screw holes. Add a nut cap to the stack, aligning the screw holes again. No glue between the cap and the rest of the stack! Start a screw in one hole, and another in the opposite hole. Holding the stack firmly in place, drive one screw until it grabs the top, then stop. Drive the 2nd screw enough to just tighten the stack together against the top, then finish up the first screw. If you used enough glue and tightened the screws properly there will be a bit of squeeze-out between layers. Too much glue and it will be running down the sides. Clean it up immediately so that the stack will fit into the tube later.
Repeat for the other 3 corners. Let the stacks dry for the time recommended by the glue, then remove the screws and the nut cap, and clean off any dried glue. Test that they fit inside the tubes. -
Next, put the appropriately sized drill bit for the threaded rod in your drill.
- Using the template, drill a rod hole only (no screw holes) in each corner of all the shelves except the top one. To get the cleanest hole, drill from the top of the shelf and make sure you have a solid piece of backing material underneath the spot where the drill bit will break through. If the top surface is chipping, firmly rub down a piece of masking tape where the hole will be, then place the template over that.
- OK, check that the following is done:
- Rod is cut to length;
- Pipe is cut to length and finished (or square tubes are made);
- Through holes for rod are drilled in all shelves except top;
- Top shelf has nut capture stacks glued on and cleaned up.
- Donuts and nut caps are cut.
- All good? Time to assemble!
-
Place the top upside down on the floor, so the nut capture stacks are visible. Set all the hardware and parts nearby, along with a screwdriver for the #8 screws, glue, and a damp rag for glue cleanup.
-
Take a threaded rod and turn a nut onto it until the end of the rod is even with the nut. Flip it so the nut is on the bottom end of the rod. Put a bit of glue all around the rod in the corner it makes with the nut - that’s on the side of the nut where the rod sticks out. Fit the rod and nut into the hex opening of a nut capture stack on one of the top’s corners. Push it all the way in. Now turn the rod clockwise until the nut has risen to just shy of the top of the stack. The glue will be drawn inside the nut, locking it into place on the rod.
-
Holding the rod vertically in the stack, place a nut cap over the free end and slide it down to the stack. It should fit snugly against it. If not you’ve moved the nut up too far - turn the rod counterclockwise while pressing it into the stack until the nut cap sits down cleanly. Line up the screw holes in the nut cap with those in the nut capture stack. Start screws in two opposite holes and drive them until they have engaged the stack. Start the other screws and drive all of them home.
-
Repeat with the other three corners.
-
If the unit must be disassembled, remove the screws and nut caps, then pull out the rods.
- Now for some obvious progress: tube and shelf, repeat.
- If all the shelves in your design are the same distance apart, all the tubes are the same length, and you can use them in any order. If shelf spacing varies, remember the unit is currently upside down, so the first space to be established is actually the top one, right under the work surface. Sort your tubes in order now and double check.
- Place the first set of 4 tubes over the 4 rods. Slide them down all the way over the nut capture stacks, until the tubes are against the underside of the top. Place a donut over each rod and slide them down into the ends of the tube. Next a shelf goes onto the rods, remembering that the unit is upside down, so the top surface of the shelf need to face down, towards the worktop. Drop a donut, then a washer, and finally spin a nut all the way down each rod, round and round. If the nut isn’t moving freely, try rubbing a little candle wax down the rod in two or three lines. It’ll get smoother with each nut. Snug those nuts up, until there are no gaps between the first sets of pipes and the shelf. No need to go tighter. Check the fit and alignment at each end of those first four pipes.
- Looks good? Drop on the next set of pipes (remember, still upside down, so this is the second space from the top!). Pipe bottoms into donuts, then new donuts into pipe tops, shelf (top surface down), donuts, washers, nuts. Snug it up, check fit.
- Repeat for remaining shelves. And yeah, remember, still upside down so watch what pipes to use, and shelves are all top surface down. When you get to the last shelf (i.e., the bottom one) you should have about 1/2" of rod sticking out before putting on the donut, washer and nut. If there is enough rod you can add a second nut, and tighten them against each other to lock them in place. No extra rod - use a nylon lock nut. https://www.homedepot.ca/product/paulin-5-16-inch-18-nylon-insert-stop-nut-pozi-lok-zinc-plated-unc/1000131539
Too much rod? Bolt cutters or a hack saw. - Rod and nut in the way of where you want to mount legs or casters? If the shelf is thick enough, drill a recess big enough for the washer to fit it, and deep enough to fit it and the nut. Skip the donut. If the shelf is 3/4" or less in thickness, don’t drill a recess. Forge some plates with a hole big enough for the nut and washer (skip the donut again) and thick enough so the nut is beneath the plate’s surface. Better to think about this at the design stage!
-
Wobble test! If it’s done right this should be a sturdy unit. But I haven’t built this design and put my laser on it, and I’m not building the one your laser is going on, so I make no guarantees! Lean on it hard, push it side to side and front to back, and make sure you are confident it can work.
-
If you build it, post it! Happy lasering -----