Many thanks, and “power to your elbow”.
1 Like
Heh… I had to look that one up.
More power to your elbow!
uk (us: more power to you!)
An expression of praise or admiration for someone’s success or brave actions:
“I’ve decided to quit my job and set up my own business.”
“Well, good for you. More power to your elbow!”
7 Likes
paint fill the engrave (so it will be dark) then light 'er up !!
1 Like
OK, not to build it up too much, lol…
Now, this pic doesn’t really do it justice; the light I was using isn’t that bright, and it’s a bit blurry. It looks so much better in real life, but at least it gives an idea…
Shine a bright light on the face of it…and display the shadow onto a wall::
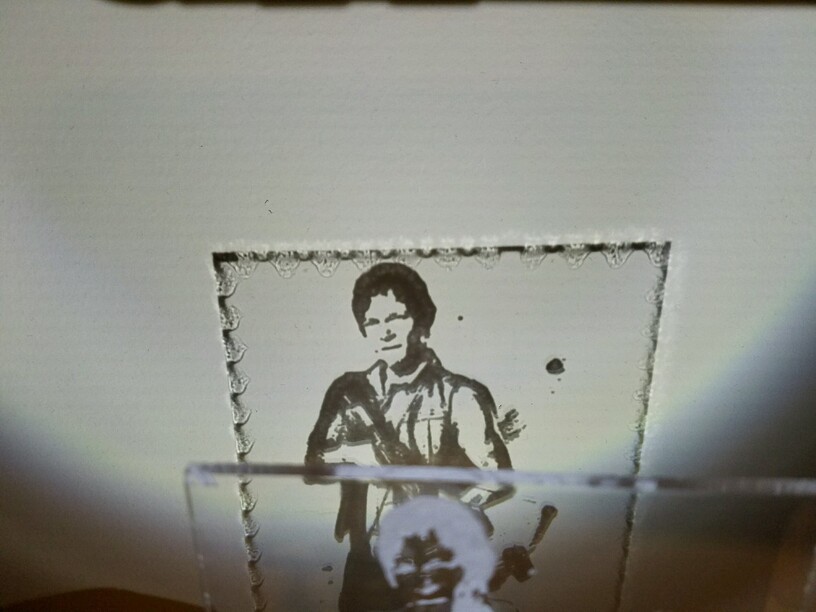
Look at that face! Sorcery!
Plus, check out the pretty border, created by the flashback from the crumb tray. Again, it’s blurry here, but it looks really nice in real life…
Sooo, think of the possibilities…shrink these down to tiny dimensions, color it in (or leave it blank), put a magnifying glass over it, and you’ve created your own ceiling / wall night light display.
Make a bunch onto one circle, add a motor, and you’ve got your own custom designed night light wall display with changing images. If you already have one of those machines, maybe you just create your own disks to use in it.
I’m guessing kids would love this…?
23 Likes
Bat Signal maglight lens-covers…
5 Likes
Shadow casters! Excellent! 
(We had talked about doing some depth map work with 3D printing for the panels on tealights, but it would be much more convenient for folks to just use acrylic with engraves.)
Think of the fun at Halloween! Bwa-hahahahahahah!
3 Likes
Great ideas!
Was thinking of maybe even having it be able to rotate; one position will edge light it, flip it (or maybe the base) 90 degrees, and it becomes a shadow caster. But at this “normal” size, and without a magnifying glass, it won’t be focused properly at more than a few inches away from the wall / ceiling ![]()
2 Likes
Are you cutting the 1/8" PG acrylic?
Try the following settings:
Note: These settings are no longer valid - they are Pre-Release and Pre-Scaling Change. Do not use them.
90% power
30 speed
0.125 FD
And if you are trying to cut right up next to an open edge, lay a strip of tape or something down on the grid next to the material to cut down on that flashback. Too much air getting in there.
5 Likes
Yes, was using the default PG cut settings for it, but I will try those settings, and the tape, next time, thanks!
Unless, of course, I want to keep that border effect 
2 Likes
I’ve never done it before and have not made any edge lit engravings, but have you considered dithering the image? From my understanding (which I admit is very limited) a grey scale image that is dithered is actually just black and with different density of black dots to make the image look grey. If you did that, would that make the image look better when edge lit?
1 Like
That is a darn good question, and I have no idea, lol.
I wonder if engraving from a .jpeg would be better in this case…?
1 Like
I always dither photos (vs drawings) when engraving. Hoping to be able to skip that step when the GF grayscale engraving support is completed. Dither images look better when engraved. BTW, sometimes you’ll want to flip the color palette (black to white and vice versa) to get really good engraves. If you’re not thrilled by a straight engrave, give the color flip a try.
4 Likes
FWIW, I was going to guess Sean Bean, but apparently not so much.
1 Like
One thing you might consider trying is running a black and white image like this through something like Inkscape’s “Trace Bitmap…” and then engraving it. This was done using Brightness Steps - Scans = 2. I experimented to get here. I don’t have a Glowforge, but my imagination tells me that an engraving of an .svg will match more closely to what I see on the screen than a raster image. Then again, at some point cloud magic may be better. Can’t wait to learn what it’ll be for myself!

7 Likes
Hi,
Thank you…someone had traced the ,jpg and converted to ,svg for me, and I actually engraved it using the .svg file.
Hmmm, maybe I need to set the dpi higher?
1 Like
Maybe that’s just the way it works on acrylic? You loose details when you melt the plastic?
Could also be the way the image was traced for you. Forgot to mention that I removed the darkened background of the original .jpg in GIMP to get a better file to trace. Hard to say, especially since I’m no expert. The shadow works great, though!
1 Like
That is very cool!
I did another Jimi in acrylic and wasn’t impressed on how the engrave displayed from being edge lit.
Just hit it with a light and wow! the shadow is perfect! Thanks for the inspiration 
4 Likes
Sweet, glad to help
4 Likes
So, my friend likes the shadow option SOOOO much more than the edge lit version, so I’m going to re-design it for that, somehow…
I may just simply add a wood post to the front and run the led strip up in it, or I may design a box for it.
One thing I know for sure, is that I must use only a single light, or it will create double shadows and overlap & look terrible. I think I also need to make it perfectly square, which is easy with a mill and other power tools.
Hmmm, I bet running two or three led wires and lights, and shining them from separate angles, would cast several shadows; one left, one center, one right…
Mirrors would do the same…
Oh, so many thoughts running through my mind…
7 Likes
Can’t wait to see what you come up with!
4 Likes