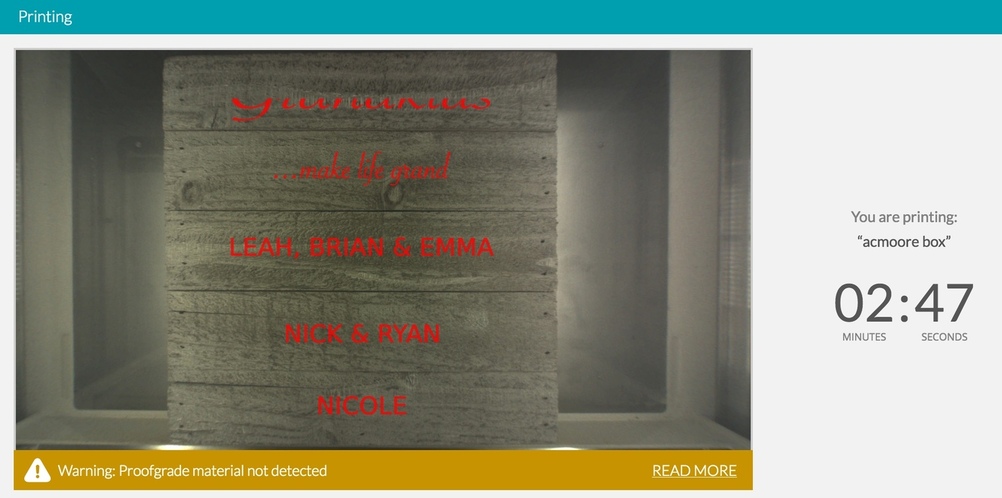
I was trying to get ahead of Mother’s Day and make my mother in-law a gift using a box/sign I found at AC Moore. The plan was to engrave some text onto the sign. I did this before on a smaller sign, so I have reason to suspect the issue has to do with large (taller in fact) items.
The positioning of the text looks great on screen as you can see here:
The on-screen visual can see up to a 1/4” shift from the overlay to the actual print location, with the current alignment specs.
It helps to have calipers to measure the actual thickness and input that. But, you can still see up to a 1/4” shift, even with perfect height measurements.
A few ways to go about it though.
You can make a jig in cardboard or something that your piece goes into.
The fastest way on this though might just be to mask the edges of your piece. Measure your piece and create a rectangle with a stroke of a unique color. I’d make the rectangle about a 1/4” in from the actual outside measurements. Score the rectangle by itself at 500 speed, 1 power. If the rectangle doesn’t fall where you want, shift the design slightly (everything) to get it where you want. Once the rectangle is aligned, your design will be aligned (as long as it’s aligned within the file).
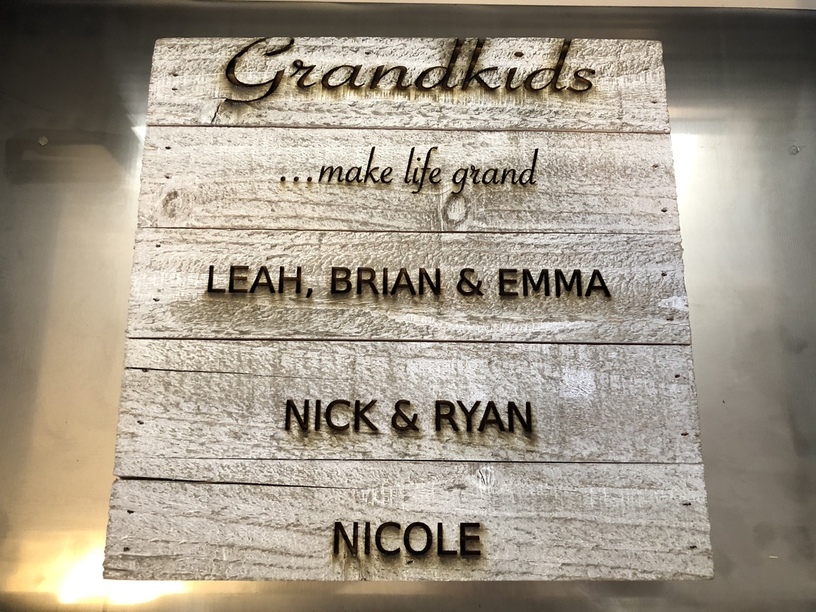
Ahhh you’re trying to align to the slats - both vertically and horizontally. And I’m guessing the slats aren’t all the same size (or maybe that’s just distortion from the picture)? So probably moving each piece of text manually so that it appears aligned?
That doesn’t sound like fun to me.
The camera is really going to be for general alignment, at this point… not precision.
However, your center alignment (Leah, Brian & Emma) looks pretty good. The rest of it is off as you get further away from the lid camera. And I guess you have the crumbtray out, making actual material height even more critical.
It looks like you are able to engrave it all in one go though, without moving the material.
And your center alignment is pretty good on the Leah, Brian & Emma.
I’d set up a document in AI that mimics the piece you’re working on… you could do it a couple of different ways, a rectangle for each slat (if they are different) or, measure the outside dimensions of the whole piece and then measure the height of the slat and put a guide for each one. Then, you can align your text off of the individual rectangles or the guides (whichever method).
Once you get it in the UI, adjust everything together, since it’s aligned in the design. Since your center alignment looks to be really good, align the Leah, Brian & Emma line to where it needs to be and the rest should fall into place if you measured and put things correctly in the design.
You said you measured everything, so I assume you did compensate for no crumb tray and all and used some risers underneath to bring the surface within the focal range.
Use a jig as @jbmanning5 mentions. That is what I use most of the time. or use a set of registrations scores that you can turn off and on to mark on masking.
That is the only way to get perfect precision on such a variety of materials. Camera alignment can be off, especially as you get unusual dimensions.
Originally I had the text measured and the space between them defined in Inkscape, however I moved things once I saw the image on the screen…So I must have messed things up by going on what the camera shows…I’ll have to see about getting another and sticking with the alignment I get in Inkscape then…Thank you!!
I have made the mistake of lining everything up, and THEN entering the thickness when dong the cut/engrave settings. But I discovered that the camera refocuses only AFTER that thickness is applied, which would then throw off the alignment. Enter the thickness first, and then line it up. I still don’t get exact alignment, but its much closer.
It doesn’t matter what the camera does, it’s not accurate enough to do what you want. IMO it can never be that accurate. It’s a good idea that turns out to be a lot harder to do with high accuracy than I think they expected.
Draw a single unfilled box around your artwork. Tape a sheet of paper down to the crumb board. In GFUI, set your artwork to “Ignore” so just the box is enabled for cutting. Set that to “Cut” but set the speed up high and the power down low - the objective is to mark the paper not cut it. Run that job. After it’s done, lift the lid and without moving the crumb tray or bumping the laser head carriage assembly, put your slats on the paper aligned with the box shape that is burned from the previous operation. Go back to GFUI and set the box to Ignore and re-enable the artwork for etch/engrave/whatever. Then run that job. Everything will be lined up.
If your objective is to align the text so it’s not over the line between slats, it’s a little harder. You can’t do it with the GFUI, you have to do it when you set up your art. Arrange the slats they way you want, then measure each slat and replicate with a simple rectangle of the same dimensions surrounding each line of text, representing each slat. Move the text within each box as necessary so center the text on the slat. Then delete those boxes. Now go to GFUI and do as above.
I engrave on the back of very small objects (dog tags usually) and yes it is very annoying to not have perfect alignment. A big reason I bought the glowforge and waited 2 years was the incredible on screen alignment that they advertised. I’m hoping that eventually we will get what was promised, but until then i’ve found a trick to get as close and consistent as possible.
For my machine, I know that I need to zoom in to 200%. I click on the art and look at the top two cursor points (i dont know what to call them exactly). I know that if I move my artwork up to the very top cursor point, the final engrave will shift down to where I need it. For my purpose, I also make sure the object is in the center of the tray. Because if it goes too far left or right, the engrave will ALSO shift left or right a bit.
There are tricks that can be used. A lot of people here talk about jigs too. I know that the glowforge is still a very very cool machine and I cannot wait for perfect alignment! Once you find a trick like me, it’ll make engraving gifts a lot easier (and consistent).