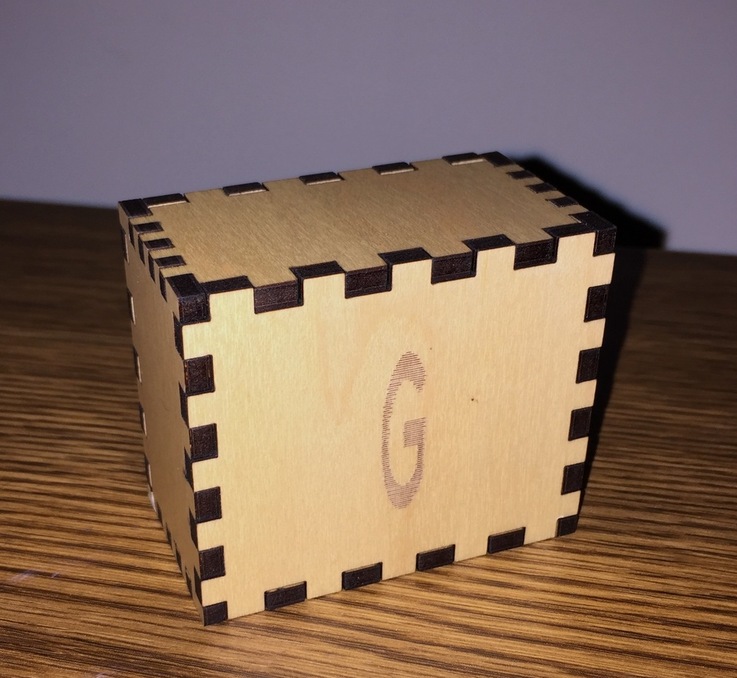
I had no trouble at all creating a box in my chosen dimensions including kerf. The model worked great! My only problem was getting the dxf into my old version of Illustrator (5.0.2). I just can’t import dxf files. So I went through an online converter, and that changed the sizes (to much smaller). I scaled it up, but a tiny bit too much which made the joints a tad loose. If not for my scaling issues it probable would have been a tight fit. Anyway, here’s the box, in Proofgrade maple 1/8" plywood. So, @mpipes, want me to send it to you?
I’ve been thinking about this issue. Normally you would slice a box on a table saw to get a top and bottom and then add hinges. I thought you could engrave a rabet on the outside and a corresponding one on the inside then cut out slightly on the sides of the tabs. The top would slip over the bottom. It would take some work to get the engraves evened out and the corners to match, but then you would have a lid that slips over and holds on its own. Like cardboard tube tops are made.
I was actually thinking the top face would be left unglued then you can grip the lasered edges of the top and lift it to open.
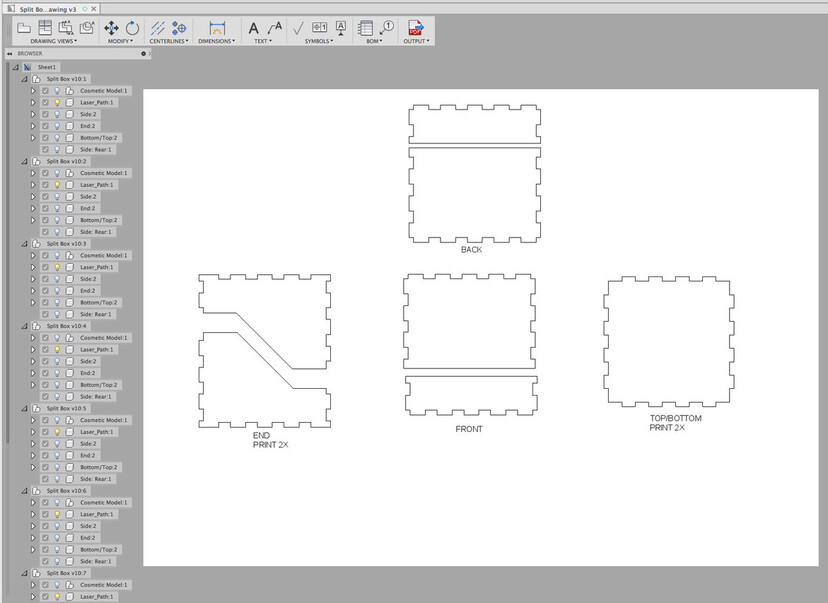
Pretty sure I can split the 3D model so it has mating top and bottom sections, while maintaining the parametric design. Then you would just need to assemble the pieces and hold the top and bottom parts together to add hinge hardware to the back, on the outside of the box like a chest or jewelry box.
If you want to do an interlocking lip, it might be easier to cut a matching ledge on the laser out of the same material, that can fit right into the opening. Or glue squares into the front corners and use a hobby knife to cut a mitred chamfer so when the top closes down, the chamfers help seat/align the top properly.
The “split” is the seam between the top and bottom “halves”, so there is no need to cut it. Just assemble each half, then hinge them together. The shape for the “split” is also parametric, so when you alter that, the affected pieces are updated in the model.
One of the tricks I learned for that at yestermorrow was to cut the dado on the side of the pieces that would later become the inside, then assemble the box and carefully cut another dado all round on the outside. Guaranteed fit and registration, although often it was a good idea to finish the cut with a very thin blade.
I wonder if you could do something similar with a laser, leaving either a tiny uncut bit or some tabs.
Wow, that looks great. Much nicer than I would have thought of. I would have used my table saw, but some fplks don’t have one. Your way is MUCH better.