I recently ripped out the carpet of my new place to reveal beautiful white oak floors. Unfortunately, there are these unsightly holes, from what I assume were old cable routings, often made of many smaller holes clustered together. I just realized that with the Glowforge, fixing it would be as easy as taking a photo, outlining the shape (with enough contrast, I’d imagine that could be automated), then cutting the perfectly sized patch/plug. Taking a picture of real world damage, and having something that close to an automated repair process gave me an intense “Whoa… we ARE living in the future” feeling.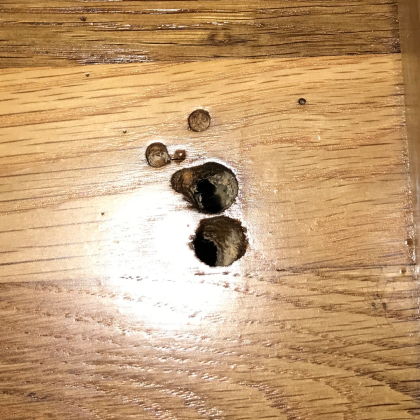
37 Likes
What a fantastic use for the machine! 
8 Likes
Yes and no. The plug will have to be very shallow or just a vanier places on top of a filler compound this is due to tapper and angle of the hole neither of witch the gf/laser would be able to work with. So yes you can cut a circle to match the profile but at any depth it won’t fit. So you will have to fill the hole with something then place the vaniesr on top and do some sanding
6 Likes
Or you can cut a bunch of thinner discs and stack em in there, glueing them as you put them in. Would probably be easier that way anyways than trying to cut a single 1/4 piece of oak
5 Likes
@zacmac1 That is a great idea!
Sometimes though it is better to make it worse so you can fix it right.
If you drill those out to be straight round holes with the smallest circle that will cover then you can 'forge round plugs to exactly the right diameter to fit. Then you get a lot of good contact for gluing, you you can rotate them around when you fit them in and try to match the grain direction, and you lose the beat up edges that will always show where you fixed it.
20 Likes
Pattern matched veneer plugs. This would certainly use the camera well.
8 Likes
another option is to use a foster bit that is a smidge over the widest part of the hole to plug and bore it out 1/8(or the thickness of your replacement material) this will great a ledge for the plug to sit on flush and allow you to mount it. It will also give you know dimension and great uniform. Another option given the cluster to bore the area down and create a uniform patch instead of a bunch of small things
7 Likes
@marmak3261, were you suggesting to use the laser to “print” a matching wood grain onto the plug? That’s a really interesting idea. Combined with some of @Clone 's suggestions, it’s even more to think about 
8 Likes
That would be pretty slick!
3 Likes
Clever application!
3 Likes
No, just thinking that you could have the image of the hole and surrounding wood on screen to place over the veneer and move it till the veneer grain matches the surrounding grain; however, that would be interesting to use the engraving feature to do faux graining.
2 Likes
Also, if the holes are far enough from the wall, you might be able to route in some pretty designs in a contrasting wood using a template which could also be made using the GF. Just remember to design any corners for the radius of your template router bit, unless you don’t mind doing a little hand chisel work.
Sorry to correct, but, he will have an easier time looking up “Forstner” bit.
2 Likes
Ya my phone does stupid auto correct stuff
Like every time I try to type. C r e a t e. It changes it to great
4 Likes
Here’s a “Foster Bit”

12 Likes
Yeah you could drill some straighter holes to be safe. Spray some Great Stuff down in there to give it something to sit on. Might wanna tape off the area till it dries. Shave the foam down a bit. Cut your veneer plugs, floor samples or whatever. Might need some filler too.
2 Likes
Hmm, all this talk about cutting custom plugs to repair floor or furniture damage, combined with the recent discussion of dithering, got me thinking about purposely cutting an array of tiny holes in a sheet of hardwood that make up a dot matrix image, and then cut the matching plugs from a contrasting species to fill them back in! Would need to be low-res to be workable logistically, but might be worth playing with.
8 Likes
That would be amazing! Like a comic book half tone maybe?
3 Likes
Get yourself some wide vinyl transfer tape. When you cut the first one, use the vinyl transfer tape to pick up all the dots simultaneously and lift them out in position. When you cut the second one, out of the contrasting wood, do the same.
You’ll have created two negatives of your design that are easy to do plug placement on.
(Sticking all of the little dots into place sounds like the worst part of the deal. The transfer tape will make it easier.)
Sounds like a great idea!
4 Likes
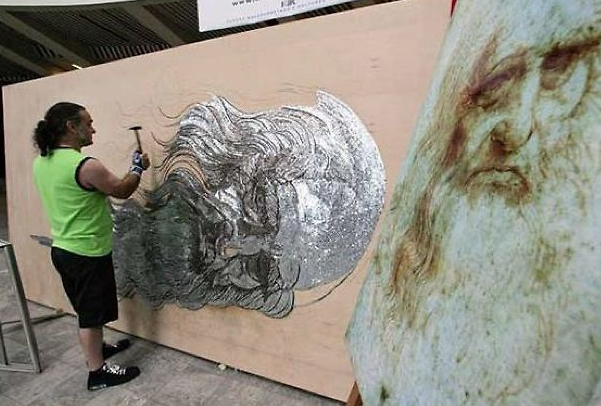
Substituting materials for pixels produces some amazing art.
The guy who did this on a big plywood sheet using nails as pixels.
Phosphate (dark) galvanized and plain. it is magnificent!
Here is an image of coffee cup rings…

Amazing minds out there.
14 Likes
I happened to see this on @Tony’s instagram feed (hopefully he won’t mind my adding it here).
21 Likes