AWESOME! Iknow several who would LOVE this lineup
Could you relate how the 3D engraving works? I’m still trying to figure this out, but then, I just got my Pro yesterday so… ;p
Hahahaha. I am clueless. I am playing with Affinity Designer, Affinity Photo, Inkscape, and Silhouetted Business software.
I have been reading the forum since its inception. I am still trying to put what I read to work for me.
I have had my pro for two weeks.
3d engraving alters the laser beam power by seeing shades between black and white (grayscale). You set a minimum and maximum power first.
Pure white gets zero power (not minimum power). The shade just after pure white will get minimum power. Pure black gets the maximum power that you set. The power ramps for the values inbetween.
So your white will be unburned (shallowest) and black will be the deepest.
Oooo thank you.
So if I want to revers the image. I would set Black to minimum and white to max
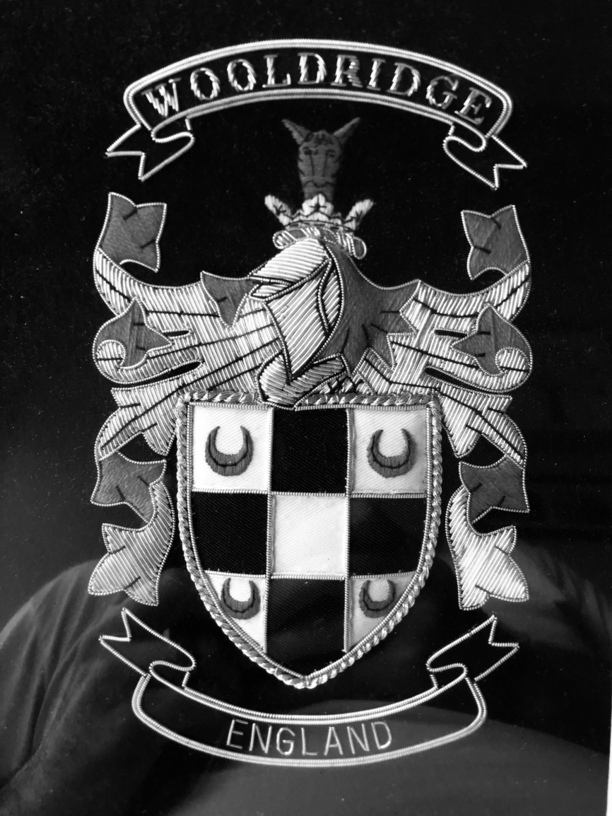
Do you know where I can find a “How To” or can you provide one for an image to be 3D engraved? I’m having a really hard time figuring this out. I get the concept, but the steps/process in order to take an image, such as the one attached and turning it into a 3D file ready for the Glowforge is busting my braincells. TIA Note, this picture was taken through a picture frame and I’m reflected in it.
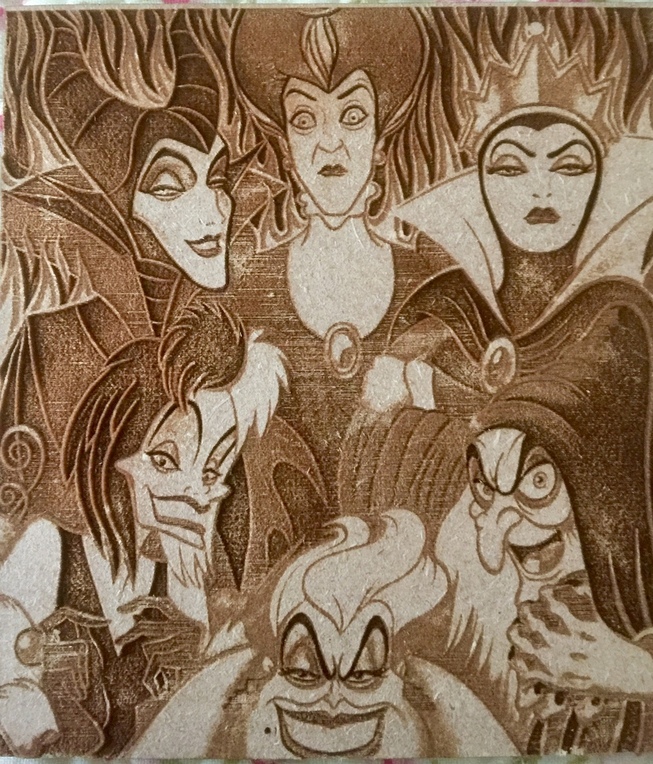
I am going to engrave this. If it works I will let you know the process.
I’m not sure if I understand what you’re saying, but you cannot set color=value in the glowforge UI for engraving (unless the engrave is a single color.) The glowforge UI always maps black to the maximum power level (or the maximum level you set) and always maps white to no power. I don’t use graphic editors like gimp or Photoshop much, but I believe they all have a reverse image function that would do this for you.
Note that for a 3D engraving the image you use to get what you want does not necessarily look like what it will be. If that makes any sense. If you want to do the photo-realistic engravings a lot of people post here then it’s all about playing with the contrast and not reversing blacks to whites.
Wow, thank you SO much!
Ok I have not tried on my Glowforge yet. I make lithphanes on a cnc and back light them to display the image. I use corian and a few other man made products for the material. I would convert the image to greyscale and then reverse the image in my cnc software( photo v carve). I was hoping there was a way to bypass the the reverse process. But I will have to continue to use photoshop. Thank you for the input
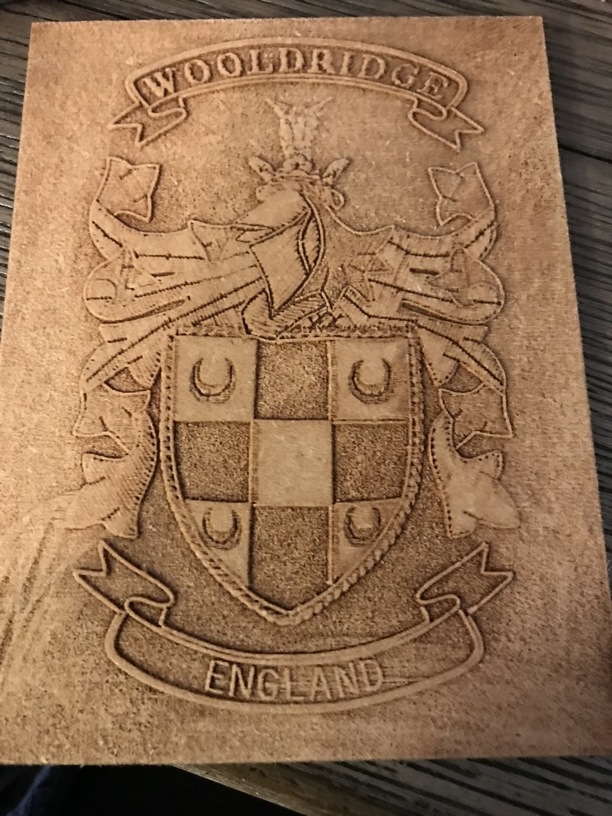
i took your picture and made sure I saved as jpeg. I opened the picture to Silhouette Business Edition. I saved it to my hard drive as an svg. I loaded the svg to GF. That is the red cut line. You will not see the photo. I added the picture in the artwork and placed it over the red svg square showing on the bed. I used the PG draft board. It would look better with a darker wood.
HOLY COW! How long did it take to do? What is Silhouette Business Edition? I’ll have to look that up. I think I have just about every program but that one. Thank you by the way!
It took about 30 minutes. I even see the folds of your shirt in it. I have a Silhouette cutter. Actually I have two Silhouettes and one Cricut. :).
I took a look at their business edition software and it allowed me to save my work to svg and other formats and save to my 'puter. I am learning, Inkscape, Affinity Designer, and Affinity Photo. I am playing as I learn.
I will do a second engrave tomorrow and see if it looks better.
I don’t have that software. I I have Inkscape, AI, PS, Sketchup, Fusion 360, and possibly others I forget. I’m hoping to not have to download more than this but if I have to I guess I will. Thank you again for this, that looked awesome and I too saw the reflection of my shirt. 
Two other free programs are good to have for that sort of engraving. That would be Gimp and Blender.
In Blender you can make it in actual 3d and then do a direct texture image of the result using a Blend texture that will automatically take care that the high points are white and the bottom black. This is very direct and great control but knowing where all the widgets are is a challenge.
In Gimpit is technically easier to lay out an area and assign it a height but what you gain in easy technology, you instead have a much harder time deciding what shade of gray goes where.
Art cam is expensive but does an amazing job with more power than Blender but with a somewhat weird approach is another learning curve.
BTW
I have been bringing inkscape svgs into Blender where you can make them 3d and modify them a lot and then create that grayscale.