So I seem to have a poor relationship with vectors. I definitely plan on looking up some online tutorials. In the meantime……
I drew the below image and tried the scan feature on the GF (like in the commercial) but the image didn’t look right. I cleaned the camera lens, still no luck. So Instead I scanned the image and traced the drawing as a vector image. This was probably 7 months ago so I forget if I used Illustrator or Inkscape. But after watching many tutorials and some trial/error I finally had a simple enough vector image.
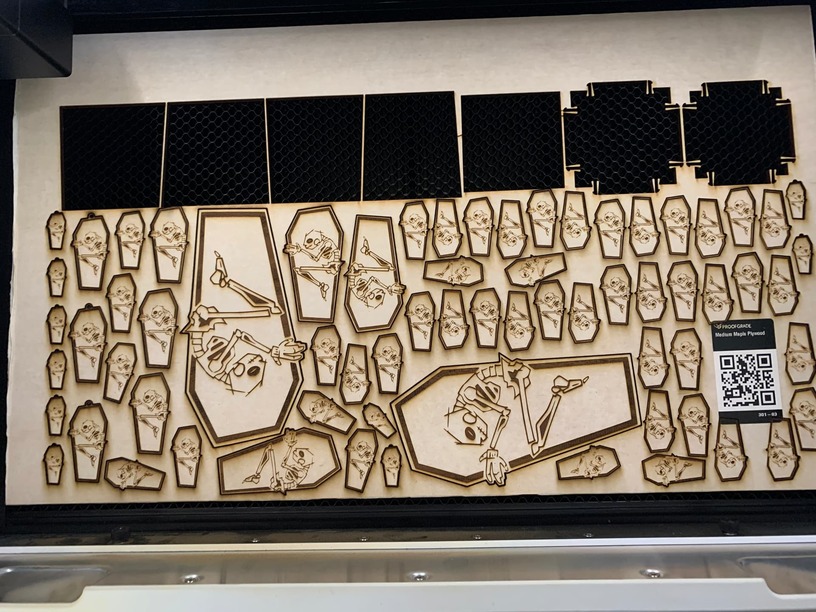
I made two versions. One with a loop on the top (for earrings/etc) and one without. I plunked my proof grade medium maple ply in the GF, scatters as many of those on the screen as possible, and lasered away.
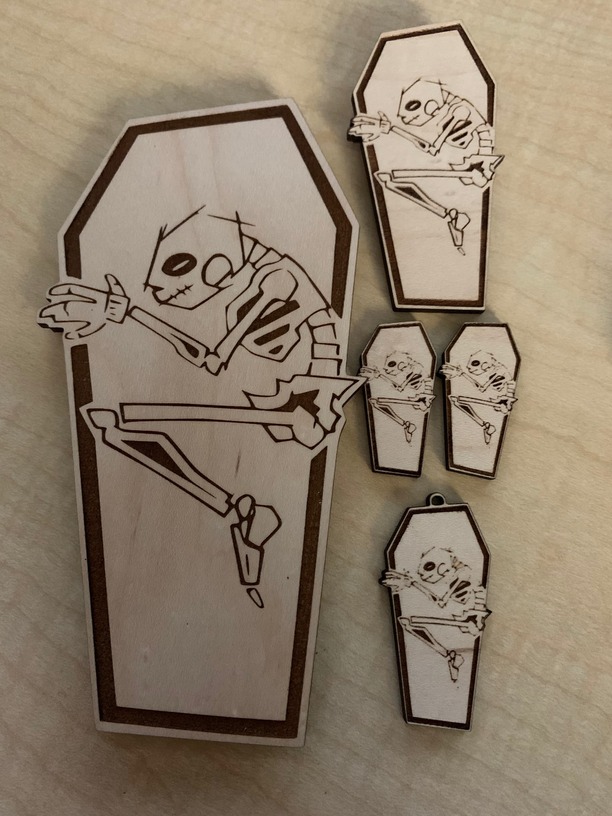
The large images turned out great but with each version that I reduced the scale of, the quality got worse. I thought vector was scalable so I’m not sure how I bungled that?
All of the smallest sizes are missing detail including the borders. Also strange, the missing details and missing borders all vary. Shouldn’t the flaws be uniform since I used the exact same svg image for each? This may be a result of placement, as I recall the images in the middle were a little more uniform….
Anyhow, thanks in advance for your time and patience. Any thoughts or input would be greatly appreciated. I’d love to get a better understanding of this intimidating machine.
And yes, next time I’ll make a trial run on cardboard before going to proofgrade. Lol
first of all, I love the art. One potential issue I see is that you have some very thin lines. When you reduce the size, those lines are getting so thin that the laser barely has a chance to make a mark.
What settings are you running this at?
First thing I would try is slowing the laser down , either by choosing a different preset that runs slower, or manually (which will likely involve lowering the power manually as well).
Another possible solution would be to bump up the thickness of the lines, and create an alternate “simplified” version of the art for tiny things like earrings.
if you feel like there might be an issue with your file and vectorization method, you can always post the file here and one of us can take a look, but I do not think that is the problem.
Thanks so much for the feedback. I’m very new at this and most of my personal projects haven’t been that successful. Thank god these forums have a lot of useful info.
I haven’t been bold enough to manipulate the settings yet. I just intended to stick w/ the proof grade material for now, assuming the presets would provide optimum results. I was planning on waiting until I’m a little more familiar w/ the GF before I play w/ the settings.
I’ll certainly give both suggestions a try. First I’ll update the simplified version, then try a slower speed and lower power setting. Thanks again for the recommendations!
Where you have vectors the size should not matter. However, the thickness of the cut does not change regardless of the thickness of the image of the line so a very thick vector line will be the same width as a very thin one. These vectors are the only way for the Glowforge to cut, as raster images can only engrave. For this reason, the smaller versions will not be as distinct as the larger ones.
I had to read that a couple times but that makes sense, thanks.
I seem to recall there was slight warp to the material too, which probably also explains the lack of uniformity between the versions of each size. I got a shipment of proof grade material last month and many of those have a slight warp to them as well. I’m going to search the forum for a fix on that issue.
I’ve spent so many year with Photoshop, pushing pixels around that I, admittedly, struggle leaving that knowledge at the door, when I’m working w/ vectors. There’s so much good reference on this forum, I’m sure I’ll get it soon enough.
There is still tons of time you will need that knowledge I use Gimp a lot, and most useful is the ability to turn mask outlines to vector lines and export them.
I don’t know how that might be done in Photoshop but there are many photoshop users here who would love to know that as it is far more useful than doing it in a vector program.
Oh, that sounds like a great idea. I bet Photoshop has a feature for that. Thanks for the suggestion. I hear Procreate had some vector features as well so while I’m learning that program I’ll see if that can turn masks into vectors. Such a great trick!
And store it flat with a weight on it, this will take out some warp and at the least keep ut from getting worse. If stored at an angle it will force it into a warp.
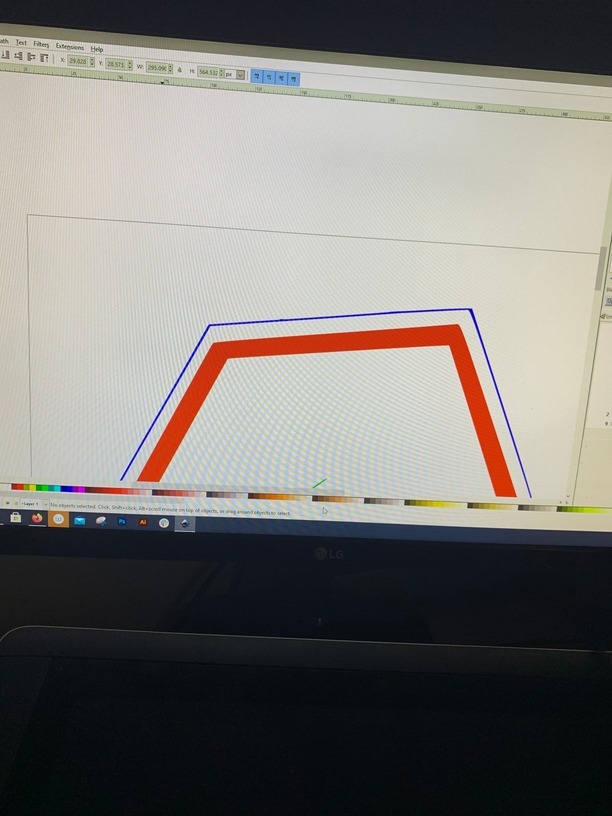
sorry, just saw this response, need to clarify. @rbtdanforth is correct in that the stroke width of a single vector line is ignored.
-but-
when I suggested bumping up the “thickness of the lines” I was not referring to the stroke width per se, but rather to the total thickness of the perceived “line” as seen in the finished art. These “lines” in the finished art are in fact closed vector shapes.
There are a variety of ways to make those closed vector shapes thicker:
You could increase the stroke width, but then you must remember to expand it, and unite it.
You could use the offset path function with a fill and some uniting.
You could drag individual nodes around.
You could re-draw with a thicker pen, and create a new vector-trace from the drawing.
Only true to a certain extent. When a vector is designed small, then enlarged, everything is normally golden. If you design large and then shrink it, you may begin losing perceivable data. with the laser especially (but also with inkjet printing, silk-screening, stencils, etc) the material you are using will dictate the lowest perceivable resolution.
The laser is one of those I am speaking about, not such raster issues as inkjet or even silkscreen which is also ultimately raster in which the pixel is the smallest resolution. Even going from raster to vector runs into that as long areas of less than a pixel width end up with a series of one-pixel triangles with one pixel or less between them that can be very time consuming to deal with. Cutting with the laser where passes are less than the width of the kerf it becomes a single line as I pointed out above with nothing left between the two lines.
I definitely will. I was trying to edit the vector on Thursday but couldn’t get it to work so I’ll be giving it another try, once I’ve logged out of work tonight. I finally had the brilliant idea to look up “vector for lasers” rather than just general vector art tutorials. @jbv and @rbtdanforth have been so helpful.
If I’ve understood correctly, I’ll need to increase the size of the “closed vector shape” of the skeleton using one of the methods @jbv recommended. I assume I’ll need to reduce the size of the skeleton, just a little, to accommodate. Then, in order to increase the size of the outer border, simply expand the size of the outer cut line a little.
I thought this was going to be slam dunk beginner project. I’m glad I finally asked for help. I’ll be sharing my progress
I would love to see if you can figure the mask to vector trick in photoshop. It will take someone really familiar with it and though I have Gimp doing well with it, there are many here confused by Gimp that might find the Photoshop way to do the same trick a lot easier. Many are not familiar with the masking concept in raster that is not the same as masking in materials.
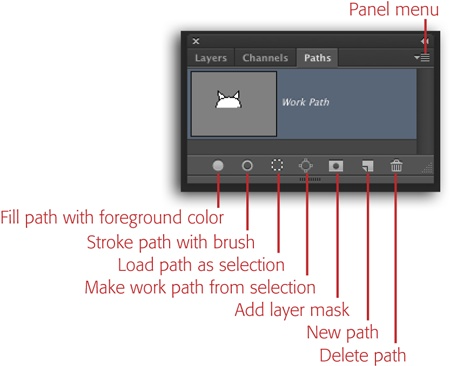
You make a selection (with magic wand or any of the other selection tools) and then hit the “make path from selection “ button on the paths palette. Then double click “work path” and give your path any name to make it not a work path (those are temporary). At that point you can File > Export > Paths To Illustrator
If you’ve made shape layers instead you can directly export vector SVGs.
Select the shape layer in the Layer panel.
Right-click on the selection and select Export as (or go to File > Export > Export As.)
Thanks Mike. My Wacom crashed while I was working on that last weekend. I’ll probably just try and re-do the design from scratch on another computer. I really want to share some progress on this thread before it’s closed.