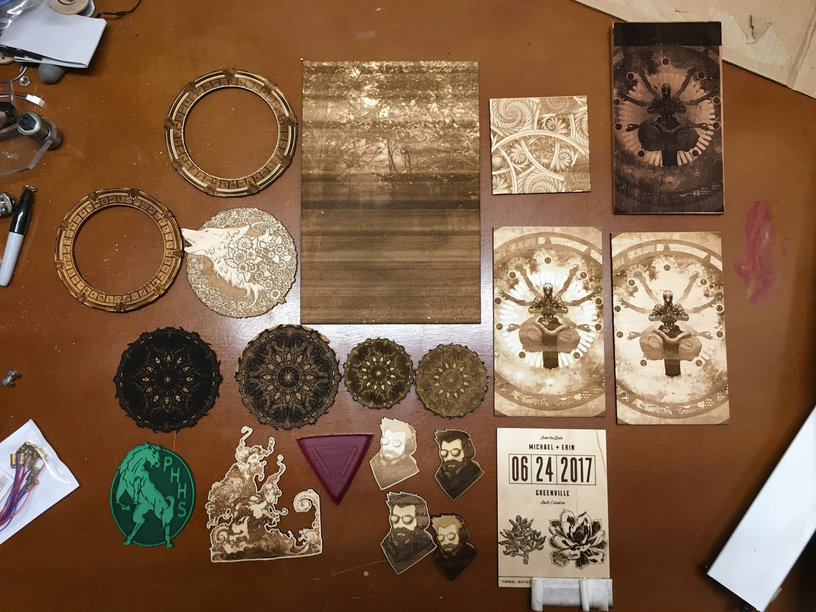
Ive posted a good few of these already, but I figured I would just post a visual summary of what Ive laser cut so far so you guys can ask me questions if you have them.
Let me make a kind of key for this so you guys can see some of the reasoning behind the pieces:
Wolf
First proofgrade autopilot test. Dropped it in and it did its thing! I was impressed!
The 4 Mandalas:
Two on the left are cork. Leftmost is lowest power highest speed engrave - black darkest color in the engrave file.
Right of that is the same with 50% grey being the lightest color.
3rd one is proofgrade standard dark engrave with black file.
4th one is quarter inch MDF with standard dark engrave with black file
Red Triangle from Rick and Morty Purge Armor
This was a test to see how defocused engraving would work to smooth a previous focused engrave, and also to cut a piece for my friends rick and morty purge armor! Its gonna be epic
This was also the first acrylic cut I did on the glowforge. SO SMOOTH AND SO CLEAN
Wedding Invite
First purely vector engrave, and also a sample as they want me to make their wedding invitations
Green Horse Logo
Testing to see if I could engrave EVA foam and at what settings. If you zoom in youll see that the only reason this one stayed together was because of the LPI being at 75. Its a very sensitive material, and im trying different methods to see how I can engrave incredibly thin and sensitive materials. I just finished one that actually resembles something usable with a 90% white engrave file and fastest engrave at lowest power settings. I think a low LPI helped a bit too!
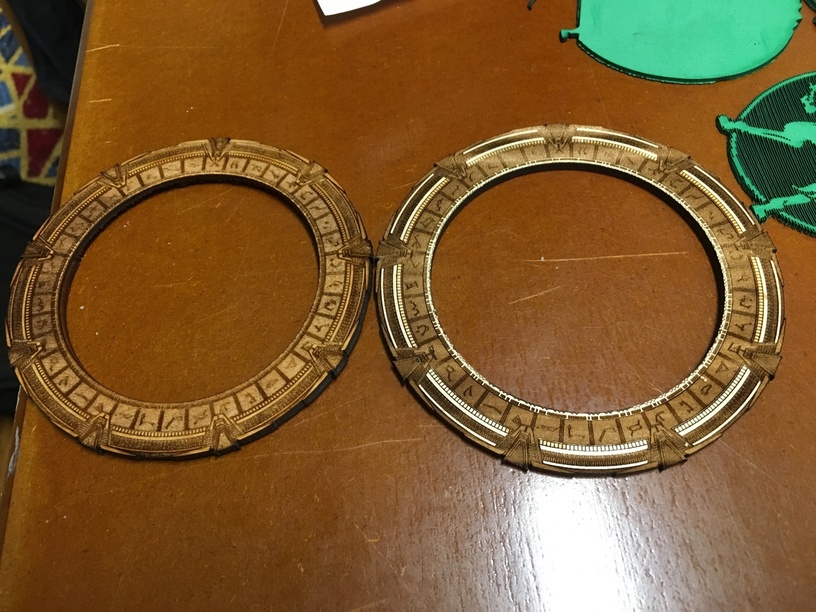
Stargates
Lower Left is birch ply, no masking ( i also changed the chevrons on this one to be lighter)
Upper right is proofgrade with masking
I cut a number of these, some to give away, and I also wanted to compare the proofgrade maple to the birch ply I had sitting around. @jacobturner I still owe you an unmasked stargate. I havent forgotten!
Zenyattas
The one on the right I did first. I peeled off the masking. it lost some wow. Had to make another one…
The one on the left had the lighter end darkened a bit to bring out the pill shaped objects more. I also left the masking on because it was whiter than the maple underneath. I want to try another one soon with the proofgrade, but covered with a thin layer of white paint first to see if it is the same effect. Paint layer thickness will have to be monitored closely. Engraving on multiple layers of colored paint could be REALLY COOL. Looking forward to that experiment.
top zenyatta was on cedar. Going to revisit this with a 50% gray at some point. I really like cedar (the aesthetics, its tough to work with).
The 4 Avatars
Top left: maple proofgrade medium darkness setting, ended up too light
Bottom left: maple proofgrade dark setting. ended up too dark
bottom right: 1/4" MDF. great for consistent tone. GF cut through in 1 pass too. I almost cried tears of joy at seeing that. Impossible on my k40. I might try the forest engrave on some MDF to see if it comes out better
top right: 1/8 proofgrade with some changes in illustrator to get color better. faster engrave to take off less material.turned out pretty good.
It was fairly easy to do, but a bit more complicated than others because of how many paths there were.
The simpler you make your illustrator files the easier its going to be in the GF UI. I brought it in originally and it made about 900 engrave jobs because my friend put almost every path on a different layer! Lots of unnecessary compound masks etc. I grouped it all into a few objects and had it engrave each vertical section in order. Footer first, the flowers, then text above.
Its taken me a few days to learn some of the nuances of the GFUI. Once you get that down it makes optimizing in illustrator a lot easier.
I have. Im actually waiting for the 3d engrave stuff to flesh out a little more because I have a really nice 3d model I want to try to make it from. The outer part of the ring and the chevrons at least. I might end up breaking the chevrons out into their own object all together, but ill probably print a couple different variations. I really want a spinning one that lights up!
Same here! I’m a HUGE fan of Stargate SG-1 and a few of my friends are too… so it’s likely going to be one of the projects I work on myself when I get mine. I plan on having the chevrons their own, ring the Locks move and an iris… Now I just have to teach myself audrino…
All of these are great but perhaps it is time to start exploring the 3d world of boxes and stuff? Not trying to tell you what to make, just encouraging you to continue to push yourself.
im still working on materials. Each of these things kind of serves a separate purpose, and they are all different from each other for the most part. I just tried to pick interesting subject matter. once I get the materials down I can then start building with them.
Getting close! Not sure how many boxes im going to make though… Im gonna shoot for some more exotic stuff
Im not really sure to be honest. I ran that one last night at 2am and was watching with weary eyes wondering if it was shadows or what. It wasnt. I think the first thing is that the file was just too dark, so it was basically just doing the whole bottom half at what it was trying to make as similar as possible - blackness, but maybe power was fluctuating a little bit, maybe some of it is wood grain (trying this on an acrylic might help to answer that question).
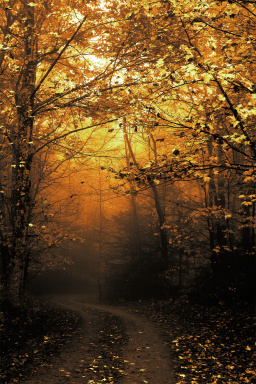
This was the original:
On all the lasers ive used, getting a perfectly flat engrave is pretty much impossible due to inconsistent material and inconsistent power output. There has always been banding in everything ive engraved. Could be the power source in my house sucks? Could be that thats just the way lasers are in general? Could be something that maybe someone on the GF staff has more insight into. Id really like to know the answer to this as well.
Id obviously like to solve this problem, but the solution for the meantime when engraving something is to just have more things in the middle tone area (greyish), and to make sure to have a lot of things constantly changing around in fairly high contrast it so you cant see those slight differences. It worked well on the zenyatta engrave, and might have worked well on this had I modified the curves a bit before engraving to be more laser friendly.
Either way, for the most part all of these engraves are just a base for understanding how the laser reacts to what I put into it. Most of them are going fairly well. Scale could be an issue here with having such large passes the things you might not notice before become more pronounced. Only thing to do I guess is continue testing! And engrave on the back sides of the crappy stuff! haha
[details=Summary]
Let me make a kind of key for this so you guys can see some of the reasoning behind the pieces:
Wolf
First proofgrade autopilot test. Dropped it in and it did its thing! I was impressed!
The 4 Mandalas:
Two on the left are cork. Leftmost is lowest power highest speed engrave - black darkest color in the engrave file.
Right of that is the same with 50% grey being the lightest color.
3rd one is proofgrade standard dark engrave with black file.
4th one is quarter inch MDF with standard dark engrave with black file
Red Triangle from Rick and Morty Purge Armor
This was a test to see how defocused engraving would work to smooth a previous focused engrave, and also to cut a piece for my friends rick and morty purge armor! Its gonna be epic
Wedding Invite
First purely vector engrave, and also a sample as they want me to make their wedding invitations
Green Horse Logo
Testing to see if I could engrave EVA foam and at what settings. If you zoom in youll see that the only reason this one stayed together was because of the LPI being at 75. Its a very sensitive material, and im trying different methods to see how I can engrave incredibly thin and sensitive materials. I just finished one that actually resembles something usable with a 90% white engrave file and fastest engrave at lowest power settings. I think a low LPI helped a bit too!
Stargates
Lower Left is birch ply, no masking ( i also changed the chevrons on this one to be lighter)
Upper right is proofgrade with masking
I cut a number of these, some to give away, and I also wanted to compare the proofgrade maple to the birch ply I had sitting around. @jacobturner I still owe you an unmasked stargate. I havent forgotten!
Zenyattas
The one on the right I did first. I peeled off the masking. it lost some wow. Had to make another one…
The one on the left had the lighter end darkened a bit to bring out the pill shaped objects more. I also left the masking on because it was whiter than the maple underneath. I want to try another one soon with the proofgrade, but covered with a thin layer of white paint first to see if it is the same effect. Paint layer thickness will have to be monitored closely. Engraving on multiple layers of colored paint could be REALLY COOL. Looking forward to that experiment.
top zenyatta was on cedar. Going to revisit this with a 50% gray at some point. I really like cedar.
The 4 Avatars
Top left: maple proofgrade medium darkness setting, ended up too light
Bottom left: maple proofgrade dark setting. ended up too dark
bottom right: 1/4" MDF. great for consistent tone. GF cut through in 1 pass too. I almost cried tears of joy at seeing that. Impossible on my k40. I might try the forest engrave on some MDF to see if it comes out better
top right: 1/8 proofgrade with some changes in illustrator to get color better. faster engrave to take off less material.turned out pretty good.
Chaotica
Thought it would look cool. wasnt disappointed[/details]
Is it just me, or is there also some banding in the darker stargate, more noticeable if you look at it sideways? Maybe something with the darkness of the image & contrast in the engrave? (I say this with zero laser experiments and enough Photoshop knowledge to be dangerous)
Here’s a photo where they’re turned to be in the direction they were engraved in. Engravings go bottom to top on the GF. The earth symbol and top chevron are the center and direct tops of the stargate when engraving.
The one on the left has smoke stains on the left because it had no masking. the vent fan is on that side and pulled smoke from cuts and engraves over that section on its way out of the GF. One reason why its good to cut first if you arent using masking (as long as the cut goes all the way through)
@takitus Thanks for sharing all this! I am super excited to cut a few Star Gates. I love seeing the Engraves. Great work putting the Glowforge through its paces.
It’s the nature of lasers & material interaction in general, but we have some tricks in the hopper to make the Glowforge perform better in the long term.
Ive noticed the banding/power drops are generally in the areas with more to engrave/deeper engraves. In the proofgrade stargate you can see the banding caused by power drops from having to deep engrave the chevrons. The engrave between seems to suffer. It is almost if there is a set amount of power available for X amount of distance, and if its being used too rapidly, the tube/psu doesnt have enough time to recuperate in order to maintain necessary power for what is coming up.
I can set up a test to measure this. It should also change if speed and power are lowered and maybe even disappear to some extent.
Its 3 in the morning though… gonna crash for the night
thank you for this cool opportunity btw! fun times
That’s actually pretty cool looking! Could you post a dedicated shot of that one? It looks like you could make some cool light or fan grills with a technique like that if you could do something similar with a rigid material. Or make the foam rigid somehow (add some kind of chemical to it maybe?).
Okay, I have to say that when I saw this photo it reminded me of the displays you see on the websites of high-end laser makers to show off the advanced capabilities of their lasers. Fantastic!