I am using a FLAT Mexican Beach pebble Stone to put my pets name on that died. 4 simple letters…JACK…nothing else. The stone is about 1.5 inches and I took out the tray. Even after I use my PREMIUM account to add the text and place it on the stone, the program says "There is no Artwork in the printing AREA!!! Even when I can clearly see it placed??? This is so frustrating!!!Does anyone know why it wont print or what I possibly MAY be doing wrong? HHEELLPP!!!
If the design overlaps the available space even a little, none of it will cut. This is a feature not a bug as you would hate to engrave all but a bit of your design, If that gray border touches your design anywhere that is where you will have to move it away from that.
1 Like
You might need to raise your rock up just a little bit more. 1.5" would be the minimum height with the crumb tray removed.
It will say “no artwork” if you haven’t entered any settings.
5 Likes
Put the rock directly under the camera. Select Unspecified Material. Choose engraving settings. Use the set focus tool. Place text. If this doesn’t work, please share a screenshot of your interface, material and settings along with the error message.
1 Like
Thank you…I see you are so helpful through the community! Even though I got my Glowforge in November and I did print a couple of things then…I am really just getting started and trying to learn…at this point I feel there is a huge learning curve…hopefully that feeling will subside as my frustrations lessen!
I am going to try again for the 4th time…I think my settings were in and I got that message but I am going to try it again and I will post results after.
THANKS!
If it still doesn’t work, a screenshot may help clarify what’s going on.
3 Likes
Have you gone through the first prints tutorials? Just mentioning it since you admit you are just getting started. If not, I highly recommended going through the tutorials, even a few times. There are many basics of the Glowforge it will help you learn.
2 Likes
Thanks Chris.
Tried it again. Put the tray in and although the rock is 1 1/2" at its thickest point, I cant put in anymore than .5 in I did reset the focus however…it was the first time it was highlighted and allowed me to do that (or to refresh bed image). Is that the server/program or do I have a defective machine?
lol…or am I defective? 
Also, once I did that everything seemed to work…that is until it started printing and nothing happened. I think speed is custom set @ 750 and the power @ 40
The rock is too tall to put on the tray, and just a tad too short to be engraved on the bottom of the machine. Prop it up on a piece of 1/4" material and then try using the Set Focus tool on it to get the correct height setting.
3 Likes
Also, for engraving on a rock you should probably use full power. I doubt 40 will make a mark on it.
3 Likes
With the honeycomb tray in place, you cannot engrave anything thicker than 1/2".
1 Like
Hello there @screamingcocka2 - I’m sorry to hear you’re having this trouble.
Lots of great suggestions from the community here to try and help with your issue, especially @geek2nurse’s points about making sure you’ve raised your material up to the appropriate height if you’re printing without the crumb tray in.
I extracted the logs from your printer and also see that the printer is having some occasional trouble focusing, and I’d like to check on area of the printer and snag a photo.
Could you clean, inspect, and share a photo of the bottom of your printer head like the one I’ve shared below?

We’ll follow up with next steps once we’ve received the photo, and let us know if raising up the material helps as well!
1 Like
Yes…I read it when I first got the printer…thanks
Hello @screamingcocka2, its been a few days since we heard from you, so I wanted to check in. Were you able to complete your print?
My colleague Mike noticed that your Glowforge is having occasional trouble with focusing. Would you mind posting a photo of the bottom of your printer head, like the example he provided, so that we can look into that for you? Thank you!
1 Like
I have been working…I can work on getting that now.
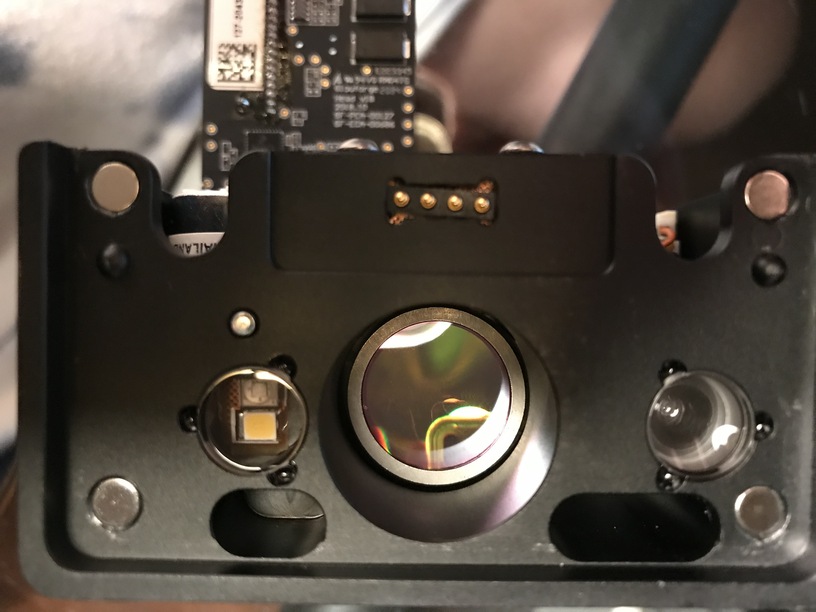
I have the printer head back in place but did not want to use until I had heard back from you…have you had a chance to look at the picture I took?
Hi @screamingcocka2, thank you for posting the photo of your printer head. Everything on the head looks as expected. In order to tell whether of not your Glowforge is still having focus trouble, I’d like to have you run the test print I included below.
Please let me know once the print is complete and I’ll extract the logs to see if there is any issue. Please let me know if you have any questions. Thank you!
Gift of Good Measure Test Print
- Turn on your Glowforge
- Place Proofgrade Draftboard in the bed and load the Gift of Good Measure design. If you don’t have Draftboard, you can use a different piece of Proofgrade material.
- Print the Gift of Good measure using the default settings. Allow the print to finish.
- When the print finishes, leave the lid closed and wait until the fans stop and the picture of the bed updates.
I have tried with a piece of Prooofgrade
Draftboard that I have used that has still usable good areas. I also realize that since it is a measuring device that the scale is locked…But, why can I not move the the Print image anywhere on the material? That doesn’t seem correct because if I were printing multiples I would have to place them…confused!
Also I cant refresh the bed or focus because those two options are greyed out…why is that?
Thanks