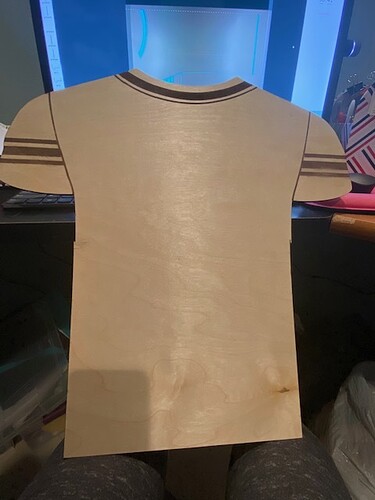
Hi everyone. I am new to the Glowforge family. I was super excited to start making something. I had this awesome idea of making a football jersey for my daughter’s best friend but I have to admit, I am disappointed. The glowforge was never able to align it right and I tried like 3 times then I clicked on aligning it manually and well I aligned it wrong so now what suppose to be an awesome jersey now looks awful! What a waste of perfectly good wood, lol. The weird thing is too that it cut the left side perfectly but the other side it did not cut all the way thru. I found this strange. So not only did the bottom half is way off the right side is not even cut right. Not sure what I did wrong. jersey 2|640x480
Ugh! I tried a second time and it came out worse. It looks perfect on the screen but way off on the actual wood. I feel lied to. I saw a marketing video and it seemed so easy and friendly lol. This is too hard.
HI,
I had the Same problem at first. what i did was played around with the settings to make sure it cut all the way through on all spots on the bed. I recommend you testing the wood and save the settings. as for a backup i write them down on my test pieces.
i also put some small pieces of wood under the right side of the crumb tray and made sure it was level. ever since i havent had a problem cutting anything.
i hope this help
Also,
if you want to make sure that your design has printed out completely, run a second pass before removing from the glow-forge. that should help with the alignment issues.
Are you using the passthrough software? The laser wouldn’t lift up like that on a straight line, hence my confusion.
If you’re trying to manually line up two cuts you’re definitely going to want to run the Camera Calibration first. The camera can be off up to 1/4" per factory specs, but the calibration gets most folks sub-millimeter.
If you’re using the pass-through software I sadly can’t help. I have a Basic so never learned that, but other’s will be along who know it well!
I’m sorry for the trouble when trying out a Pro Passthrough print. If you’re trying to align the print manually, @deirdrebeth’s suggestion bout running the Camera Recalibrator is a great idea!
For using the Pro Passthrough software, something which might help would be to include a few more design features for the system to use when aligning. On prints which don’t have many lines or distinct visual features, it might help to draw a few unique symbols on your material near the area where you expect to split your design, such as a square, heart, star etc. When the Pro Passthrough feature aligns the next section of the print, it looks for unique features on the material to match where the next cut should be placed.
Will you please let me know if this helps with your project?
Thank you all for your comments. I hadn’t responded because I was away. I am back now and ready to start making new things. I will definitely do all those suggestions. Thanks a bunch
Thank you for the update. I just wanted to check in and see if Ivan’s suggestions worked for you.
Could you please let me know if you are still having any trouble with your Passthrough prints?
Honestly, I have not tried it yet. I am kinda scared.
Do you happen to have a shorter or smaller Pro Passthrough project you could use as a test? Trying another print with the suggestions we shared earlier will let us check the logs if it doesn’t run correctly and then follow up with next steps.
Okay let me try something
Araceli 
Thank you for taking the time to work through an additional test print! Please let us know how it goes 
It worked!! Thank you for the tips.
Thank you for the update. It’s great to hear that it worked! I’m going to close this thread. If you run into trouble again, or have other questions, please post a new topic here on the forum or email us at support@glowforge.com. We’ll be happy to help!
