So I picked up my machine yesterday and set it up today. I didn’t really have any ideas ready and waiting so I sat down at 8 pm to see if I could come up with something.
I want to show some leather items in the gallery where I display my photography. I want to emboss a logo on the work so I wanted to try that but I didn’t want to just stamp a piece of leather. My night went something like this.
8 pm
• Look up and purchase Three33Designs.com and a couple of others.
• Search DaFont for an interesting design. Pick a stupidly narrow font.
• Load up AI setup the text. Realize the font’s kerning was all but non-existent. Hand kern the letters.
• Search internet for inspiration. Ooh, a bookmark. That’s easy enough.
• Move outlines to PS and add some outer glow to add structure to the stamp.
• Back to AI to add a cut box and off to the GF.
• Create the cut lines for the bookmark. Well that’s boring.
• Search for some free vector designs and add them to the bookmark. The embossing stamp was a bit on the big side so there wasn’t room for much.
• Send job off to GF.
• No clue what I’m doing so I moisten the bookmark with a wet paper towel and clamp the acrylic stamp to it with a block of wood and some c-clamps.
• Go back inside and look up “how to emboss leather.”
By 11:30 I had this:
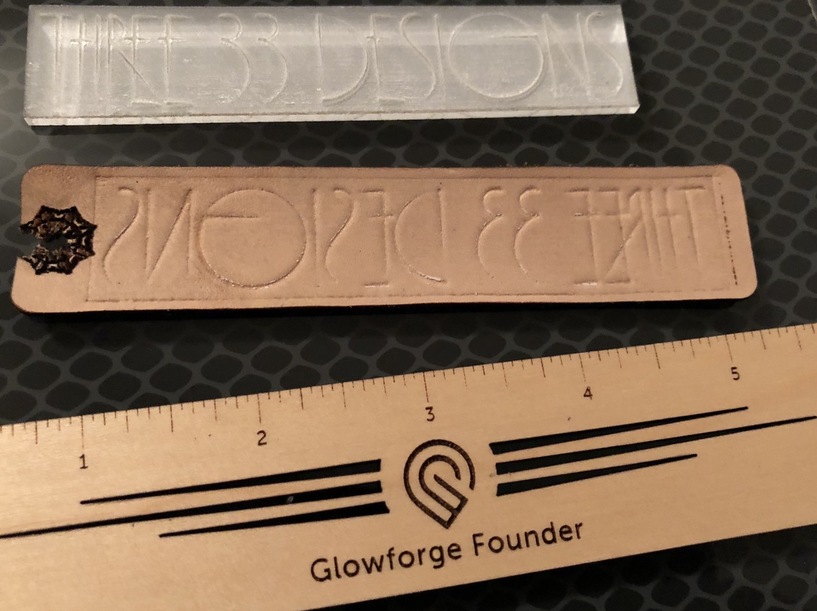
Much better than expected. Particularly with the fine lines.
Issues:
I made a rookie mistake and forgot to mirror the stamp.
I also was a bit too aggressive with the masking and tore the ribbon hole.
The full PG engrave power may be a bit much for the thin leather. Likewise, the medium grey at the other end did next to nothing and barely got through the masking.
The default settings worked well on the acrylic engrave. For a leather stamp I would ultimately go for a deeper cut. Either two passes or up the power. I knew I would have an issue with the stamp edges but I wasn’t worried about that for this test.
The next challenge is to get some things done for First Friday (this week) and the holidays.
Not a bad three and a half hours to start. ![]()

 I had wanted to use the Three33 mark for another project and was pleased to find Three33designs available. The concept of actually having a GF was so distant that I didn’t do any planning ahead. Just a jumble of ideas I wanted to try. Now I really need to get serious.
