I’ve been told several times in the last year that what I’m experiencing is not possible. Well I got some proof. I just finished cutting the base to something I’ve been working on, it has not been taken out of the glow forge or modified in any way since it finished it’s cuts.
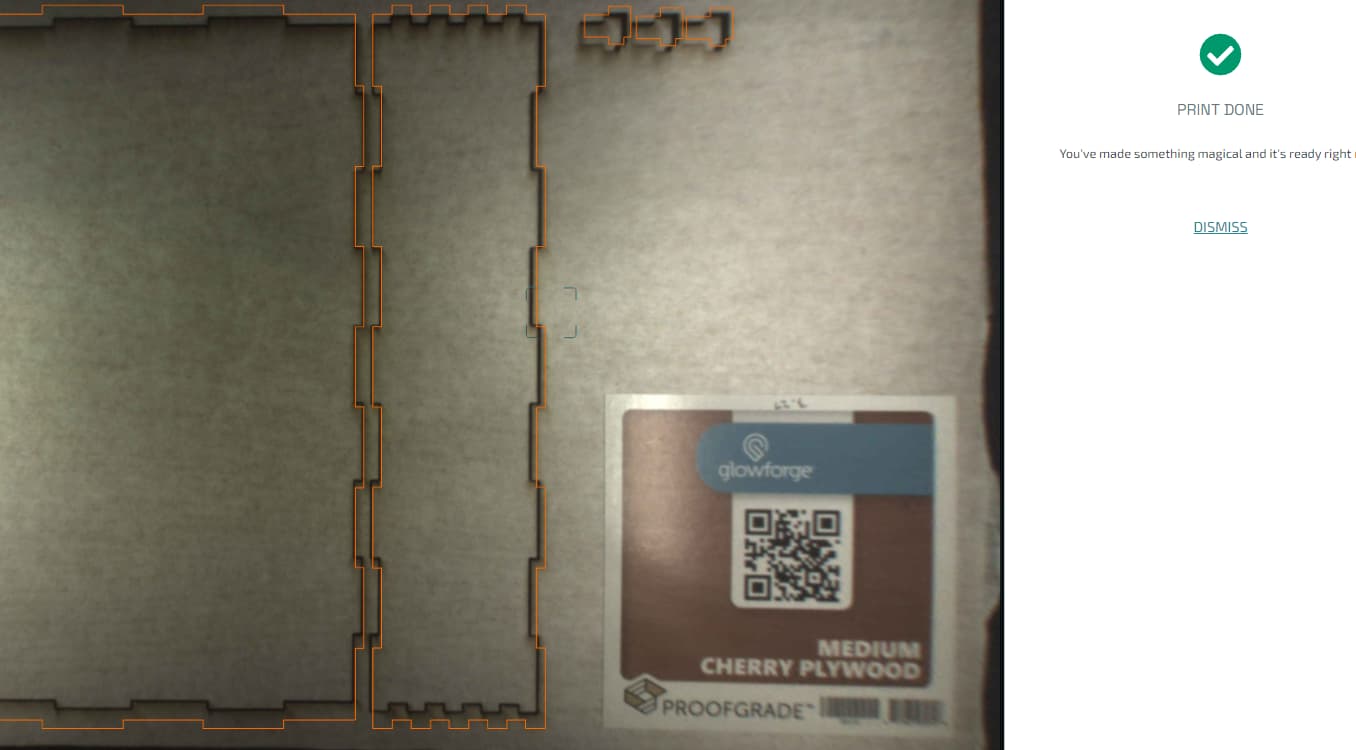
I’ve been told that if the proofgrade or any other material has not been moved, i should be able to set it up again to do the same cut with no issue. However as shown here, when it’s done the pattern is skewed and will never match the currant cuts again. This first came up when I had my first run in with proofgrade not cutting all the way though, and then on several other occasions when I was running into the same issue.
The camera focused again once you lifted the lid, which is why the lines don’t match up. If you don’t move the material and use the same focus as the first cut you will be able to cut the same path again. However, if you change the focus distance or move the material it will not match up. Just ask the many people who use jigs.
If you are attempting to report a problem specific to your machine you will need a lot more documentation.
Actually, you didn’t state that. The point stands, though, regardless of if you lifted the lid. The camera refocused as soon as it finished the cut, but it will also refocus if the lid is lifted.
Don’t move anything and use the same focus and you can repeat the job. If you ran the same job again, set up exactly the same way, the new cut lines will fall right on top of the current lines from the previous cutting. The preview has only shifted because the focus has changed. Once the focus is set to the same way it was before the cut will be the same.
This is the way everyone’s Glowforge has always operated.
Have to agree with @ben1, your screenshot looks totally normal to my GF’s behavior.
It doesn’t look perfect in camera, but it if I actually ran a cut again it always lands in the exact same spot as previously.
That issue became evident to those of us who had pre-release machines. We had to figure that out just like you are doing now. Ben gave a good description of what’s happening.
What you see is what it cuts only if the camera has run a set focus, and then only if the machine is properly calibrated. However what gets cut is based on actually fixed numbers rather that the image you see. If you have the material fixed and not moving, and see that the size and location when you highlight the design that it is the same numbers, it will cut those same lines even though the design looks like it is not in the same place.
The machine will always cut by the numbers no matter where the image sits. The tricky bit that needs set focus etc. is to get the image to line up with those numbers so you can see where the numbers will fall, the numbers themselves is all the machine deals with.
If you have a fixed place on the crumb tray that you know the real numbers you can set the cut by those numbers even though the image is not even close.
The only purpose of the lid camera is to center the head at power-up, and then approximate material placement. The machine will print in exactly the same location time-after-time. It plays no role in the “set focus” process, that is done by the camera in the head, although the image sent back to the UI is adjusted based on the result of that.
Run a quick test. Place a shape in the corner of the cuttable area. Lock the material down, cut the shape, remove the shape, and look at your display. It should show the offset in your original image. Recut the same shape. Does the laser follow the same path and only hit the honeycomb? Does the original shape fit back in (modulo kerf?). This should be proof either way.
The camera is not an input to the movement system.
The camera is not an input to the movement system.
The camera is not an input to the movement system.
Internalize that and the advice you’re getting might start making sense to you.
If your “base to something” is at position (5,10) on the art board, the print head is going to move to position (5,10) and start cutting. If you hit print again, and the design is still at (5,10), the print head is going to move to (5,10) again and start cutting. Moving the print head 5 units to the right and 10 units down is going to put it in the same place every time. It will cut right over the lines it made the last time it cut.
The camera image is not telling the print head where to move, the placement on the art board is. You can tape over the lid camera after the startup sequence and your Glowforge will work like this, predictably. It doesn’t need the lid camera for anything after startup.
The comments above explain how to prove this to yourself. It will not involve looking at or sharing pictures of the camera image.
I routinely run non-proofgrade jobs and then pop open the lid to check to make sure my cuts went all the way through (using a dental pick to confirm the cutouts can be moved a little, signifying they are no longer attached). If the cuts didn’t go through all the way, I shut the lid and run the exact same job again. There have been some cases where I had to do this 3x, even.
Always works perfectly because…
As stated, the camera doesn’t control the positioning system. At power up the printer centers using the camera, and once that reference point is determined, all subsequent operations are executed relative to the stored reference point. As long as the printer doesn’t re-center, your cuts are guaranteed to remain aligned irrespective of the view you get in the GFUI.
Also worth noting, the camera is attached to the lid, and every time you open and close the lid the camera lands in a slightly different place because there is nothing that guarantees the lid closes exactly the same way each time it’s opened. The camera is very close to the surface it’s imaging, and it uses a very wide angle (=fisheye) lens to be able to see the entire print bed. The image has to be “de-pin-cushioned” to remove the significant amount of distortion that’s present in the captured image. The geometry of that transformation means that the further away from center, the greater the amount of error/misregistration. A tiny shift in the position of the closed top cover can result in fairly large displacements at the edges of the image. Normal, and unavoidable.
The camera can only be reliably used for rough approximations of position.
I also, have had a few kiss through cuts that didn’t make it all the way through when doing non-pf BB with a Catan design. Checked it all with a dental pick making certain nothing moved. Closed and reran without touching anything. The outline was off as it always is. Re-cut exactly where it was supposed to.
Glowforge is very accurate, the user is not always so much. As noted above I have had occasion to have to spend as much as an hour or more to get that accuracy, as it did with the example posted, but once my placement was right, the Glowforge was as accurate as needed. If I had used a 3.5" wide piece of material I would not have had to be so careful.
We are agreeing in concept here, just not the words. For me, GF accuracy would be the ability to place a design exactly using the camera. The GF specs call out a 0.25" capability here, but most of us achieve better than that. If you have to “spend an hour or more to get that accuracy”, then you don’t have accuracy in my definition. What you have is precision - the ability to repeatedly place a design in the same location, even though that is not the location shown in the camera.
The key is repeatable accuracy. If you put a large bit of scrap so the piece is against the right side and the front face and then place a rectangle design with the lower right corner at 19.5, 10.75 with the rest just getting the rest of the scrap and cut there then when you place the part not cut there it will always be close to accurate. If you want more certain accuracy, you can fix the crumb tray with more certainty as is noted elsewhere. I have never had that issue as it will fall to exactly the same place if not stressed to move (YEMV)
Then you can accurately place the corner of any material, in that corner and know the number location of that corner. When using a full sheet I place the crumb tray pins in the lowest available opening and that accomplishes the same thing.