I did it upside down. Picture side on the bed. Then inverted the puzzle in AI.
2 Likes
I would laminate the photo with something like this, before applying masking to the front. Or if you don’t like glossy I believe there are matte laminating materials available. That should seal the photo and make it possible to remove the masking after cutting.
5 Likes
Or you could apply a thin coat of Mod Podge, (either gloss or matte), and let it dry. It would be wipeable, and will seal the picture off from the smoke residue.
Gives a nice finish too. (Decoupage)
13 Likes
Besides the other recommendations you could do a sacrificial layer of something like 1/8" or 1/16" plywood on top and adjust the power/speed accordingly. The cuts you care about will be inside the sandwich along with the photo.
7 Likes
I’m doing one this week actuall for a friend. But is an actual photo print (b&w) that my son did in the darkroom. Luckily he has a few fails I can use to test
1 Like
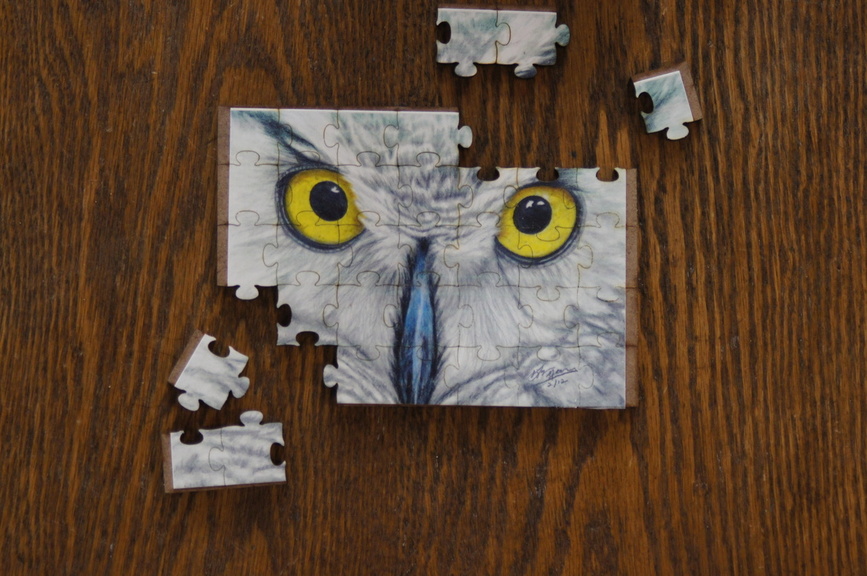
OK. This is almost acceptable. Probably would benefit further with a few process changes. I used one of my wife’s drawings that was inkjet printed on glossy photo paper. Used spray contact adhesive to put it on MDF. Sprayed Polyurethane over the photo to protect the print. After the poly dried I put masking material over the photo. (The poly keeps the masking from pulling the ink off the paper when you are peeling it) Placed the photo in the laser face down and cut the puzzle pieces. Obviously I didn’t size the puzzle correctly. Couldn’t see the photo for position and guessed incorrectly. Either way, there is still some edge discoloration but not too bad.
39 Likes
Pray share when done.
Love this. I plan to make all sorts of puzzles. Face down seems to be the current good practice.
Anybody care to overlay something on a photo face up? Like a ‘hard mask’. That might also help with smoke & give a cleaner cut(?)
1 Like
Looks good to me ! With the poly-spray, doesn’t that minor discoloration wipe off 9maybe with a dab of goo-gone?). Still cannot believe your wife’s artwork !! amazing. 
1 Like
Didn’t notice any discoloration with the brand of Poly spray I used. Not home right now so can’t look at the name/type.
Oh. You meant the smoke. Didn’t try real hard because was a little worried about wetting the MDF and the photo curling up. It was an interim test for the pic. Will get serious later.
1 Like
I wonder if a different type of wood would generate less smoke or soot?
Has anybody tried balsa?
Now that REALLY came out nice!
2 Likes
I think this looks great!
Thanks. I think MDF is probably the worst choice of backing. It throws up an incredible amount of smoke and sticky residue. (Maybe pine might be worse with the sap). This was just a test. One of us will eventually want to make picture puzzles as a real project, spending the time to work out process and best material.
4 Likes
I’ll have to find some thicker chipboard that is like a normal jigsaw puzzle backing. It cuts so well. I have a desk blotter calendar that is pretty thick, but would have to do two layers glued up. Spent some time with the Inkscape puzzle generator last night.
Here is one that is just slightly smaller than the usable bed area.

17 Likes
I am unable to see the SVG file in my browser. So I saved it off and tried to open it in Inkscape. Got an error that says it was in an old Inkscape format at 90px/inch and did I want to re-scale it to 96px/inch or change the viewbox. Just an FYI that the format might be a problem. I was able to load it after the rescaling.
I find that some of marmak3261’s SVGs are not viewable in MS Edge browser, but are viewable in IE.
can’t see it in Safari right now either… Big white blank…
Apologies. I made this in an older version of Inkscape that had the puzzle extension on it. I’ll fix it and repost and make the lines a bit thicker and darker too.
How is it now?
1 Like
It shows up now, using Safari.