Why, after taking all the time, setting focus, and then hitting print, the Glowforge jumps and does not start where it shows it is set? It is like it backs up, regroups, shrinks the surface that you see, and moves the print over.
This is happening on non certified and proof grade materials. I have checked the level and it is level. I have cleaned the eyes, ears, nose and mouth. (LOL).
Thanks!
Leanne
I know it has to be something simple, but for the life of me, cannot figure out why.
It can be confusing, but what happens is that the unadjusted preview on the screen pops back immediately after the job is run, so it “looks” like the print changed size and shifted. You can ignore that because it has absolutely nothing to do with where the job prints.
If the actual results on the material turn out the way you want them to, you know it’s working correctly. But in fact, the only time the view and the print will match up is immediately after you hit the Set Focus button and do your placement, and before you hit Print. Otherwise, the fisheye effect comes into play. It has to zero itself out for the next run.
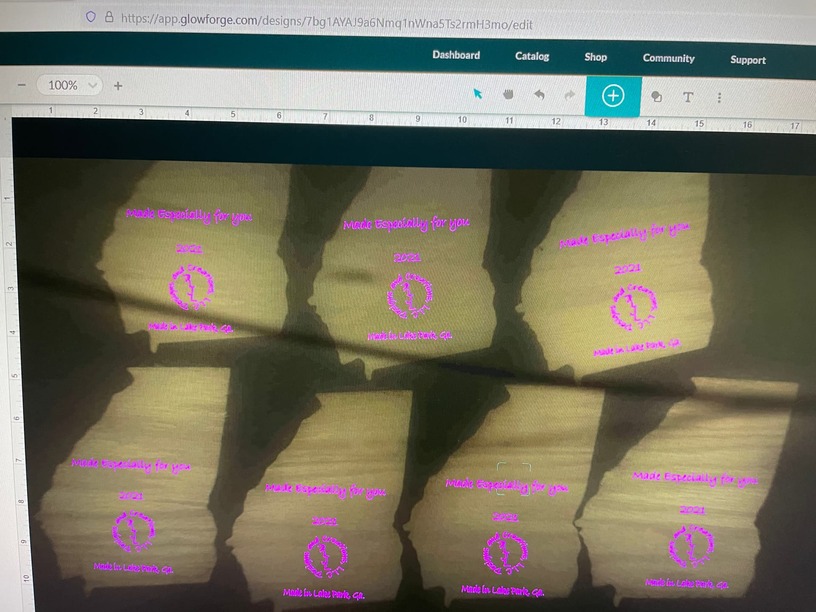
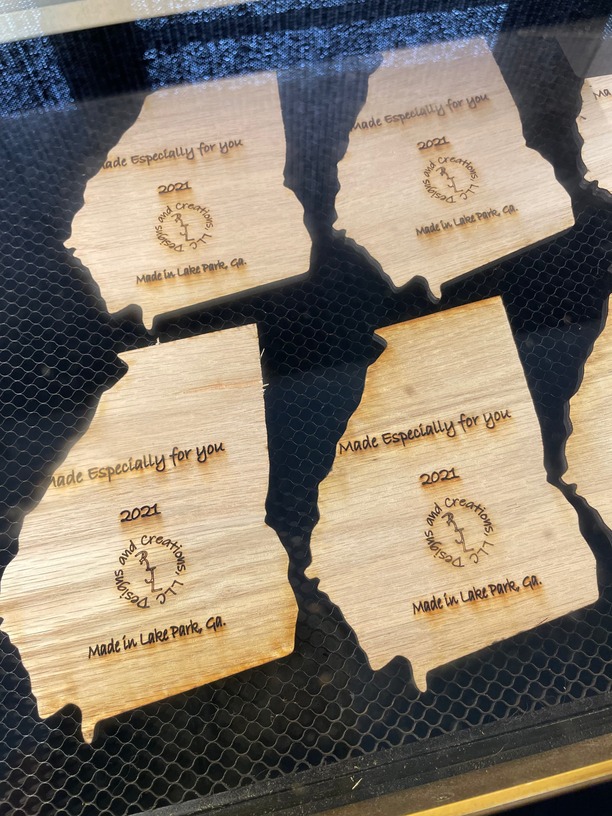
Thanks, but the actual print is jumping. I marked the board with an ‘x’ for center, then centered my design. When it actually printers, it had ‘jumped’ off the ‘x’ by a good 1/4”
Can you share a screenshot of a completed print so that it is possible to see the set focus mark, the design placement and the final cut? It is also helpful to know what material is being used and if this happens on every single file.
There are two small circular windows on the bottom of the Print head that I believe have something to do with taking the measurement for height…if those are dirty, you might be getting a bad measurement and that gives an incorrect view of the spot where you are trying to center on the X.
Just check those and make sure those are clean too…I always overlook them but they need a wipe once in a while.
The other thing to watch if you are cutting out something next to an open area is that the red targeting laser actually lands on the material, and doesn’t fall off into a hole somewhere. (Working on a board with cuts already in it can cause that issue if you are placing the design too close to a cut out area.)
How is your camera alignment on a regular basis? Have you completed the lid camera calibration? For placement of text on irregular blanks such as these, a jig would be your best bet, or doing them one at a time directly under the camera. Also, did you utilize auto focus or manually input the height?
Its not as much that its ‘jumping’. Up until you print a lot of the purpose of the app is helping the user. So you are setting focus one by one on each item but do you only mentally care about the item you are set focused on at that time? After you set up one item and focus on another, the item you had just focused on will look off, but its not actually. So when you set focus are you paying any mind to the other items on the screen that will suddenly look off focus?
The reason why it “jump” on the app once you click print is that it is going to refocus and adjust. But if you set up all items correctly, then it wont effect it.
This is a good project for a carboard jig until you get the alignment thing figured out. Tape a piece of cardboard to the crumbtray and cut your state outline with the graphic you want to engrave ignored at first. Then pop the state in the cutout and run the engrave. Or do that with multiple state cutouts. But it is frustrating to think you should be able to engrave where the image is. Mine is spot on all the time, but I use set focus and have a well-calibrated machine.
Oh no, I’m sorry to hear about the trouble @ennael.
For us to determine the next best steps, could you run a test print for us? The design we use has some known dimensions built into it and it will help me extract logs afterward to take a closer look.
Here are the steps for the test:
Turn off your Glowforge.
Check for small pieces of debris or dust.
Check the lower door to make sure it closes all the way. It may require some force to open, but open it, wipe any dust off the edges, and close it all the way.
Remove the tray and clean any dust or debris from the surface underneath. Pay careful attention to remove all debris from the four dimples where the tray rests.
Check the lid to make sure it closes all the way. Small particles of material, such as dust or debris, can prevent it from closing completely.
Check the surface your Glowforge is on to make sure it’s flat. Ensure it is not twisted slightly and that there is no debris propping up one side of the machine.
Turn your Glowforge back on.
Place Proofgrade material in the part of the of the bed that you are having the most trouble and print the Gift of Good Measure using the default settings.
When the print finishes, leave the lid closed and wait until the fans stop and the picture updates. Without moving your artwork or your material, take a screenshot of the Workspace to show us the difference between the artwork placement and the actual print placement. Make sure to include the rulers in your screenshot and show as much of the bed as possible.
Mac: Press Shift-Command-4 and click and drag a box around your image. You’ll find the screenshot file saved on your desktop.
Windows: Click on the Start Menu and type “snipping tool”. Open the Snipping Tool > New then click and drag a box around your image. Click the Save icon and name and save your file.
Send us the screenshot along with the date and time of the print, and we’ll investigate.
I think you deserve to get good, reliable results from your Glowforge and not have nice cutting boards ruined. I know it is frustrating, but I think it is worth figuring out the problem so that you can stop wasting material.
The reason I asked about set focus, is that I can’t see the focus mark. In my photo, I used the set focus tool and then placed the circle. You can clearly see where I focused the camera, but I can’t see that in your photo. There are number of us in the forum that would like to help you get this sorted out, and if it is a machine problem, Glowforge support can get it fixed.
Thank you for sending over that photo @ennael. To help us better understand the trouble, could you tell me the thickness of the board you’re printing on?
Next, did you get a chance to perform that test print in my last response? That design has some known dimensions built into it and it will help me extract logs afterward to take a closer look. When you perform the print, let me know the date and time and I’ll take a look!