So, new to Glowforge, and have been trying to do some cut outs, but having issues with turning a graphic into an outline to be cutout. The GF always says I am unable to cut a bitmap, only engrave, even when I edit the file in Inkscape and save it as an SVG or PDF. I managed once to take a completely black shape, the shape of a steer for instance, and somehow created an outline of it in Inkscape, however the outline was very think, which caused the GF to make multiple cuts as it cut both sides of the thick line.
I was simply trying to make cut out templates for some woodworking projects of things like a steer, a flag, a star, etc. Anything that wasn’t already a shape available in the GF library. What I would like to do is pull a graphic down, let’s say a Longhorn Steer, then turn it into an outline that the GF would cut out as a shape. For the life of me I cannot find instructions for doing something like this in inkscape or Gimp. I can find how to engrave, or cut simple shapes, but not take an image and turn it into an outline.
I have searched the knowledge base and found a few articles that seemed like they might have the answer, but they either referred to other tools (like illustrator), or the final answer was shared via a DM and not in the thread, etc. I’m sure this is really a lack of experience with tools like Inkscape, which at first glance looks pretty complicated to me. Anyone willing to point this newbie in the right direction?
There is a command in Inkscape Path ->Trace Bitmap that will put a vector around the graphic. There are many settings that have different effects and you will have to experiment to find what you like for what you want.
So, thing #1: SVG and PDF are just “container” files. Putting a graphic into one of them doesn’t make it into a vector image.
Thing #2: There are two types of graphics. Rasters, aka bitmaps, are made of dots. Those can only be engraved. Vectors are made of lines. Vector graphics can be cut, scored, or engraved.
Thing #3: You should take some time to go through the tutorials that were linked on the screen when you finished your Glowforge setup. They’ll teach you things like this and save you a lot of confusion and frustration. You can find them over here.
Thing #4: The Glowforge interface ignores the thickness of lines. Your cut and scored lines will be the width of the laser, no more, no matter how thick your line was. What happened was you somehow “expanded” the line in your design software, which gives you two lines that follow the outline of your original line. That’s why you got two cuts, not because the line was thick.
I don’t use Inkscape or Gimp, so I can’t help with particulars, but there are a ton of good tutorials over in the Glowforge Tips and Tricks section, and I’m confident you can find something there that will help you find your way.
Thanks for the responses @geek2nurse and @rbtdanforth, most of this is new to me, I have little experience with graphics programs. Those are very helpful definitions! I’ll keep that in my toolbox as I continue to play with the tools.
I have been through all the beginner tutorials that I could find but doesn’t appear any of them address converting an existing raster into a vector - but at least I do understand now that the container doesn’t necessarily matter (picking up the lingo already ). That was really puzzling me, but now I can turn my attention elsewhere. Definitely a lot of good stuff about engraving pictures (which I did some cool experimenting with) and cutting out basic shapes (which I was able to use to do things already found in vector format).
I did stumble upon the Trace Bitmap function looking through the Inkscape tutorials later after my post. It’s tough to find what you are looking for when you don’t know what you are looking for (you don’t know what you don’t know, you know), but understanding a little more about the terminology helped me track that down.
According to the tutorial I unearthed, appears the way I did it previously creates what looks to be a very thick line, but is actually translated as a line inside another line, with fill, thus why it looks like a single line when I upload to GF but GF is seeing it as two lines and cutting both. I’m not sure yet how to prevent that, as its a one step process, and I’m not doing anything to expand the line, which is where I was getting stuck previously. There are a number of options within that function that are not explained in tutorial however, so very well could be one of those.
I did manage to create a very clean looking vector by inverting it, making the inside of the image white, but the background black. I think it will actually cut out what I need, but I’m convinced it’s not the correct way to do it as it also cuts out the frame around the image as well. Oh well, I am getting closer at least.
If anyone has experience with this and has any good hints, would love to hear them!
The fastest and easiest way I know to create a clean outline in Inkscape is to first use a raster editing app (I use Gimp) to “fill” the whitespace around the design with a bold color - I usually use red (#ff0000). If the design has “holes” along the edges, you can undo, fill those gaps with a small brush, and try again. This allows you to also “fill” inside areas that would also need to be cut, such as the open space inside of the curve of an arm, for example.
Then in Inkscape, you can trace on that color only, producing a single, clean path.
Depending on the nature of the design, you can then use the Outset function to “expand” the path around the original shape. There are several options to allow you to tune the results, all are well documented in the Inkscape documentation portal.
That is interesting, I was using Inkscape and outset when I wanted to engrave a band but that second engrave was a huge time eater so I started putting them in Gimp. Gimp has a vector that it calls a path, but I have not found a way to export it as an Svg. (It does import an svg and can turn the vectors into paths)
Gimp will also put a path around a mask and you can even edit that path though it is much more clumsy at it than Inkscape, but is great for fixing masks as it goes both ways ( mask>path>new or saved mask) and from paths you can even Boolean masks! You can also run a line or a tool along a path like erase, or blend etc, and if the path is an edge of a mask it will only do the half inside. It will also do a line along that path (half on the inside) and as you can offset the mask and subtract the path mask and create new paths there are all sorts of games that can be played,
By using layers you can even export multiple images. I routinely export a colored Jpg, a colored Png, and a grayscale Png for Inkscape, as well as saving the Gimp xcf with all that information, You will often see two color variations of the same design in my avatar which atm is all I am able to do with them till I can figure out how to paint an engraved earring or Christmas ornament.
Isn’t this situation exactly what the Create Outlines tool in the Glowforge premium trial was created for? You could give that a try until you get some Inkscape training under your belt.
It depends on how you save the raster out of your bitmap program. If you save it as a png with transparent background, after having deleted all background pixels other than what you want to keep (using the eraser tool or whatever is useful), you will get the correct outline.
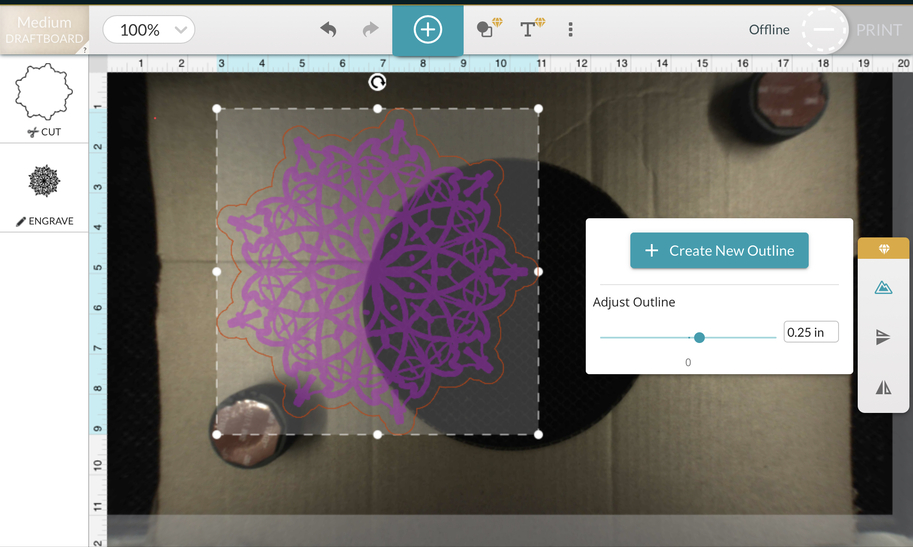
In the following example, I saved this mandala out of Amazegraph on my IPad as a png with transparency, and the expected outline was generated:
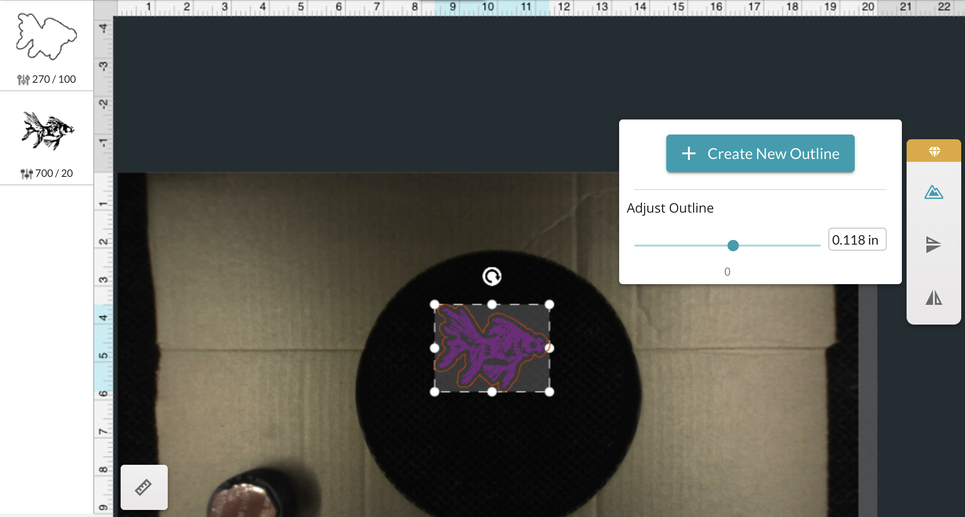
The UI outline feature works nicely with most “normal” bitmap/raster images with a design surrounded by whitespace, it doesn’t need to be a PNG with transparency. The images below are just JPG from the interwebs. It will be a paid feature in the future, however, so I prefer to teach people to fish for themselves…
Yes, thanks @cynd11 , I did see this but was getting some wonky outputs with it. Probably just a matter of cleaning of the original image to remove artifacts not apparent to the naked eye, as you mentioned in your other post below on deleting all the background pixels. Thanks for the pointers!
That is where the settings in the second tab come in. Of the three settings the first defaults to 2 and I often put in 30, the second defaults to 1 and any less makes a mess, the third maxes out at 5 and I often go there and there are two radio buttons below that I turn on.
On the first page, the first choice goes from 0 to 100. zero will be all white and 100 will be all black, but around 96 or so the line will fall on the png cutoff point that us usually the point you want.