I can look it up but I thought I would throw it out here first, just in case someone has done this in the past. I want to be able to place a base with an LED onto a metal plate and have it light up. The plate would be supplying the power to the base. I then want to be able to place more bases on the plate and have them light up. Is this possible? Or do I have to make circuits with contacts in specific spots on the plate such that the contacts on the bottom of the base always click into the right spots? In the end I need to be able to power upwards of 24 bases at the same time.
I have a fair bit of arduino stuff at my disposal, and I could potentially buy more.
It would kind of suck to have to change 24 batteries at a time. I like the inductive idea, though it is a bit pricey. $10 per piece just for the coils is $240 minimum. I might be going with a more radiation all method where I have a board with spaces and contacts that connect each space to the piece.
What if the board were made of interwoven strips of copper tape, or aluminum tape would be a nice aesthetic. All the X-axis are connected to positive and all Y-axis connected to negative. You’d need insulators at each intersection - time consuming but cheap because you can use tape.
This gives you a checkerboard pattern of tons of contact points. You set your piece down and depending on the width of the tape used your chances of mating up the right polarity are pretty good. If not, simply scoot the piece a little bit to make contact. The LED simply will not light and will not be damaged by the reverse voltage as long as the power supply for the grid (3 volts or 5 volts most likely) does not exceed the reverse voltage limit for the LED.
Questions:
Do you want them color changeable?
Do you want it 1d or 2d (a line or a grid)?
Are you okay with having pre designated spot where you can place the base?
If you use two metal plates, then you would complete the circuit, as long as each unit spanned the dividing line between plates. Each unit would need two contacts underneath. Wouldn’t cause any damage if they don’t span the two plates (it just won’t turn on).
You might be able to simplify by using strips just in one direction, alternating positive and negative. It would be less time to set up and easier to control and avoid shorting the two together since they are not weaving in and out of each other.
Maybe instead of strips of conductive tape, you could use thin gauge NiChrome wire or even the conductive thread from adafruit, which might be a nicer aesthetic.
If you ran a third contact strip you could make that a signal from an Arduino running a NeoPixel library and make the pieces change color. If the signal strips were wired in “parallel” to each other all the pieces would be the same color. If that signal strip wove continuously through the grid but had a break in the line at each piece, and the piece closed the break, then each piece becomes an independently addressable pixel, so you have each one being a different color.
Or embed the LED’s into the base instead and make the pieces clear so the light transmits through them when placed into the grid.
Another possibility might be to get two metal plates, one perforated, one solid. Then an insulating sleeve on one of the contacts sticking down and a little jiggering each time you set a base down so the the conact with the sleeve goes through a hole. (This is basically how one of those kids’ toys lets you put LEDs down on a surface to make light-up art, only more industrial.)
That’s interesting. This is for a game, and I would need the pieces to be two different colors. I considered using colored transparent acrylic and just white LEDs, but it would be really cool if I could use clear acrylic and had the LEDs change color.
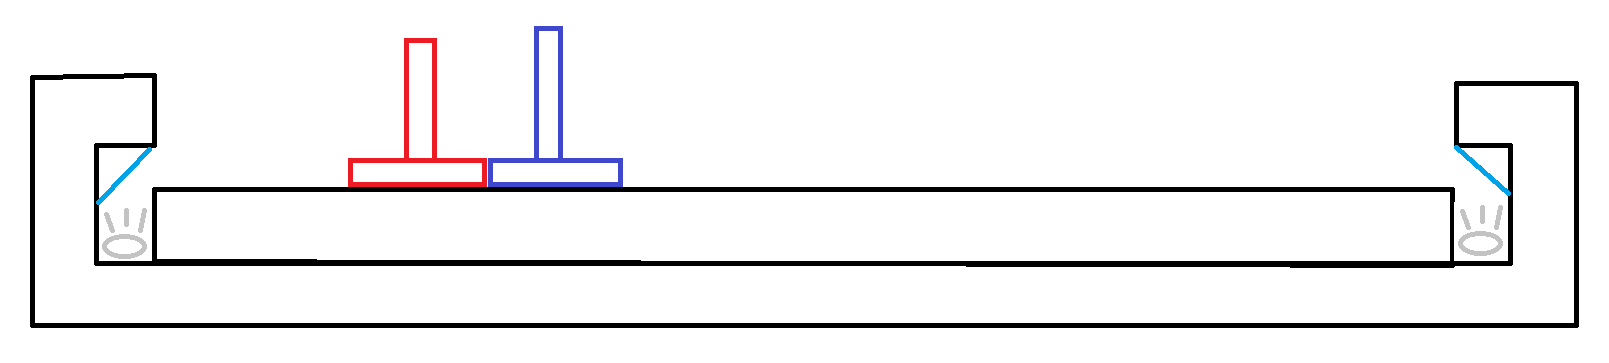
First, I apologize for using Paint, but I wanted to bang this out quick. Basically, inset LEDs that direct up at a mirror which redirects the light into the base of the playing pieces. This would be all the way around the play area, so light could get to the pieces from any direction. But, I’m liking having the LEDs embedded in the pieces instead and trying to just get power to them as you set them onto the board.
Just be sure the contacts on the bottom of the bases are smaller than the gaps between the strips so that things don’t short.
Also, if you put two LEDs per base in parallel but opposite polarities then you don’t have to worry about the polarity of the strips when you put the base down on the plate.