So I got my glowforge… and of course have done little else over the last two days than cut things with light beams.
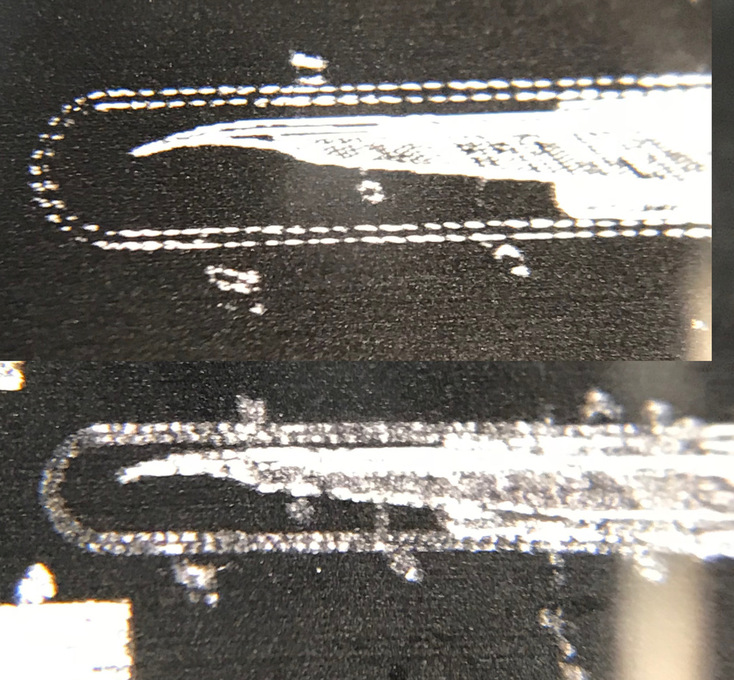
One thing I noticed though - Nominally, the forge engraves at a maximum of 1355 LPI. One of the things I made was a business card design which I had previously engraved on a Trotec Speedy 300 with - if I remember correctly - 600 LPI. Have a look at the attached image: It seems to me that the compared to the - excuse the pun - laser-sharp Trotec engrave at the top, the glowforge’s looks like a soupy mess at more than twice the resolution. Source file is the same, as is the material - 1mm black anodised aluminium. Am I doing something wrong here?
The precision of the motion control system exceeds the precision that you can focus and contain the energy of a CO2 laser.
That is, the dot made by the laser isn’t infinitely small and it isn’t perfectly crisp. Plus the material conducts some energy into the surrounding material.
So at resolutions exceeding around 300lpi, you’re getting some line overlap. Meaning that if you don’t reduce the power somewhat, higher lpis will just burn away some of the detail you were trying to keep.
…in that case I’d wonder why they put in the higher resolutions at all, unless it’s all just “Look how high we can go!”
Further experiments with 450 and 675 LPI at various powers show absolutely no improvement, if anything there’s even less discernible detail. I’ll keep trying a bit, but I must say, I am a bit disappointed…
“zooms” would have been my first choice, but I thought it could be mistaken for magnification settings. And as my extended family is Irish and therefore catholic, “pews” have a different meaning as well…
Definitely a big difference! Good question, @palmercr.
Here are some musings:
DPI = LPI * 2
or
LPI = DPI / 2
This image is 921x515 pixels. The formulas above tell us that there is a big difference between 600 and 1355 LPI; 600 LPI and 1355 LPI effectively translate to 1200 DPI and 2710 DPI. The image LPI when scaling down to the size you are is about 1200 DPI.
How much that matters, I’m not sure… some testing between input resolution and output resolution would be interesting. How images are interpreted – are they upsampled to meet LPI selection? Are they sent as is? Is a 1200 DPI image that is embedded in an SVG the same file interpreted for engraving?
The other thing I would consider is the method of engraving/marking? Are you using the convert to dots method, or vary power? The same methodology/approach for both systems? I wonder if one default setting is better than the other here? There’s a lot of data in that file beyond black and white; it’s not just black and white. In fact, I believe it uses a full 255 shades. You can see data across the entire histogram (and also, obviously see different shades in the screenshot)
Here’s a look at the histogram… those pixels are going to be interpreted somehow - whether it’s dots or lower power hits from the laser.
Thanks, @jbmanning5, that’s a very good point. The Trotec software (JobControl) has several more options for dithering, among others “Stucki”, “Floyd-Steinberg”, and “Black&White” (@dan - one for the hopper?) and - one that would also be very handy for engraving aluminium or acrylic - an option for “invert” (@dan again? )
I used the b&w-option, so the grays are probably ignored. A bit of fiddling with the image should give me the same effect, if my reasoning holds water. I’ll let you know the results once I’m back home and shooting lasers again.
Incidentially: Does anybody know which dithering algorithm GF uses for “convert to dots”?
I think it uses Floyd-Steinberg because that used to be what it was called in the GFUI until they dumbed it down more by removing all technical details.
Kind of makes you want a “Professional mode”, doesn’t it… Again - coming back to Trotec JobControl: That one has three settings: “Simple”, “Advanced” and “Expert”, where “Simple” is something like the GF with PG, just tell it which material you have and if you want to cut, score or engrave. Expert on the other end has all the options, like turning air assist on/off for certain passes, zips, pews and LPI, engraving direction (top-bottom or bottom-top) and a load of others that I’d like to see on GF as well…
I concur with Floyd Steinburg, or a derivative of it.
Not sure what software you have access to but in Photoshop, the quickest way (off the top of my head) is Image > Mode > indexed. Select Local (Selective) palette and change that black and white. You can adjust the threshold there for whether the gray value is determined to be black or white.

 )
)