This jig helps give consistent positioning for two pieces cut in immediate succession.
(I say immediate succession because the coordinate system can change, if Glowforge recalibrates, or the crumb tray is jostled, etc.)
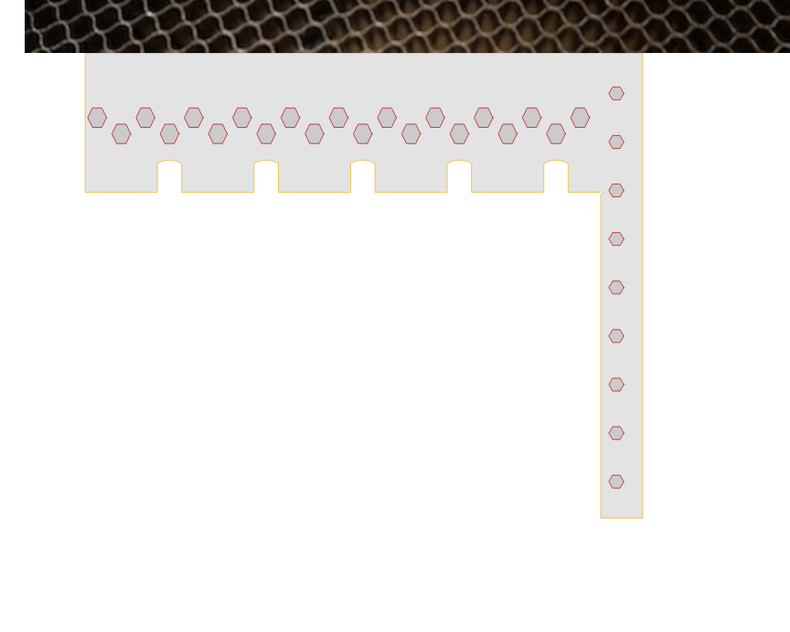
The narrow arm is designed to be wedged snugly against the left edge of the crumb tray, while remaining slightly outside the cutting area. Its holes are aligned with the honeycomb. (Note, my honeycomb may not be exactly the same as yours. Glowforge evolves.)
The wide arm has larger holes because the rows of the honeycomb crumb tray aren’t exactly at right angles to the columns!
The concavities at the bottom of the wide arm are to allow you to pin down your workpiece.
I made mine with medium acrylic. It’s meant to be cut upside-down.
Show old version
Alt-click on the below image and “Save As…” :

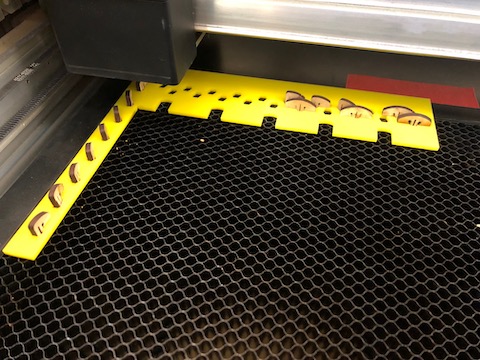
UPDATED VERSION: To handle workpieces with edges not perfectly straight, or not perfectly at right angles — for example, pages of heavy card stock, which usually aren’t perfectly cut — the updated version only touches the workpiece at three points. Another advantage is that it no longer depends on the arms being at perfect right angles. It only depends on being very firmly fixed down.
I find this a huge improvement: precision near 0.001". (I was able to remove and replace a piece of card stock and make a second cut, finding the second cut to be within 0.001" (2.5µm) of its expected position relative to the first cut, 4 times out of 5.)
Alt-click on the below image and “Save As…”

54 Likes
Your on it tonight.
I have a stack of jigs for the glowforge several inches deep yet I feel compelled to try this one!?
9 Likes
This would pair nicely with @timjedwards ’s tray boots that keep the tray consistently positioned! I’ll try to remember to come back and insert a link to them when I’m on my computer instead of my phone.
9 Likes
I am cutting this soon. Thank you so much for this helpful design.
8 Likes
Yes, I’m now combining the tray boots with these sticky dots. Super stable. As far as I can tell, the slight thickness of the sticky dots makes no practical difference.
7 Likes
 Thanks… note, I forgot to mention that not everybody’s honeycomb will be the same. You might have to realign the holes.
6 Likes
Thanks for the great share!
5 Likes
What a great idea! Thanks for sharing!
3 Likes
If you look carefully you can trace a row of holes in the crumb tray. I suspect that most will be aligned. When I want such alignment I put a few head pins in along such a line

4 Likes
I tried something similar to that other approach of just sticking pins in the honeycomb, but couldn’t make my version stable enough to get the precision I wanted. And then I discovered my honeycomb is slightly warped; the rows and columns aren’t exactly at right angles.
3 Likes
I frequently find myself cutting 3"tall parts in a hair over3" wide wood that is 12 or 18" long. Under that circumstance getting the angle exactly right is really important. I have indeed spent as much as three hours going back and forth getting the angle right, but the reason I do the basic bottomline as described, as it does make a good foundation, A few tiles against the front door works as well but cuts off the maximum “Y” value available.
3 Likes
thanks, i’ll give that some thought.
1 Like
Do you have the file available or am i just missing something? Ive been thinking about a solution for this very problem.
Thx. DJ
Just right click on this, below the photo;
and save as…
4 Likes