I love design but I don’t much care for assembly. Why should you have to deal with glue when your Glowforge can make the fasteners for you?
I did some experimenting with serrated edges on tabs, and the results have been terrific. Proofgrade plywood is very consistent in thickness, so when using it, you can reliably depend on a design with serrated tabs to go together with a few taps from a rubber mallet.
I’ve printed a single serrated design from Proofgrade maple, cherry, walnut, and I think Draftboard too. Every one went together perfectly.
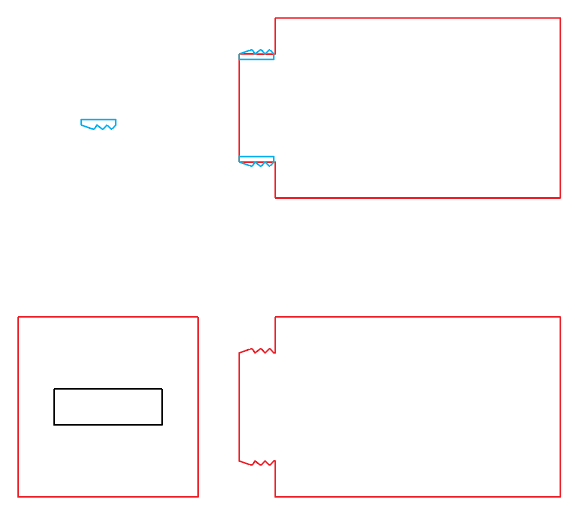
The trick is taking a little serration (shown here in blue top-left) and adding it to every protrusion. Steps:
Create a tab and a slot that are the same size
Add the serration and its mirror image to both sides of the tab
Align the serration so the gentle slope points towards the direction of insertion, and the midpoint of the serration is on the edge of the tab (see picture top-right)
Use the “union” or similar tool to join it into one single shape
The serration is 0.033 inches tall, which means it protrudes 0.0165". The kerf should be about 0.008, so imagine the hills smashing down into the valleys to fill up the kerf. It holds very tightly, but can be forced apart with pliers if needed.
As I recall, for Inkscape you have to turn the drawn shapes into a path first before you can combine it with anything else…Path > Object to Path. Then select both and Path > Union.
I tried that. Selected each of the three objects individually and Path > Object to Path. Then selected all three objects and then Path > Union. I still have three separate objects.
One way that happens is if one or more of the objects isn’t a bare path. Be sure none of your objects are groups or shapes like rectangles/ellipses. You can usually select all three and look at the bottom of the screen and it’ll tell you what you have like “3 paths selected” or “3 objects selected of type group, rectangle, path”. If you’re 100% sure they are all paths and none of them are groups (sometimes you’ll have a group of one object, so you really do have to verify it), then the path actions should work even when unioning 3 paths at once.
Also, as a last caveat: some path actions don’t work on more than 2 paths at a time, but union should.
Yup all three are groups. Ungroup them, (control-shift-g). You’ll see it’s STILL a group in there, ungroup again. Now you’ll see there’s 2 paths and a “object” (rectangle). Convert to path. Then try path->union.
Voila!
This is a really good object lesson on getting your svgs from sketchy sources Whenever you get a file from somewhere you need to inspect pretty closely for weirdness. You’ll often find broken paths, or misaligned nodes or other gotchas like grouping.
For really difficult deep-grouped files (groups of groups of groups of groups… ), there is a deep ungrouping extension as well. You can tell it how many layers to ungroup and it’ll unwind the entire mess. This one isn’t too bad, only 2 levels of groups on 3 objects, but it’s something to keep in your back pocket for when you need it.
I had been using this concept successfully and really loving it, until the last experiments.
I was trying a stained glass look with acrylics and using a wooden frame.
It seemed to really help with a no glue press fit, but then I noticed it was straining the wood and causing cracks. Sometimes right away, sometimes the next day.
Tried a few placement changes and finally abandoned this and went for a tighter kerf standardization. (yikes mathz)
.
Fact is that the wood will give but the acrylic will not, therefore the wood loses any pushing contest.
If it was all acrylic it may have worked better.


 Whenever you get a file from somewhere you need to inspect pretty closely for weirdness. You’ll often find broken paths, or misaligned nodes or other gotchas like grouping.