I’ve tried everything and still nothing!
1 Like
It will help if you define “everything” and “nothing.”
EDIT: Never mind. I see you’ve already opened other cases about this. Since I don’t know which case you’re actually looking at, I’ll just ignore them all. Good luck though!
Posting in this section opens a support ticket, so it is helpful if you can supply detailed information to help them with troubleshooting your problem. 
Sorry I opened another thread and thought it was connected somehow. My set focus doesn’t work. I’ve cleaned the lenses. Tried proof grade and non proof grade material. I’ve refreshed my browser. I’ve turned on the machine on and off. It was working great then for the last week nothing.
I apologize for the trouble you’ve been experiencing utilizing Set Focus. I’ve extracted the log files from your Glowforge to review your most recent attempts, and compared it with all of the details you’ve sent over. Based on the logs, I’d like to take a look at two specific connections on your Glowforge.
Could you please do the following?
- Turn off your Glowforge.
- Holding only the finished black surfaces, grasp the printer head as shown. Pull gently up and back to disengage the magnets and remove the head.

- There is a small tab in the center of the wire ribbon. Push down fully on the tab to release it, and gently pull the wire ribbon plug from the printer head.
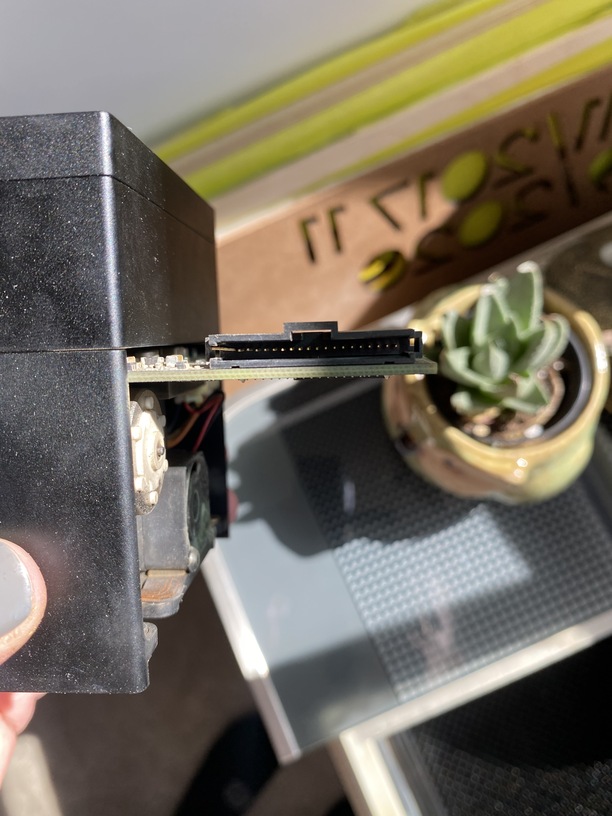
- Take a clear photo of the gold pins inside the printer head where you just unplugged the wire ribbon. It should look like this.
- Pick up the printer head and wire ribbon. Make sure the tab on the wire ribbon is facing up. Slide the ribbon back into the head until it clicks.
- As shown, lower the printer head over the metal plate so that it rests next to the two round posts. Then push it gently away from you – you’ll feel a “click” as magnets pull the printer head until it sits snugly atop the metal plate.
- Pull the laser arm all the way forward.
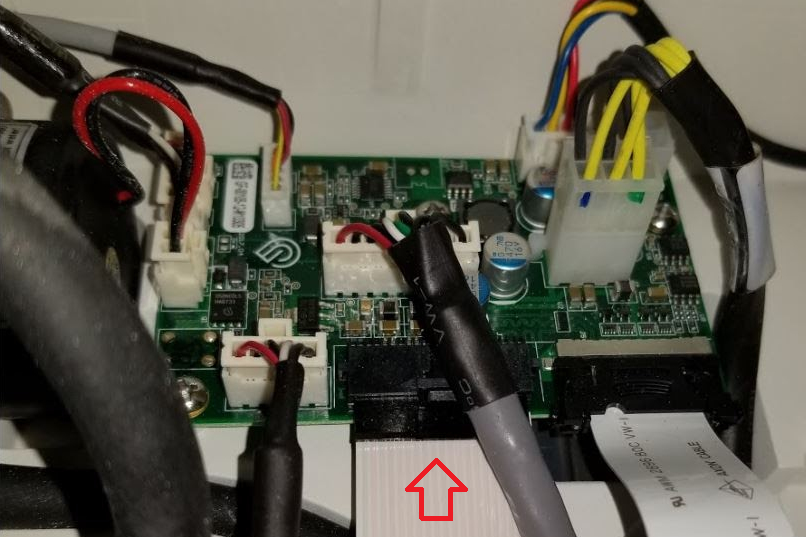
- Reach over the laser arm, and to the left of the inside of the unit and you’ll see this circuit board:
- Take a photo of the circuit board. If the cable I’ve indicated above with the red arrow appears to be loose, please reconnect it and try printing again. This cable should ‘click’ back into place.
- Turn your Glowforge back on.
- Send us the photos you took in step 4 and step 9.


Once we can review these two photos, we’ll send over the next best steps.
Hi @elisa.silverio1. It’s been a while since we’ve seen any activity on this thread, and wanted to check in to see if you’re still running into any trouble with the Set Focus function. Feel free to send back any photos of the requests from Marc’s last response and we’ll be happy to take a look. Thank you!
Yep its still not working. Ive been waiting to hear back.
Hi @elisa.silverio1. I’m sorry that you’ve been waiting to hear back and having still trouble getting Set Focus to run for prints on your Glowforge. Unfortunately, I wasn’t able to see any response or open email support tickets after Marc’s last response. However, if you could post any of the requested photos, we’ll be happy to take a look and decide any next best steps to take.
I’ve included the steps to get the requested photos and connections checked, and let me know if you have any trouble completing anything . Thank you!
Could you please do the following?
- Turn off your Glowforge.
- Holding only the finished black surfaces, grasp the printer head as shown. Pull gently up and back to disengage the magnets and remove the head.
- There is a small tab in the center of the wire ribbon. Push down fully on the tab to release it, and gently pull the wire ribbon plug from the printer head.
4. Take a clear photo of the gold pins inside the printer head where you just unplugged the wire ribbon. It should look like this.
5. Pick up the printer head and wire ribbon. Make sure the tab on the wire ribbon is facing up. Slide the ribbon back into the head until it clicks.
6. As shown, lower the printer head over the metal plate so that it rests next to the two round posts. Then push it gently away from you – you’ll feel a “click” as magnets pull the printer head until it sits snugly atop the metal plate.
7. Pull the laser arm all the way forward.
8. Reach over the laser arm, and to the left of the inside of the unit and you’ll see this circuit board:
9. Take a photo of the circuit board. If the cable I’ve indicated above with the red arrow appears to be loose, please reconnect it and try printing again. This cable should ‘click’ back into place.
10. Turn your Glowforge back on.
11. Send us the photos you took in step 4 and step 9.
Hi Brandon,
Thanks for the response! As I was taking the necessary pics for you. I realized that one of the pins look out of place? Is that correct???
| Brandon.B Staff
March 6 |
- | - |
Hi @elisa.silverio1. I’m sorry that you’ve been waiting to hear back and having still trouble getting Set Focus to run for prints on your Glowforge. Unfortunately, I wasn’t able to see any response or open email support tickets after Marc’s last response. However, if you could post any of the requested photos, we’ll be happy to take a look and decide any next best steps to take.
I’ve included the steps to get the requested photos and connections checked, and let me know if you have any trouble completing anything . Thank you!
Could you please do the following?
- Turn off your Glowforge.
- Holding only the finished black surfaces, grasp the printer head as shown. Pull gently up and back to disengage the magnets and remove the head.
- There is a small tab in the center of the wire ribbon. Push down fully on the tab to release it, and gently pull the wire ribbon plug from the printer head.
4. Take a clear photo of the gold pins inside the printer head where you just unplugged the wire ribbon. It should look like this.
5. Pick up the printer head and wire ribbon. Make sure the tab on the wire ribbon is facing up. Slide the ribbon back into the head until it clicks.
6. As shown, lower the printer head over the metal plate so that it rests next to the two round posts. Then push it gently away from you – you’ll feel a “click” as magnets pull the printer head until it sits snugly atop the metal plate.
7. Pull the laser arm all the way forward.
8. Reach over the laser arm, and to the left of the inside of the unit and you’ll see this circuit board:
9. Take a photo of the circuit board. If the cable I’ve indicated above with the red arrow appears to be loose, please reconnect it and try printing again. This cable should ‘click’ back into place.
10. Turn your Glowforge back on.
11. Send us the photos you took in step 4 and step 9.
Brandon needs you to post a photo of it before he can say for sure. ![]()
Thank you for working through the instructions my colleague Brandon provided. I’m so sorry to hear that one of the pins appears to be bent on the far left side.
I’d like to see if it is possible to try and bend this pin gently back into place, and then reconnect the white ribbon cable. Could you try this out, and let us know how it goes?
We’ll follow up with the next best steps.
1 Like
I did that! And it looks like it’s working. Thank you so much!
Elisa Silverio
I’m glad you resolved it! I’m going to close this thread. If you run into any other trouble, please start a new topic, or email us at support@glowforge.com. We’re here to help!