Hi everyone! I have found these threads so helpful but I’m unable to find the proper settings for engraving on curved material - I can’t find anything within the forums or even from Glowforge.
Additional details: I’m attempting to engrave on 1" diameter blank wine corks. I’ve seen this done before, but I can’t seem to get it right. I’ve got my cork lined up directly under the camera, it’s secured to a custom wood plate I created, but I can’t seem to get the writing to look correct (one line of text lengthens out and is distorted) AND it starts to burn in certain areas. Arg!
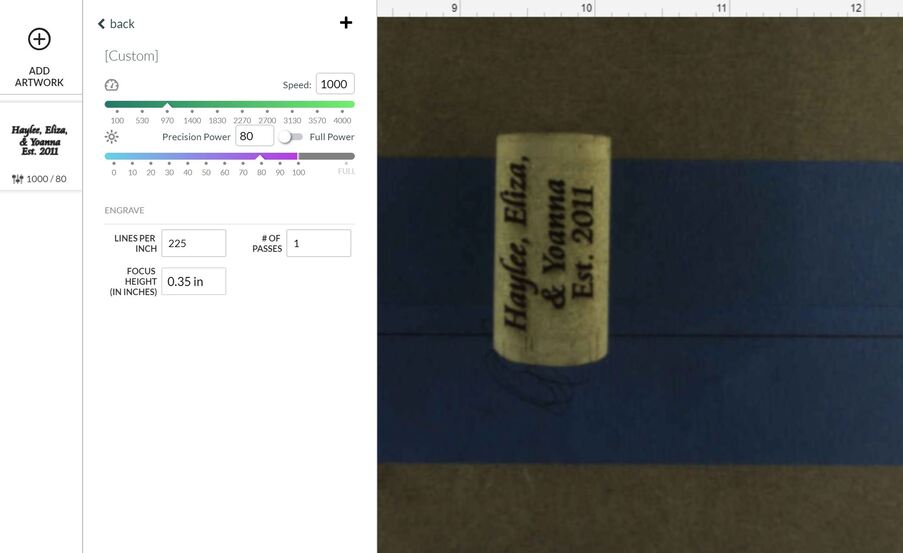
Hi Anselm, I think I’ve eliminated most of the issues with one of the lines of text stretching out when going around the curve of the cork, but here’s a picture of my latest settings and the placement. I have the cork right under the lens, but in the future, I want to be able to cut more than just one at a time.
You may want to search on cork in the Beyond the Manual section of the forum. I have never engraved it, but from what I’ve read it is, we’ll say, quirky.
The width of the laser beam varies along its length, it should be hour glass shaped, where the two halves of the hour glass are cones. Therefore, when engraving on a curved surface the width of the laser beam is different depending on how close the material is to the head of the glowforge. This can lead to your engraving being distorted.
To do more than one at a time you’ll need to create a jig. Search the Tips and Tricks section for details. Basically, you’ll create a rectangle that is the height and diameter of the cork. Place your text inside said rectangle. Place cardboard, or some other cheap material in the glowforge and cut out all the rectangles. DO NOT MOVE THE CARDBOARD JIG. Remove the cutouts and insert your corks. Now set the rectangles to ignore and engrave your corks. Repeat as necessary. Once the cardboard is moved, you have to cut a new jig.
cool, even that by itself looks really good. I personally have yet to engrave anything that curved or that small, but you have 2 options. you can set different settings for each line of text adjusting possibly both the power and focus (you’d have to set a different color for each line). Or you could run each line separately then rotate the cork the be aligned at the top.
I imagine the first option, in the long run will be easier, but if done right, I imagine the second option could be more accurate if done right, how to do that right, well, I remember seeing a post about someone using a jig that rotates their object to a specific angel.
I engraved a couple of lines on a curved aluminum flashlight barrel. I engraved one line, “rolled” the flashlight a bit, then engraved the next line. It was fiddly, but it worked. For this project, I suggest engraving the names in one print and then doing the date separate. Also, I think your power is a little higher than necessary.
Thanks Everyone! Burn is starting to go away. I’m going to take the advice you all gave me and create a jig. Once the jig is created, will I need to set the focus every time or is it better to let it auto focus? Right now, no matter which one I choose to go with, my artwork or the bed image shifts…
You need to use set focus for a non-uniform material.
In theory, the machine will find a point that corresponds to your artwork and set focus from that automatically, but with irregular shapes, it can sometimes miss. Manually using set focus will always focus exactly where you tell it to.
As long as you don’t move anything in the GFUI, it will cut/engrave in the exact same spot the next time.
At one time I was under the impression this only held true if your artboard was set to 12x20", but that may not be true now (or then.) All my projects are set to that size though.