I came across this backwards… I saw a review of his on the inexpensive low-wattage Banggood engravers first, and after digging in his older videos came across this gem.
He describes a simple way to make rings out of wood veneer, and he cuts inlays by hand and super-glues powdered brass in place. But who wants to cut inlays by hand when you have an engraving Glowforge with auto-focus?!
So my setup is pretty straight forward.
-A bit that I can accept sockets so I could fit that into my drill.
-A socket set that had at least an inch of flat space on each piece. I actually ended up buying 2. One imperial and one metric because there are slight size differences
-I got a set of ring sizers from Michaels.
-The thicker ‘Gel’ gorilla glue brand super glue I found was best.
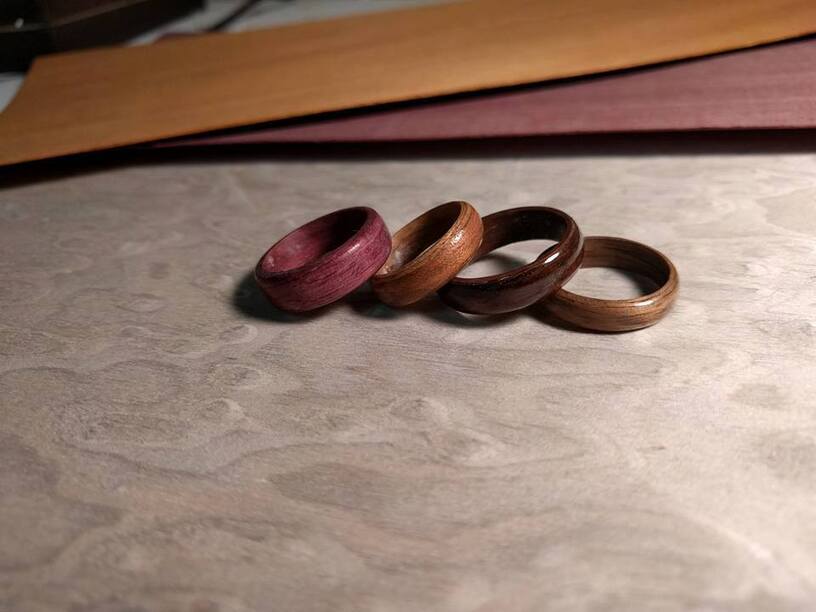
-The wood veneers I bought in packs from Lee Valley. Get thin stuff with good flex to it to make your life easier. Avoid super hard woods like ebony. That stuff just cracks and I was only able to make one ring that worked well using it.
-Lots of sandpaper
-Scotch Tape or painters tape
So my first step is the rough blanks.
I cut 1 foot by half inch strips of veneer using a straight edge.
I take those and sort them into different colors. Some I boil. Some I microwave. There are lots of methods around that you can use. I found the best was to fully immerse them in hot water and then microwave the crap out of it. Sometimes sandwiching between a bunch of sheets of wet paper towel and microwaving works too. With woods like purpleheart you want to spend as little time in the water as possible because the color leaches out of the material and you end up with something that is more purplish grey.
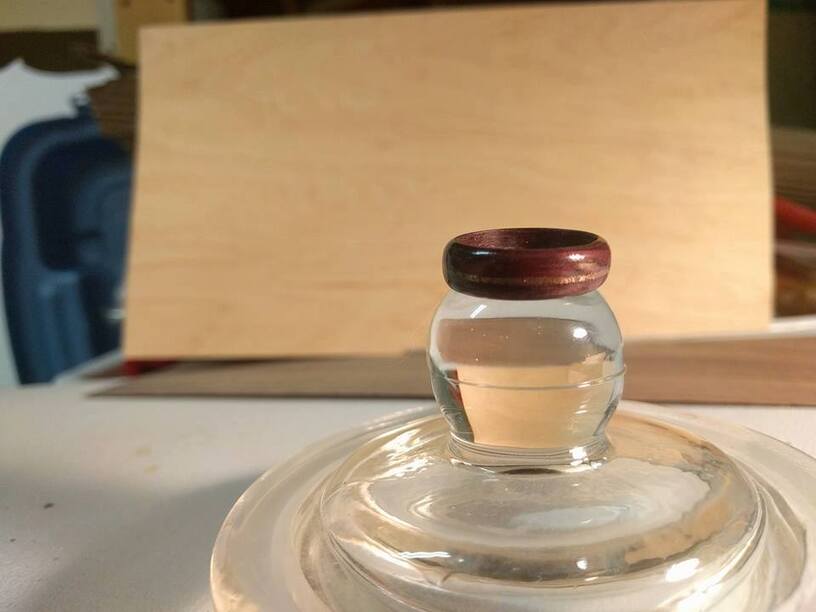
At this point you’re basically following the video. Take your strip and wrap it as tight as humanly possible around something roughly the size of the ring you want. Be prepared for some pieces to crack on you. If they are small cracks you might be able to get away with it but larger cracks its better to just throw them out and start over. Try to wrap as tight and as uniform as possible and when you’ve got it to a place you like wrap it all the way around in tape to hold it (you want to use tape that will come off easily in the next step)
Slip the taped up piece off whatever you were using to size it and leave it to dry out for a few days. I usually make a dozen or so blanks at once because an assembly line really is the best way to do these things.
When you come back you can start working on putting the ring itself together. Take off the tape.
Using your ring sizers find a socket that is as close as possible to the size you want. From practice I find its a lot better to go a half size up from your target. Wrap in painters tape so its a snug fit with your sizer.
Using sand paper take the inside edge of your curly veneer and sand it so it tapers almost flush with the next layer. The idea here is we don’t want to do a lot of finishing sanding on the inside so you want the seam to be as small as possible.
You’re going to want to wear disposable vinyl/latex gloves for the next few super glue steps… trust me with this one. You don’t want to lose as many fingerprints as I have. Replace them whenever they rip or tear. You’ll go through a lot of gloves.
Wrap once around your ring sized socket and put in a drop of glue just past where the wood meets for the first time. Hold for a few seconds.
Keep wrapping. Putting a generous dob of glue every quarter turn or so and holding it until set. You want to wrap as tight as possible because any gaps will show in the final product.
Once you have the entire thing wrapped and glued slide it off the socket and set it aside to dry. At this point if I think a section or two needs more glue I’ll place on a smooth flat metal surface and drizzle glue into the grain.
This is where the fun starts.
Slot your socket into a drill and using sand paper sand it to the size you want by slowly spinning the drill and holding the paper in place with your other hand.
I use a belt sander to hog off large sections of material because none of my rings I want to be a full half inch thick. I sand down each side, eyeballing and checking as I go to make sure things are straight. Most times I have to discard the ring at this point because I got overzealous with my sanding or I found a flaw mid wrap.
Sand sand sand until you get the shape you want using finer and finer sandpaper. I go as high as 320 grit but that might be a little excessive.
I then take and run it on a piece of leather and a piece of cloth, take it off the socket and finish up the inside of the ring the best I can with sandpaper.
At that point I put it back on the socket, put on a fresh set of gloves and put a thin coat of super glue on the whole thing. I put a good dab on my finger and spin the thing to coat. When that is dry I take if off the socket and give the inside a similar treatment by hand.
Super glue will take a shine. I run it on the leather and cloth again to try to buff it but most times I just take it, slot back on the socket and then spin the drill while giving it a coat of spray lacquer. I do a few coats, inspect for defects and then it is done!
For inlays I take a thin saw or knife and channel out the area I want. His video explains it pretty well.
On the purple and copper ring I posted above I took a thin saw, hand filed out a groove, put the saw blade in the gap and then spun until I got the depth I wanted. I then took powdered copper (I just used files on a copper pipe until I got a big pile) dropped it into the groove and dabbed with super glue to keep it in there. Then I did all of the finishing steps.
All of this is a lot of trial and error to try to get a good flow down. But in the end the rings turn out pretty great if you take care when you’re doing them
I’m thinking it might be easy and wonderful to use the Glowforge to (as suggested ) etch the ring and cut an intricate pattern from a different colored veneer. Could make for some great looking stuff.
It occurred to me that the curvature could cause fitment issues if you cut the veneer on the flat and then tried to fit it in the ring. Could this be overcome by bending the veneer over the curve of the ring when cutting? In my head it works…
Yeah, I thought about that as well. I wasn’t sure if all the manipulation to curving it would cause additional cracking though. When the time comes I plan on experimenting with engraving before rolling and after.
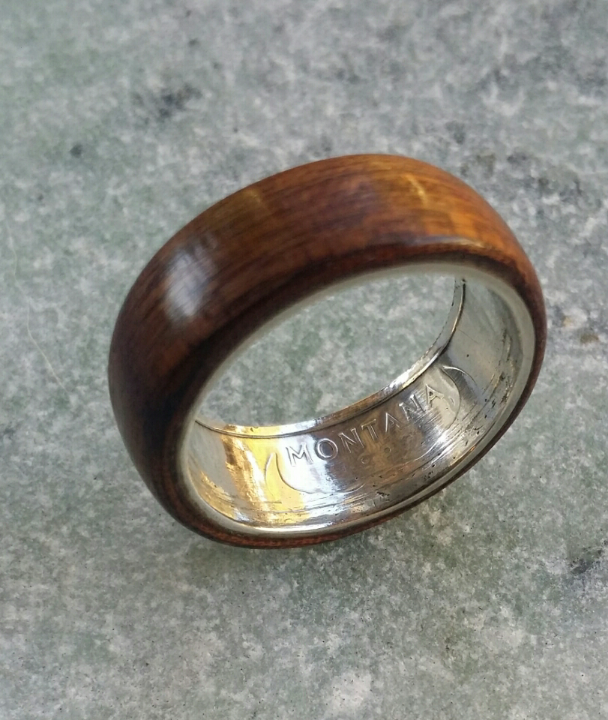
I love making wood veneer rings and with my Glowforge I hope I will be able to engrave designs for metal inlay or resin inlay. I have also wrapped wood veneer around coin rings. Makes an interesting project. This picture is wood veneer wrapped around a silver Montana State quarter ring.