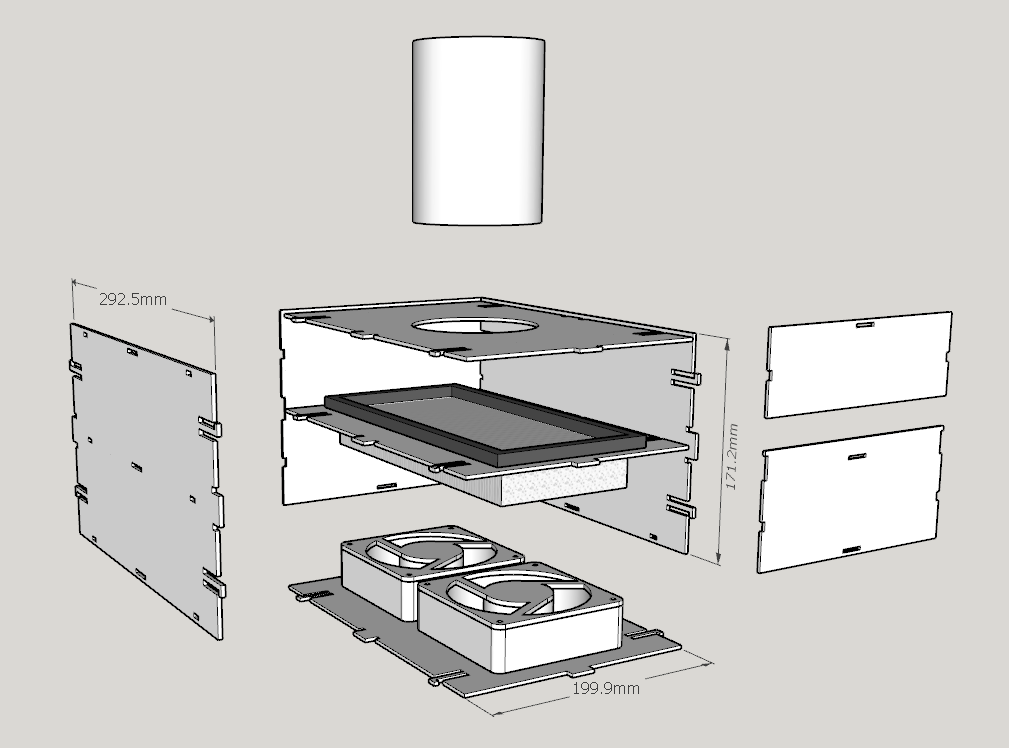
I’ve talked about this in other threads, but those were in regards to exhausting the Glowforge fumes out a window in areas such as Canada. I’ve sketched out a filter design I’d like to make for (and cut by!) the GF. The airflow comes in through the top and is forced out below. I plan on hanging this like a basket to reduce vibration noise.
For any Americans that don’t know the One True Measurement System, it’s roughly 11-1/2" x 7-7/8" x 6-3/4" tall, designed around 3mm (1/8") thick material.
Please feel free to criticize and make suggestions!
I’m wondering though, with the slots for the “snap fits” as they are, you would need to plug them to keep the exhaust contained. With that done though, how do you get to the filter to replace it?
@cbarker_iit I would recommend covering the snap-fits for the upper half chamber for sure, but elsewhere it’s not such a big deal unless it starts to whistle due to air pressure. I forgot to mention when I posted this in the middle of the night, on top of the filter I plan to place a layer of activated charcoal in a satchel for toxin removal. On the right there’s a two-half panel design so that you just have to pop off the top half for satchel and filter replacement.
I’m excited by this design! Is this something that could be used to filter air for indoor use? How much Charcoal will you need, and how do you know when it’s time to replace it? This looks much more affordable and replaceable.
@Wondergy Indoor use is the intention, for sure; as I mentioned, I’m in Canada and windows tend to be closed about 7 months of the year. How much charcoal is required is open to interpretation, but I’m allowing for about 1/2" - 1" loosely packed. Activated charcoal is cheap, you can get a few pounds for $10 off Amazon from fish/pet suppliers. There is no hard and fast rule for when to replace filters… most times, people cite a regular schedule. I’d do it ever three months. The filter I chose is from a 1990 Ford Escort and costs $7 CDN at Canadian Tire. If you buy into the whole HEPA marketing hype, a HEPA branded filter costs up to about $12. I personally don’t believe more than the basic filter is required in conjunction with activated charcoal, but I understand if others feel more cautionary.
I may may be wrong, but though that activated carbon came in different forms, each of which had different specificities for the compounds that they could absorb. Does anyone here know for sure? One form might be a lot better than another for a given offgas.
Disclaimer: I’m not a chemist. I’d be keen to hear a trained chemist’s viewpoint, but this is my understanding of the process:
The “activated” part of activated charcoal (AC) comes from the porous nature of the granules, and typically the AC has additional product added to it to increase it’s absorption of certain materials.
One of the more likely offensive off-gasses you produce from lasing is hydrogen chloride (HCl) gas, which is why it’s important to check the Material Safety Data Sheet (MSDS) before lasing in order to avoid it. Or chlorine gas in general, for that matter.
Fish don’t like chlorine, and they don’t like ammonia. Most AC used for fish tanks have additives mixed in to increase absorption of ammonia and chloramines. Chlorine will easily dissipate as a gas but is much harder to neutralize when bonded with water, because when you mix water with HCl you get hydrochloric acid. Since this is a dry system, let’s just stick to the gas.
Most commercial fish dechlorinators are based on plain sodium thiosulfate (Na2S2O3), a crystalline salt that generally comes pre-mixed with distilled water, usually in a 1% solution. Most fish charcoals coat the AC with this type of solution.
Sodium Thiosulfate basically neutralizes HCl into salt (NaCl) and sodium carbonate (aka washing soda), Na2CO3.
PS.- The Chlorine industry has an informative website at
I am in no way a chemist, but would point out that when you burn almost any complex organic compound, you are really likely to get something that is offensive to the nose/lungs/EPA. Benzine, formaldehyde, tar(s), various alcohols, and particulate matter in a wide range of sizes, and that is just what I can think of off the top of my head.
Not that it can’t (I have no idea) but if you are going to run your machine inside, your filter should really be able to deal with most of these.
I don’t agree. That’s incredibly out of scope. This isn’t a chemical filtration unit.
There’s burning organic compounds based on carbon, and then there’s burning plastics with noxious chemicals. Anything that produces those gases you list should be avoided at all costs, before they even enter your hopper – not only for health reasons, but for the potential corrosive effect it would have on the Glowforge equipment.
The goal is NOT to make a WHO-level containment unit that can stop all carcinogens, but to minimize odor and a feasible density of off-gases used to produce plastic.
@jkopel - After thinking more about it and rechecking some of the chemicals you list, I wanted to correct myself and say that not all the chemical items you list are off the table. Not all would require something as drastic as a chemical filter. Benzene, Toluene, Xylene, oils and some chlorinated compounds are common target chemicals removed through use of carbon. Those should be fine. I was focused too keenly that I wouldn’t be caught dead lasing tar and formaldehyde in my GF.
As for “particulate matter in a wide range of sizes”, well, that’s up to the (fabric) filter material itself. If you’re going to be worried about the sizes, then I recommend the $12 HEPA filter route. What they’ll do is coat the fabric with oils that cause the molecules to stick more easily to the fabric and get trapped. This is after it passes through several millimeters of carbon and polyester fabric used for holding carbon in the satchel.
Not looking to argue, your house, your lungs, your filter. But plastics are usually considered “organic” by the chemical industry, and burning wood can release all kinds of nasty. Take a look at the combustion byproducts of plywood glues. Activated charcoal can and will deal with most of these if you get the right kind and use enough of it.
One of the other issues that I see for filtration is determining the capacity of the filter, or more importantly, knowing when the capacity has been exceeded so that you can change out the filter. I don’t think that it is really economical or practical to incorporate an in-stream analyzer that will detect all known contaminants so how will users know if they are polluting themselves or not. The nose is a detector of sorts but doesn’t work for many compounds. Carbon monoxide is one example, but there are inexpensive alarms for that. It’s the ones that can’t be smelt or that are unknown that would concern me.
Anyone contemplating laser cutting a chlorinated material should run through a back of the envelope calculation on how much chlorine might be eliminated by the laser operation and how much GAC (or other absorbent) will be needed to contain it. Very few separation processes are 100% effective too, so you might want to look into how much might be getting past the filter when it is at peak performance. As others have pointed out that chlorine or chlorinated compound can do significant damage inside the Glowforge before it gets to the filter, too.
Most folks here seem to think that the filter will take care of the off-gases of whatever they cut or engrave and stop thinking there. I’m trying to encourage folks to think through the whole thing a bit more. I haven’t looked yet, but someone on the web has probably done relevant calculations and possibly even observations. I bought the Pro version and will start researching the subject in depth once ship time gets closer. I may just opt to primarily use the outdoor vent and rely on dilution to correct the pollution.
I may just opt to primarily use the outdoor vent and rely on dilution to correct the pollution.
The long and the short of it is if you even suspect you’re cutting material that emits poisonous off-gases, you should be doing a lot of research – regardless of exhaust system. If it’s hazardous, then you must do risk assessment for the sake of your equipment and health.
If it’s low risk, then this filter would probably work for you.
Medium risk, then you should probably reconsider the possible damage it may cause the GF, and really should vent it outside.
At high risk, I would NOT use it in the GF, but would DEFINITELY vent it outside if you’re crazy enough to go ahead.
I just want to clarify that I really like the idea of a DIY filter unit, but I still intend to vent outside.
Here in Seattle the weather is generally temperate enough to have the unit vented all year round (probably with an inline blast gate). However, my basement windows are 12 feet away from, and right underneath, my neighbor’s living room window. So I will probably make an inline charcoal filter just to cut down on the odors I am pumping their way.
@dan_berry and @jkopel thank you for your discussion - really appreciated
it and I was able to take some key points away! I would love to hear how it is
working out for you @dan_berry - ones you have received your unit! BTW: is
there a reason why you put two fans side by side instead of using one (more powerful)
fan? This way the filter would be even smaller.
I might as well drop this here, since it seems pertinent…
@jusjus Thanks, glad you found it helpful. I haven’t made it yet, but I’ve been gathering parts together. I’ve done just about as much as I can until I get my hands on the GF to start unless I were to try cutting it out on my CNC. Smaller areas of it around the snap-fits need about 3mm accuracy, so really it needs to be cut on a laser.
I went with two fans to be on the safe side; Even though it should be relatively tightly sealed, I wasn’t sure how much air pressure was going to be created by passing through layers of polyester->charcoal->polyester->air filter. It would be better to have more air forced out than to have back pressure at the entry in. The fans I think I’ve finalized on are 105 CFM and about $25 CDN each. Two fans also helps even out the airflow under the filter area. As a worse case, I could either only install one fan or I could run two fans at half-speed. However, fast moving air isn’t exactly what you want either… you want enough airflow to draw away from the Glowforge and not plug it up, but you want slow enough that the filter can do its job without blasting the particulates out the other side and not getting caught.
Conscious design choices were:
Must be able to be cut out on the Glowforge… so no panel larger than 13x20"
The internal filter must be replaceable with an accessible off-the-shelf filter. Preferably one that still offered some filter choices. Furnace filters are all too large. Desktop air purifiers nail people for expensive replacement filters. So I settled on automotive air filters, because they have a variety of shapes and sizes for different purposes. I knew they have seals and like to keep things tight-fit, so it was a bonus.
I wanted small but not unsafely small to do the job. If you go too small you’ll wind up replacing the filter more often than you’d like to keep yourself healthy.
I settled on FRAM xx3660 filters, like the CA3660: http://www.framcatalog.com/PartDetailWindow.aspx?b=F&pn=CA3660 which is $6.50 CDN at Canadian Tire for their basic filter, and about 2x that for their “Extraguard” HEPA filters. I’m sure there’s even cheaper locations in the US, and it’s not like a 1990 Ford Escort is uncommon. And it’s not incredibly expensive to replace.
Re-reading my posts from this thread months later… sorry, I realized I didn’t answer this question.
The combined maximum draw is about 240 CFM with two fans. Because the Glowforge static output is around 120-140 CFM (if I recall correctly), the filter will be increasing pressure that needs to be overcome – plus, you need some additional negative pressure to allow good flow.
Space: If you have only one large fan, it changes the design space to provide an equal amount of CFM, making it more boxy. Plus, with the filter I had chosen, a rectangular array made more sense given the surface area.
Just in case: With two fans, if one fails the remaining operational one can help. You might have to suddenly run it at full speed to make up anywhere close to the difference, but it wouldn’t immediately create a sudden backpressure from zero airflow. Hopefully enough time to pause the print and resolve the situation.
Noise: I hadn’t worked out the power control for fan control yet, but it’s quieter to run two fans at half speed than it is to run a single model of the same fan at full speed.
The filters could be placed in a 12x12" box with a 4" duct flange on each. Put the MERV 13 filter on the GF side, and carbon on the exhaust side. Then add a 200 CFM, 4" inline fan on the output side, with it set to pull the GF exhaust through the filter box. Add a length of hose on it’s output to get the exhaust out of the immediate area, possibly still from there out a window.
Just a personal opinion, but I don’t think that’s enough activated carbon/charcoal. Those thin coated filters will require frequent changing (at $9 a pop), or the particles will have too much opportunity to pass through such a thin layer and not be absorbed, making them relatively useless.
I was more concerned with finding a fine enough filter for the main stage, something MERV 13 rated so it’d be fine enough to handle smoke particulates and the like.
It wouldn’t be hard to change that to just a filter sock of activated carbon, which as you’ve noted up thread isn’t really that expensive. The only worry is airflow through whatever particulate size you go with, and ensuring that the CFM would be sufficient that the restriction of the media doesn’t starve out the fans in the Glowforge.
I’m planning on putting mine in my garage when it arrives, so I’m still half planning on just drilling a hole through the wall and sticking a dryer vent louver on it, but I’d also like to mute as much of the offensive stuff as I can, just to be a nice neighbor. =)