I’m pretty sure the 2x4 basics kit is not height adjustable. Just make sure if you add casters that it doesn’t add so much height that its uncomfortably high to work on. I have made that mistake once before.
1 Like
thats why I was telling him to mount on one of the 2x4s, or on a bridge between two of them. Theres about 3" clearance at the bottom, so he should be able to find a caster that will just barely clear that…
but better to go with the lifting casters, that way its always on the floor unless youre moving it.
Right, I didn’t clue in at first till I reread the post, good call.
After watching the promo video, the size didn’t really occur to me. After seeing the image up top, I went back and watched the video again. Yup, this thing is a beast! I’m gonna have to rethink the layout in the mancave. I was going to sit it right next to my 3D printer, but now I’m not sure if the desk is big enough.
1 Like
Sitting in shop contemplating the forge placement, I have changed my mind a few times.
The latest plan is to place it on a shelf with full extension drawer glides under a tall workbench, utilizing unused space.
First thought was to place it on the steel welding/grinding table under a window that has power ventilation, but that would require moving the forge whenever I needed the table for other operations.
I am fortunate because the crawlspace under the floor is evacuated by an oversize radon fan, so I realized I could place it anywhere in the shop and vent it through the floor.
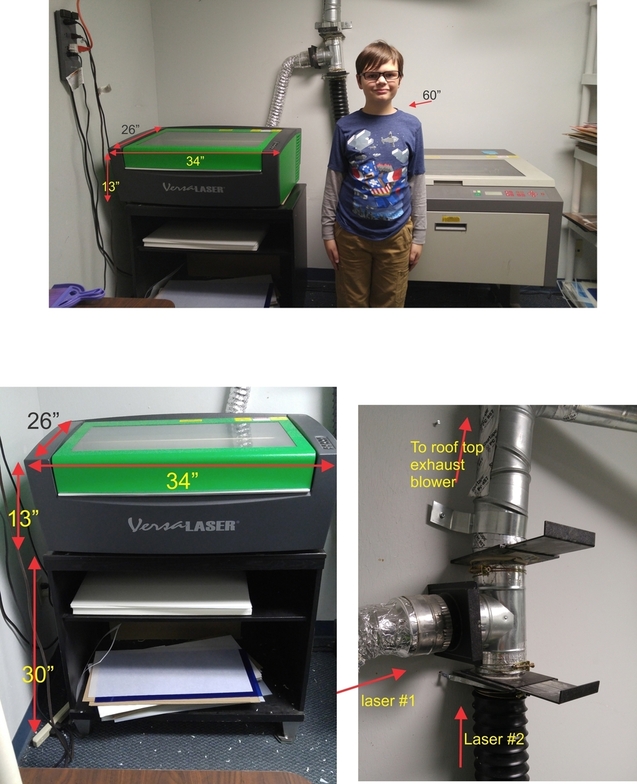
Just to give some perspective on the size…I have two lasers and the Glowforge is actually wider than both. Not near as deep or high, although with the filter I think it will be as high as my green one.
The TV cabinet is 30" high and is a perfect height for me to see into and handle materials (I’m 5’ 3") so I’ll probably get another one for the Glowforge when it’s at my office.
I also included the pic of my exhaust set-up…since I don’t have windows, I vent out the roof with an industrial blower that sucks out the fumes. The sliders are essential to cut off cold or hot air from the outside.
Even with the blower, it is still recommended that you use as few elbows in your venting as this will slow the air flow.
The slim, telescoping vents may not work unless the Glowforge has a pretty powerful blower for the exhaust.
3 Likes
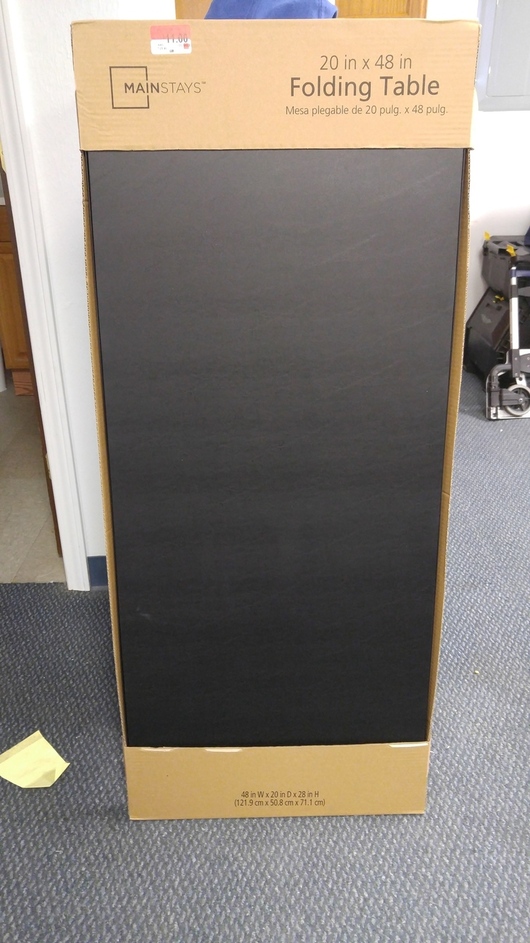
Just found this on clearance for $11 at Walmart…should fit the Forge just fine with a bit of room on each side.
4 Likes
The airflow resistance is something I have been pondering.
The standard dryer vent hose is good for creating turbulence due to its corrugated nature, probably not much, but there is a reduction in efficiency. For that reason I plan on duct work.
Can I ask what the CFM of your fan is? My forge will dump into an evacuated area in the crawlspace, but I plan to augment it.
Your measuring stick is already 5 feet tall? Soon time for a drivers license…
2 Likes
I have yet to work on this part of placement for the Glowforge and had asked about how much room to allow for the duct elbow for venting out the window above. This is what Dan said;
“Yes, the hose is a standard 4” dryer hose, and we’ll include it with every Glowforge order (even if you also ordered a filter). A 90 degree turning bracket can be used, or you can curve the hose, which will probably take 6-8" depending on how willing you are to smush it a bit."
It was suggested by others that I use a slim, periscope style of vent…so I’m hoping that will work for me.
1 or 2 small bends with 45 deg angles shouldnt effect you too much. if you are running a larger venting system like in the photo above you have to take everything into account. They have a 90 degree turn in there which is inefficient, they could have used a Y joint there to reduce friction a bit. If the run gets too long you might have to put another fan at the end or somewhere in the middle to keep things moving.
After a bit of Googling, I’m finding that flexible duct has significant losses in bends. One source says to add 20 feet of straight-duct-equivalent for every 90 degree bend! https://www.google.com/url?sa=t&rct=j&q=&esrc=s&source=web&cd=8&ved=0ahUKEwib4quCze_KAhXGPiYKHYawC1oQFghDMAc&url=http%3A%2F%2Fwww.flexibleduct.org%2Fimages%2FADC~IR5E.pdf&usg=AFQjCNHVLXd2jC2_Ei_f7mXc9mGHuX_iNw&sig2=z3-PtRPW2CS936oOYradqw&bvm=bv.113943164,d.eWE&cad=rja Disclaimer: I’m not trained in HVAC, so I may be mis-interpreting this info. I recall reading somewhere that equivalent duct lengths for bends is often expressed in multiples of duct diameters, so the link I cite may be considering relatively large ducts. If we assume that it is considering 12" ducts, then the multiplier they are using would be 20 diameters, which translates to 6.7 feet equivalent for 4" flexible duct 90 degree bends. This seems more reasonable. (BTW, for smooth 4" ducts, the standard is to add 5 feet for each 90 bend.)
1 Like
Keep duct length in mind when considering placement, too. Dan has mentioned that he suggests an in-line booster fan if going over 8’ (and I would think that 8’ would be on a fairly straight shot).
Boosters can be found at Home Depot/Lowes/online, starting ~$30.
Not sure of the CFM but its an industrial size. Pulls all the exhaust from both lasers very well and its on the roof which is 20 ft up…
1 Like