Hi All, So far all my engravings have been just line drawings/text/etc. This will be my first time engraving an image that is filled in (vs outlined). I played w/ my settings & figured out how to get the depth & look I like.
HOWEVER, my tests were done on Baltic Birch (1/8“) and my final engraving will be on maple (approx 1” thick cutting board). Any idea on how to convert the BB settings to something comparable for maple? I have to get it right the 1st try b/c the board is too $$ to mess up.
I need to get this done tonight if possible, & would GREATLY appreciate any help. TIA!
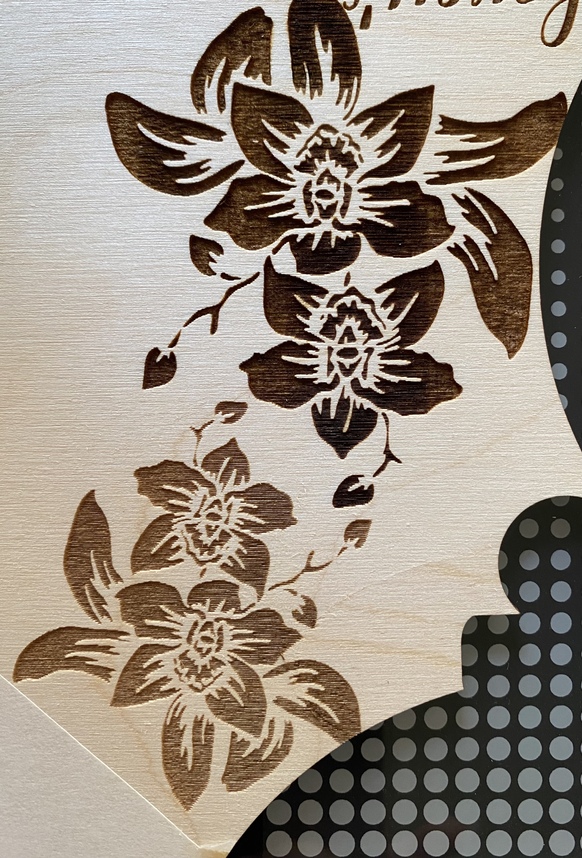
The lower flowers are the depth/look that I like (upper flowers were where I started & it was much too deep/dark). Settings used on BB (1/8 “): 900/80/195 LPI
Lots of testing is the only way when you are not using proofgrade material. There is no magic formula to convert from one wood to another since every piece of wood will work a little differently due to natural variation.
Here’s an idea for engraving on the cutting board…you can always go deeper and darker by just sending a second pass of the engraving on the board if it doesn’t turn out dark enough for you the first time…
In my experience, birch burns darker than maple. So you should be okay transferring the settings from birch to maple, and if it is not dark enough for you, send a second pass immediately after the engrave, without shifting either the cutting board on the bed, or the design on the screen. (Do not try to realign the design if it looks like it didn’t land in the right place, just hit Print again.)
But…and this is very important…
For a 1" thick cutting board, you are going to have to remove the tray, and prop the board up on something that is exactly half an inch tall in order to bring it into focusing range. Otherwise it will not print where you think it will. Use the Set Focus tool to place the design.
I like the idea of starting with the BB settings and doing a second pass if necessary. Thanks so much!
And I do know the drill (removing crumb tray, etc.) because I’ve used cutting boards a lot. It’s just this one darn design that is throwing me off b/c the filled in designs seem to engrave so much deeper (as opposed to outlines and text that I normally engrave on these boards).
here is a hint for a second pass. DO NOT MOVE the cutting board, or correct the position on the screen, I know it looks off, but its a glitch and will ALIGN perfectly – as long as nothing changes.
you can start the second pass, and watch it to make sure there is no shift, and hit the button and cancel the job is anything goes afoul, without it effecting the cutting board. (or just a teeny tiny mark)
Thank you! I’ve never done a second pass because as soon as the print is done, the graphic looks off on my screen (as you described). Good to know that it is a glitch & doesn’t mean it won’t line up for the 2nd pass.
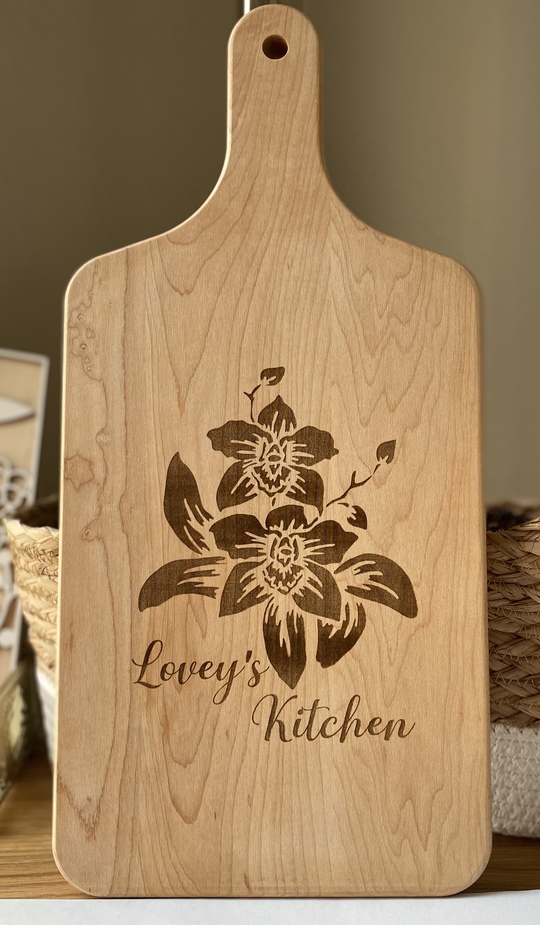
Thanks everyone for your help!! I ended up using the BB settings I had found through testing (900/80/195 LPI) and it was fine with one pass. Turned out pretty nice! This is not my typical style (I usually do more modern/less ornate designs) but it is what my friend chose for her mom, & I think she’ll be happy!
Thank you! It feels good to start understanding how to manually adjust speed/power/LPI to get different depths. Slowly but surely I’ll get more confident.
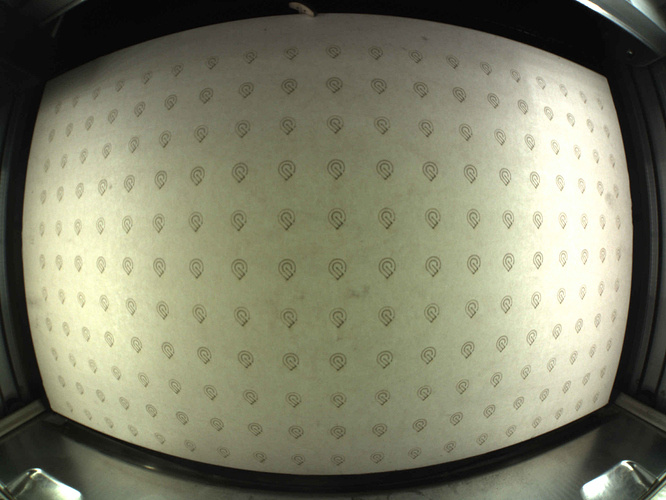
FYI, it’s not actually a glitch in any meaningful sense since a glitch is something that might be fixed in the future - the image you see on your computer is an extrapolation based on the extreme fisheye that the laser actually has for a camera. When it’s refreshing it’s defaulting to being focused directly under the camera at a depth of your material default - as opposed to the location and depth determined by your use of Set Focus. This is what it would look like if you didn’t have the extrapolation going!