I am trying to make horse heads for a game with numbers on each side but can’t seem to get the numbers lined up with the opposite side. Anyone have any ideas or help?
Perhaps a carboard jig would help? That way you can precisely place the flipped piece into the same location.
3 Likes
Welcome to the forum.
Are you using a file you created in another program or are you just using the interface? How many are you doing at once? Can you share a screenshot of what isn’t lined up?
1 Like
If you’re cutting out the pieces to begin with, don’t move the material, just lift up (with some tape) the pieces and flip them over. Then you can change what needs to be engraved on them. Just don’t move the original outline-even when it looks ‘off’.
1 Like
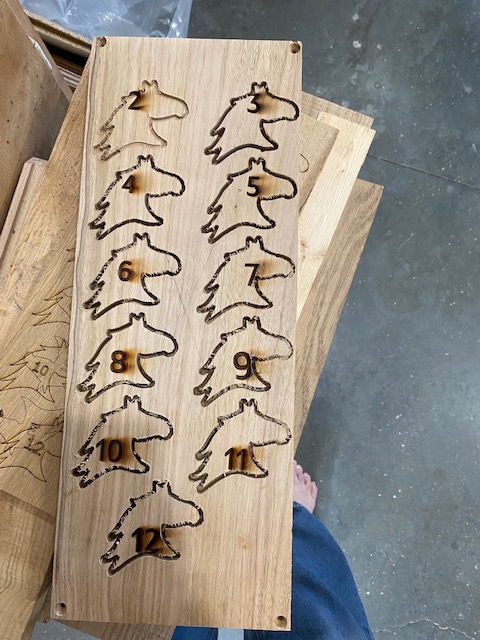
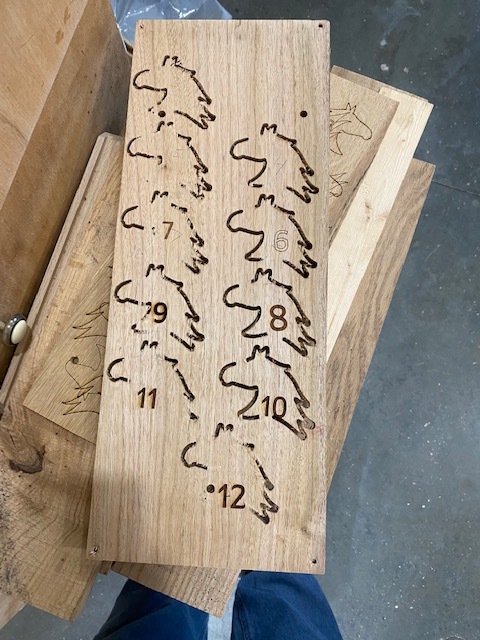
I’m using pdf files with the numbers on them and lining them up on horseheads I have carved out on a cnc machine, hope the attachments work for you to help me, thanks
(Attachment back numbers for glowforge_1-back numbers for glowforge.tap is missing)
(Attachment heads for cnc_2-front numbers for pdf.tap is missing)
1 Like
Thanks I’ll try that, do you make a small jig to keep the material in the same place?
1 Like
If you have the file that you used for your CNC you can use that to place the numbers. What format is your file in?
1 Like
CRV. Vetric file
1 Like
Hard to tell from the the photo but looks like your board might be more than 1/2" thick? If so, did you take out the crumb tray and prop up the board to the right height? The GF has a narrow focus range - just top of crumbtray to 1/2" above. “set focus” can work very well for lining up artwork with the screen image but the surface needs to be in that narrow range to work properly. There are a couple tools other users have posted you can make to help with measuring - I like this one.
1 Like
If you have the Premium trial you can simply type in the numbers as you can get pretty good alignment if you use the set focus tool. Also, you can save the numbers you will be using in a pdf file separated by some blank lines, open the numbers pdf in the Glowforge and drag and drop the numbers onto the horse heads.
1 Like
Thanks for your help but the suggestions I’ve received have not worked. If I send a copy of the Vectric file do you think you could look at it? Thanks, Dale
1 Like
I cut and engrave a lot of stuff that is bilaterally symmetrical so if the material is tightly held in place and the cut is good I can vacuum it out of its hole and drop it back upside down. Your horse heads are not but a square or hexagon around them centered on the place for the number could be.
That could be set up in your design software for accuracy and have each a separate layer you could set on or set to ignore as needed.
I am sure if you post the Vectric file here someone more skilled than I am would offer some assistance. I will try to help, but am no expert with a CNC
1 Like
Thanks!
I may have missed seeing it, but another method is overlay the two files for each side of the “coin” and IGNORE the “tails” while you etch & cut out the “heads” and then either flip the coins, or if not cut, the whole board, then IGNORE “heads” and ETCH “tails”.
When you cut & what you flip will depend if you need to keep each side’s orientation matching, or if you can key or register coin to the board, or board to the bed–and if keeping orientation between heads/tails exact for each coin will lead you more registration/keys between coins and board and board and bed…
But I have learned when I’ve done double sided work with symmetrical shapes that it’s much easier to leave the board in place and flip the cut outs over & put back into the holes in the board before IGNORE the “heads” artwork & cut, and ETCH the “tails” artwork file. (And followed the sage advice of another user a couple years ago about layering the files for the two sides and ignoring one and switching when they are flipped).
And when doing multiple boards, put some tape or hold down pins to mark the edges of the boards so when I change to the next board, it’s going exatly same place on the bed, and I don’t have to move the artwork, just do the Ignore/etch+cut-flip-etch/ignore+ignore cut routine.
2 Likes
Thanks so much for your response. I understand what you are saying but I do not understand how to “ignore one side or the other. Thanks so much for your help, Dale
Still waiting for the file. We really want you to succeed with this project.
Another possibility for getting help would be to trace the image of your CNC engraved items and then export that result which results in a file you could manipulate in Inkscape or Illustrator.
1 Like
In your design program, set the color of the etching that you want on each side to different colors. Then, when the file is brought in GF, each side will show up as a different step. Set one side to “ignore” while etching the other
Hi,
I was assuming you had separate files for the “heads” artwork and “tails” artwork uploaded separately, if so, you have to manually overlay each in the GFUI.
And each appears as a separate “block” in the left control panel.
OR when you create the file, as @stoli noted, use different colors and that will be interpreted by the GF as a different “file” that can be separately modified in the GFUI.
It’s also good practice to use different colors for what you want to cut, score, or etch, e.g. red for cut, blue for score, and and green for etch.
If separate by file or color choice, you’ll see a block for each of the “heads”, “tails” and “cut” steps in left control bar that shows the artwork files. Click on any of those, and options for etch/cut/score/ignore appear at the top popup window (the file type will limit what options are active–e.g. an jpeg is only etch or ignore) and click on the word to change the action. The color in the bed image may also change when it’s active or ignored artwork.
This is also really useful method for any file with different layers/type of steps as you can modify each step as suits the material and look as you find works best–and you can save those unique settings there.