The labelled sizes don’t seem to fit the actual sizes at all. Labelled size is 10mm, but square is actually 7.49mm. Did the whole image get scaled accidentally?
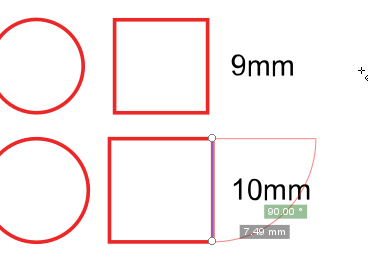
The labelled sizes don’t seem to fit the actual sizes at all. Labelled size is 10mm, but square is actually 7.49mm. Did the whole image get scaled accidentally?
I tried to fix the svg to fix the size problems, but it’s just not possible. Scaling the entire svg to fix one size, breaks others.
Maybe this is a problem with the ai to svg export?
Hello, sorry for late answer 
I checked and it seems good to me 
It’s not “perfect sizes” as i get some floating point numbers probably due to the SVG’s pixel<->mm conversion but it’s close to the labelled value.
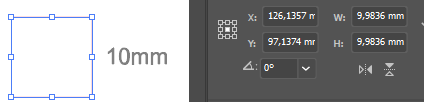
Did you get the latest version of the file ?
What software do you use to open the file ? I’m using latest Illustrator.
Have you tried printing it and measuring the result ?
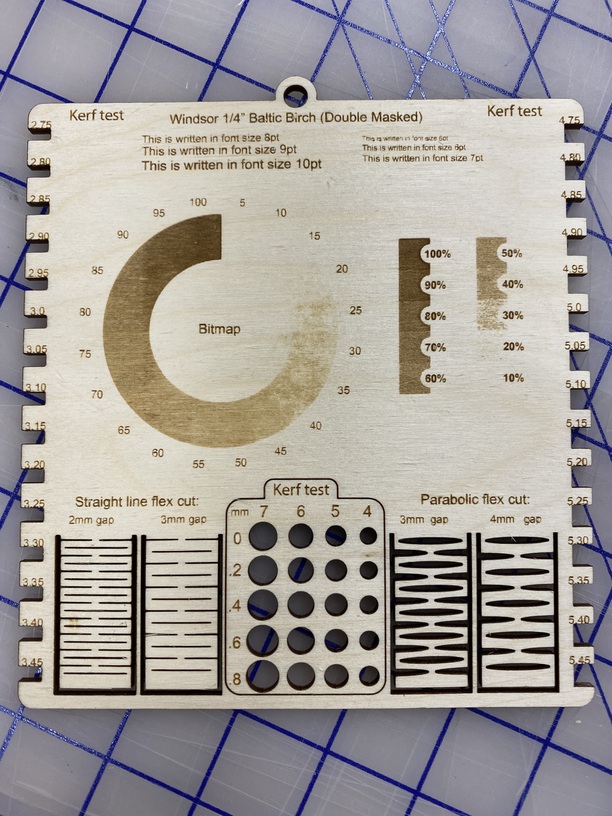
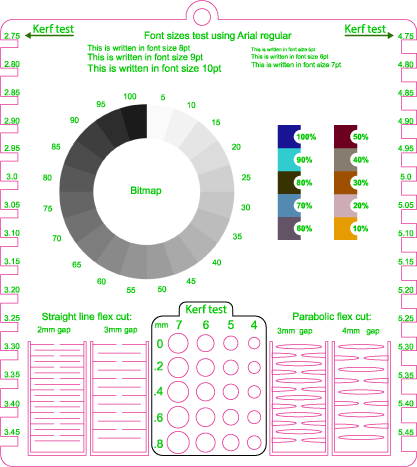
Can someone explain the purpose of each section? I understand I need to find my initial cut through setting first and then manually change the percentages on each step. For some reason all of the dots are just not connecting. For example, why would having all those different sized squares and circles be helpful? What variable is the red graduation bar vs the circle graduation bar showing?
Hello 
The purpose of the holes is to check if an object would fit properly your cut.
Glowforge as some precision gap, it’s not perfect, cutting multiple holes can help check which size you need to cut a hole that fits an object you have.
The circles and squares on the right could be removed from the board though. They’re a bit redundant with the circles matrix on the bottom and the kerf tester on the sides.
The bitmap VS vector engraving has some rendering differences. The 100% of the vector version is much deeper than the bitmap’s. Or was, i havent tried it since my post, maybe it changed since then.
Just saw the latest update mentionning the possibility to export design with detailed settings.
I thought it would allow to just load the design with settings pre-filled, which would have been so nice.
But it’s not 
Still, i made an update to the design and exported it with that tool so all the params are within the file if you don’t know what settings should/can be used to print this design.
(click the image to download a ZIP containing the SVG)
Also i removed unnecessary holes and maed it slightly more compact in width (very slightly).
No, it’s still only for record keeping. And no promises it’ll ever be anything other than. If it ever happens, it’ll be a surprise one day like all the other announcements. It’s just be the way Glowforge roll.
do i have to enter the setting once in the gf app? if so do you have a sheet of what the settings should be? im a newbie sorry…
Yep sadly you have to enter values by hand.
You have all the values insides the SVG, these text values are stripped out by glowforge app but if you open the SVG in your browser you should be able to see them properly on the left
Hey all
New to the GF world, been cutting for a month or so now. Finally got around to going through some of the resources that people have pulled together, like this template.
I ran it tonight, and had a couple of questions / trying to get my head wrapped around how people are using it. (My result below)
I noticed that one user was running non-masked, which I thought was interesting. I run all of my jobs masked, so of course, I did that here. Wondering what tasks people are running unmasked. Since a lot of this is engrave testing, seems important to run it the way you’re going to cut for real.
I’m surprised to see how the vary power raster came out. I’ve used it before and gotten the expected result, but here, the GF seemed to have a mind of its own. It looked like it was varying the power during the cut operation, but in discrete X steps based on the output. Other samples earlier in the thread showed what I expected to see.
I haven’t really used score for anything except one job. I found 125/15 worked well for me (what the round kerf test box is scored with). Is there anything different between score and cut in terms of how GF operates? Does it help with the “corner problem” for example?
I’m trying (still) to figure out how to get cut settings dialed in and wondering what peoples’ process is for that. I’ve had really weird results with a lot of stuff not cutting through, yet getting flashback and scorching on the back. I often will do sample squares and run them at variable power and go up “one” from the one that got through (to account for warpage or glue), but sometimes I’ll miss by a ply+ in some sections on my sheet. I’m super frustrated with the amount of chisel / Xacto work I am doing, especially on puzzle jobs. Haven’t really found a good protocol anywhere for really figuring it out.
Love any thoughts or wisdom from those who have made more kindling than I…
Thank you
Often the area engraved by a raster image means that 100% of the area is engraved and there is little point in that case of masking. Worse, if 90% is engraved such that almost white is engraved while white is not then the line between white and not white creates a lot of problems. If there is masking then some of the depth will be the masking and removing the masking removes the details. You can set a minimum depth but too deep will leave a ridge, and not deep enough, and it will not get through, plus the adhesive will become a nasty mess.
This is of course if you are using variable power which is different from dithering that applies a series of equal depth marks concentrated where dark and scattered where light. Under that, every dot is the same depth and darkness so there is the same black for each dot, so the scattering gives a much better range of apparent depth than variable power that the range of clean to black happens very quickly and makes a black mess for most of the depth. if you want a carved relief design then that is when to use the vary power part, but it takes very special images to work well. But even dot dithering leaves a chopped up mask that is a mess to remove,
Many of your issues (laser not always cutting through, engraving not consistent) may be due to the material itself.
When using food wood quality (or, just anything but MFD), nerves of the wood, knots or even holes can drastically impact the laser job.
Try it on a basi MDF sheet and you should get a much more consistent result. But note that the tape also affect the laser, and depending on how close to the sheet it is you can get non uniform results just because of that.
Finally, regarding the score, i believe it’s just a low-power cut. The advantage of it is that it’s WAY Faster than engraving for simple lines. For example it would make sens to convert texts to simple lines so they could be scored. But it’s a pretty annoying process (unless someone has a magical tip?).
I personnally use scoring to mark some parts so i easily know which parts should be assembled together or in which order, etc…
Thank you so much for sharing this test file. ![]()
Just a couple of comments about scoring: I love scoring! lol
I try to use scoring instead of engraving as much as possible. It’s SO much faster.
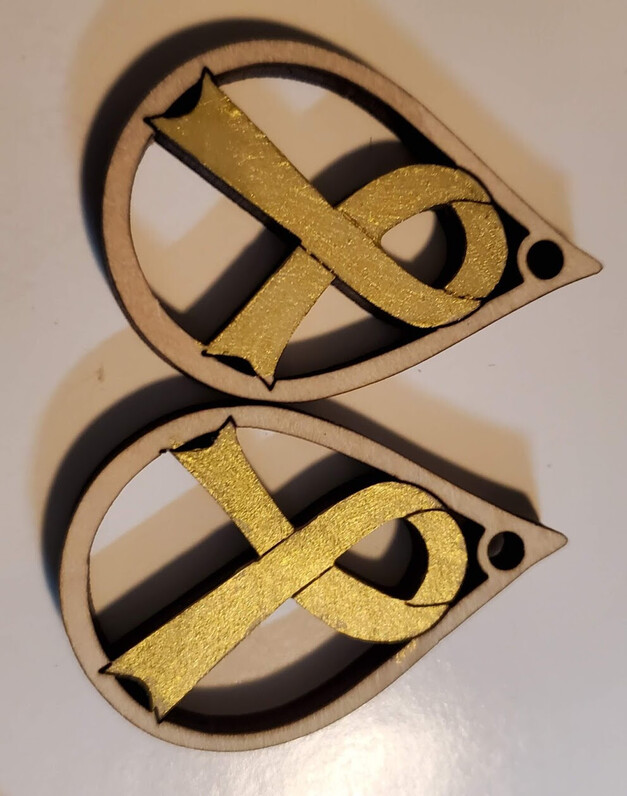
Sometimes I do scored outlines of text and then those can be painted in by hand (paint markers are a fav and easy for kids to use, too). Or I use a thin font and just design with the knowledge that I’ll be scoring and use that intentionally. I also use it for defining shapes (like the edges of the awareness ribbon for these earrings) or just a simple design.
Pretty much any time I engrave, I ask myself if I can score instead. ![]() hahaha
hahaha
and remember, if you defocus when you score, you can make that score line wider. so if that line is just a little too thin, do a defocus test until you find the right setting for the width you want.
Thanks for mentioning that, I haven’t tried that method yet and I need to! I always forget. Lol
I like the way you think.
Following this for later
Thank you!!
Sorry, I’m green here. But is there any testing for speed and power that should be done?