so from my understanding on the open flaps (i know about the rest of the upgrades) the material only gets longer. i personally can not think of a reason to use this option besides one…skateboard etching (i dont skateboard but after going to a art fair its the only use I’ve found to upgrade). but i also think its not going to work because of the bends involved could pass the 1/4 limit. so my question is can it etch on a long board and what are people using the open flaps for?
P.S. dont care about industrial use. seriously if its something beyond what a personal laser printer can do just spare me your life story and just deal with the fact that its a PERSONAL laser printer.
What I envision using the extra length capacity for is engraving trim mouldings for doors & windows, making abstract decorating panels, such as a city skyline, sci-fi favorite or forest scene, the possibilities are limited only by your imagination & construction capabilities. Torsion box construction(think hollow core door) for home furnishings becomes way easier with a laser cutter as well. While the Glowforge is somewhat expensive, trying to find and buy things like that is pretty expensive and you don’t have the cool toy to play with;) You could do all that with the basic as well, just not on as grand a scale, you can do a lot with that 1/4". This is what I plan for personal use.
I need to be able to work with 18"x24" coroplast, and many of the laser-engravable 2-color acrylic products are sold in a 12"x24" size. The less time I have to spend ripping material down to size, the better. There is also the potential for making various jigs for things like pencils, chopsticks, and roll-to-roll fabric marking (we are waiting to see if the pass-through material tracking software will be able to handle rotation… it has been mentioned that it may be possible)
i read the skateboard post its very informal how you can go about it. but im still left with the question of how it would benefit dishing out a 1500 more (early bird).
@lcuellar63 thanks that’s a good reason costume trim i like it
I was hoping to engrave walking sticks…looks like they will be too thick (1.5") for the opening, but I’m sure I’ll make use of the ability for something else.
Other than that:
I make architectural models and the ability to pass longer material through the GF will be useful.
My son really enjoy’s designing board games and I suspect that we’ll use the pass through to make ~20"x 20" square boards instead of multiple pieces.
To engrave walking sticks you should be able to just leave the fold down door open and override the safety mechanisms with magnets. As long as you are engraving at the top or bottom it’ll still work
yeah the height restriction dose prevent a lot of use for the open slot option. i like the cane idea but the height would case a problem. even so engrave walking stick is a good reason to get the upgrade
@Brandon_R i completely agree with you and i think im going to take your advise and make the GF 1.0 pay for the GF 2.0 and just wait for it…do you think people that got the early bird special on the 1.0 would also get a discount on the 2.0? that would be epic @dan may you consider something like that?
Sword engraving. Not that everybody uses lots of swords; but the cosplay/costuming crowd sees that advantage. Belts and other leatherwork. Picture frames. Custom computer cases. My life and your life may not match up; but I definitely see the advantages.
i think me and you are on the same page but our budget ain’t. i got the lulzbot taz5 like 6 months before glowforge and well i can only spend so much on hobbies in one year. like you i just make random fun stuff especially anime. leather is going to be the best part because there’s lots of leather use even on the swords, purse, armor, wallets, the list goes on. like i said if i had the money i would…if i started a company i would. but for now its just fun for me, i do regret not having enough for the pro but ill just have to wait untill the 2.0 comes out. untill then i hope to have learn how to use a 3d printer and a laser printer like one of the pros
@Elf, I also did not get the pro. I will have a basic. The question was, for personal use, what will people use the flaps for. I so badly wanted that feature; but couldn’t personally justify it, though I can make a product list that wants it. My brother makes swords, and he has a replica of a LOTR named sword that he got signed by the smith at WETA. He wants to get that signature etched in, and he’d like to engrave some blades, but he’ll have to wait or convince his wife that he needs a GlowForge. He and another brother do leather - some practical like belts and wallets and holsters, some fanciful for comic cons, fairs, cosplay, and those things. I’d like the pass-through; but I couldn’t justify it. Maybe if it pays for itself it can save some money and buy a little sister: 2.0 pro or something.
Bought the Basic on the first day. A month passed and I paid the credit card bill. Somewhere in the back of my mind I convinced myself that the Pro was now only $1500. After all, the original $2000 was long gone. Seemed like a great deal. Upgraded.
All of the work I am going to do (the work that is ultimately paying for this thing) is basically less than 12 x 12 so the Basic will work great for me and cost a whole lot less. Maybe someday I’ll dream up something and wish it was bigger, but this will be a tool for creation of actual products for me to sell, and I’ve been making that stuff via other means so large scale work just isn’t necessary.
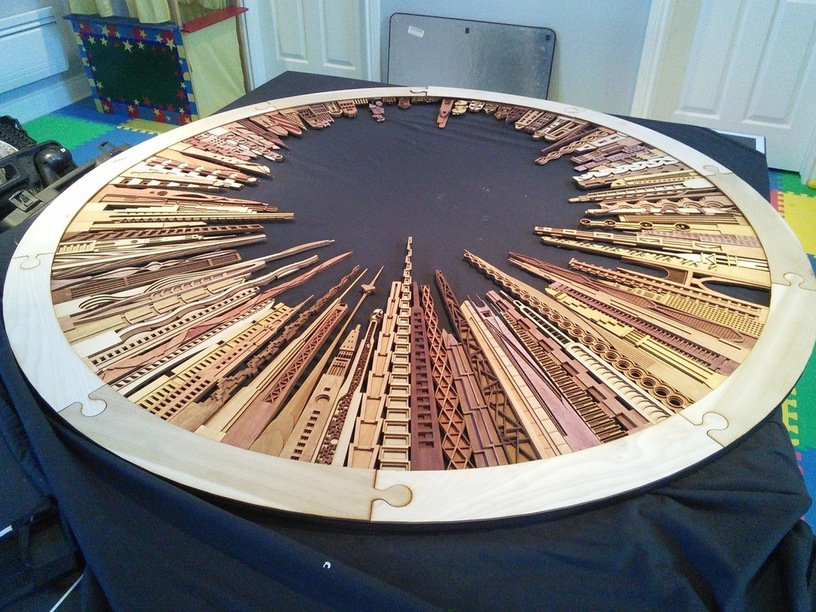
I make artwork with the laser-cutter. My pieces tend to be bigger than the bed of any laser-cutter I’ve used.
I cut all the pieces on a laser-cutter and then glue them up in layers to create one large piece. For me to be able to cut pieces longer than 20" is a real advantage. I will mean having less seams in my work, which makes it easier to assemble and it will feel more solid.
I plan on making 3 panel changing screens. as well as cut leather for bigger projects. I’ve not worked with a laser cutter before, but I think this will be so much fun!