My assistant asked me to make some coasters for her with my mandala patterns on them for Christmas (I usually make them much larger, but it’s kind of fun to see them tiny).
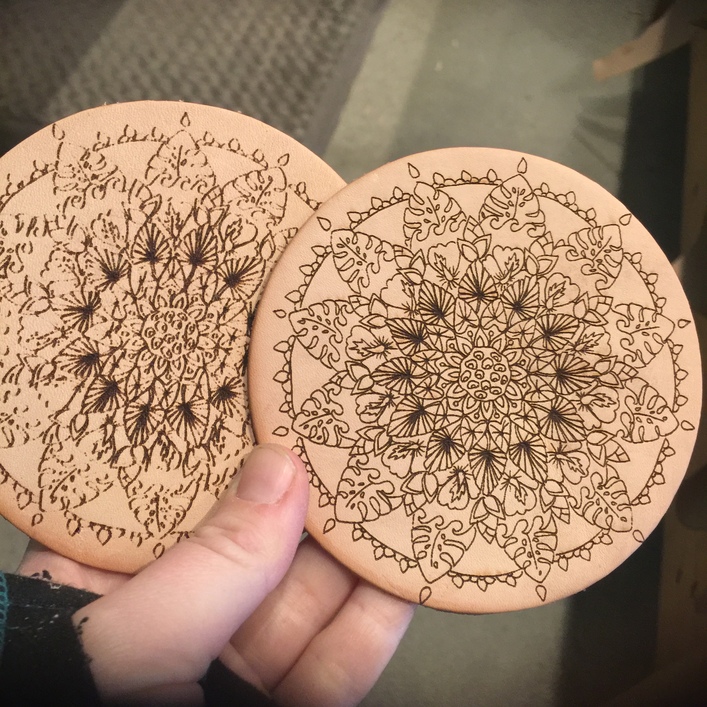
I set everything up to print and the first time I printed everything is fine. I switched the leather out, hit start again, and then the next set is a disaster. The first set is on the right, the second set on the left. What happened?! And how do I fix this?
Calibration seems fine, lens is recently cleaned (4ish printing hours ago) and I’m printing on the same matieral as I was previously. I’m using scrap for these but I still don’t like to waste it. And I’m nervous about printing any orders until this gets cleared up.
it’s not “proofgrade” leather - i’m a leatherworker, and that stuff is CRAZY expensive compared to what I buy a hide for, and it’s not any different than regular veg tan, so this is regular veg tan. I’ve done hundreds of pieces on my veg tan with no issues
the focus was set to “auto” which has been working so far… I’ll try one manually setting the focus and see if that’s better.
I’ve had similar problems, so I’m going to venture a guess: the 2nd one (photo left) was among a bunch of holes (scrap material). And you didn’t use the “Set Focus” option. So the head moved out and focused on a hole rather than on the material. With the wrong focal distance, it did a bad lasering.
OR: you had magnets around it and the head auto-focused on the magnet’s height rather than the material. Same problem – it auto focused on the wrong depth.
IF this is the case: before lasering, use the set-focus and specify the dead center of the material (no way the little red light from the head will miss anything). When I use scraps (usually acrylic), I keep a big scrap that is the same height nearby and I autofocus on the big scrap to ensure the correct focal distance.
I was using the honeycomb hold down pins and I think maybe it focused on one of them. These were cut before lasering, so there were no holes around them. And all the pieces that I was lasering were the same thickness, but the hold down pins are taller.
Manually set the height on the engrave step to prevent that.
I feel like you would have mentioned it but it looks like one was masked and the other wasn’t. True? If so the masking prevents fine detail rendering in some cases.
I always wish I could do that. But my 'forge and my computer are on different floors. I wish one could really pinpoint where the red dot would hit. Seems silly one cannot.
I’m so sorry your print didn’t turn out as expected! It seems the community has provided some good advice. Did using set focus help improve your engraves? If not, let us know and we’ll investigate further.
MOXIE & Oliver
Caitlin McNamara, Owner
[p] 206 355 3445 [w] www.moxieandoliver.com
Join our Facebook group for exclusive deals and one-of-a-kind pieces Redirecting...
From: “Dakota.G via Glowforge Owners Forum” glowforge@discoursemail.com
Sent: Wednesday, December 4, 2019 12:15 PM
To: caitlin@moxieandoliver.com
Subject: [Glowforge Owners Forum] [Problems and Support] What is
happening!?Same settings, 30 minutes apart
I’m so sorry your print didn’t turn out as expected! It seems the
community has provided some good advice. Did using set focus help improve
your engraves? If not, let us know and we’ll investigate further.