I know this has been asked a lot but, I am at a complete loss. Every time I try to calibrate my GF it will disconnect from the wifi. I have literally tried everything!
*Bought a new router.
*Changed the channel settings multiple times.
*Moved the router in multiple locations. (Even literally right next to my GF)
*Unplugged/turned off every electronic near.
*I even tried connecting it to my hotspot on my phone.
The same exact thing happens every time! Is there ANYTHING else I can do?
Well the good news there is you can remask a calibration board or use anything ekse that’s light colored and very flat so you don’t have to waste your Proofgrade.
I’m sorry for the trouble when trying to run a calibration on your Glowforge, and for the confusion caused by the error message you received. I extracted the logs from your unit, and I what I found suggests that this isn’t related to your unit’s Wi-Fi connection. It looks like your Glowforge may be having intermittent trouble communicating with the print head.
There are two key connections I’d like you to check for me. Could you please do the following?
Turn off your Glowforge.
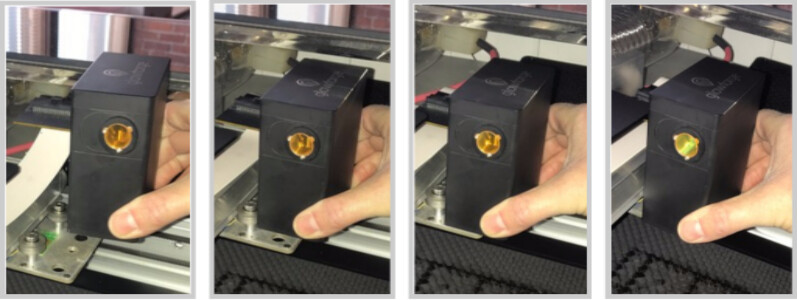
Holding only the finished black surfaces, grasp the printer head as shown. Pull gently up and back to disengage the magnets and remove the head.
There is a small tab in the center of the wire ribbon. Push down fully on the tab to release it, and gently pull the wire ribbon plug from the printer head.
Pick up the printer head and wire ribbon. Make sure the tab on the wire ribbon is facing up. Slide the ribbon back into the head until it clicks.
As shown, lower the printer head over the metal plate so that it rests next to the two round posts. Then push it gently away from you – you’ll feel a “click” as magnets pull the printer head until it sits snugly atop the metal plate.
Take a photo of the circuit board. If the cable I’ve indicated above with the red arrow appears to be loose, please reconnect it and try printing again. This cable should ‘click’ back into place.
Turn your Glowforge back on.
Send us the photos you took in step 4 and step 9.
Please let us know what you find. We’ll review the photos you share and then follow up with next steps.
I took the photos you requested. I did find on another post related for the ribbon cable (the second one connected to the circuit board) before posting this one. I took it off and reseated it so it shouldn’t be loose. Printer Head.HEIC.pdfBack Circut Board.HEIC.pdf
After I did that, I did a tests on some metal cards. I was trying to make something for a buddy who’s kids passed away. The letters kept coming out fuzzy and distorted. I’ll post pictures on the results (which are interesting). I did take out the crumb tray and cleaned everything but, still got the same results. Test (Group).HEIC.pdfTest (Clear).HEIC.pdfTest(Fuzzy).HEIC.pdf
Thank you for the additional information and detailed photos. I’m so sorry for our teams delayed response.
Unfortunately, it looks like your unit is experiencing an issue that we can’t resolve remotely. I want you to have a reliable unit, so I’m recommending we replace this one. I’ll be in touch via email very soon to sort out the details. I’m so sorry about the bad news.