WJL's Production Machine Projects

Here are some of my first projects. These are their stories. I’ll keep adding them to this post as I go along.

I got my :glowforge: at just after Noon on Friday. 4 days shipping to just north of Chicago. I waited about 40 minutes to get help unloading it. It really is not that heavy, but is awkward to lift on your own. The last thing I wanted to do is drop it before it even fired up. Also, items packed this well often are tough to get released from the tight packing material. It was securely packaged, but came out of the box quite easily. Up and running in about 15 minutes after carefully following the start up manual.

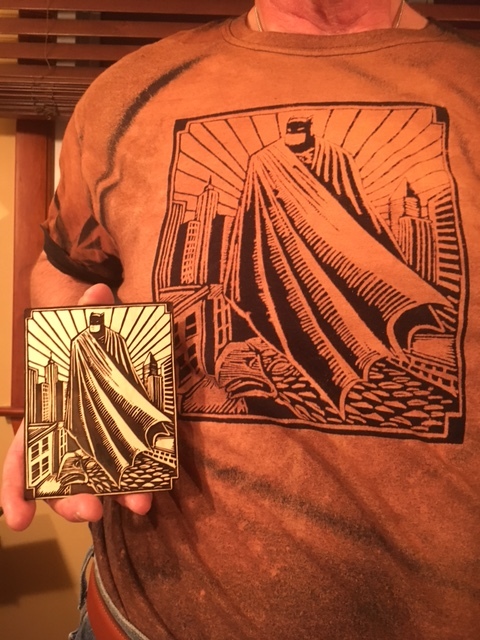
I did the ruler, but everyone’s seen that, so no post. It did cut flawlessly, and I did Squee :squee: when I saw the first cut and engrave on my own machine.

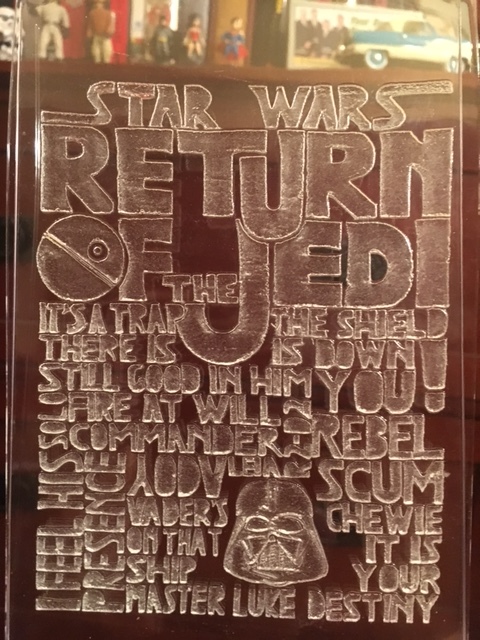
Next was the plaque. I cheated and printed a design instead of free handing it. I also added a little twist.

This is it on the bed just after cutting. I had scored the masking on the Maple ply and replaced it with adhesive “Laser Foil”. @johnbrooker knows all about that, but that is a story for another day and post. You apply this to the surface, then cut, score, and engrave. The scores cut cleanly through the foil material, and the engraves vaporize it.


This is it out of the bed and before any cleaning or un-masking.


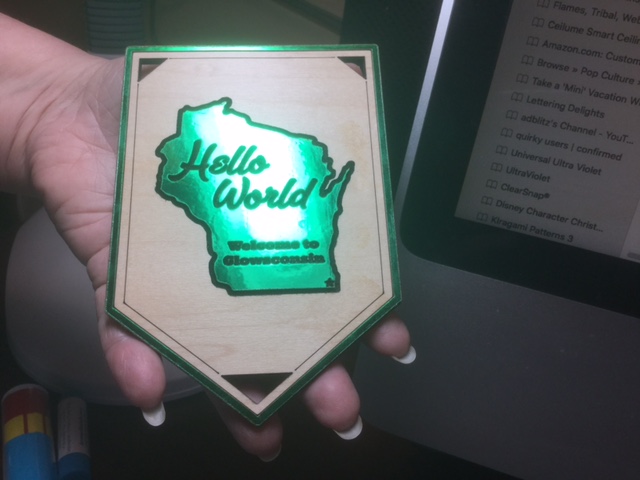
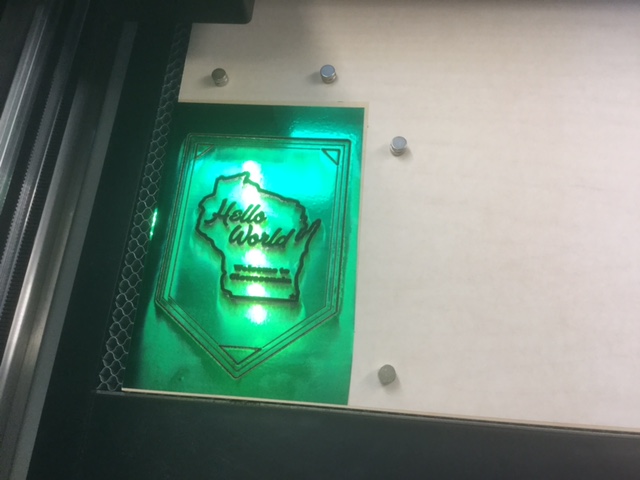
Here is my niece holding it after peeling off the unwanted foil and wiping with a damp cotton cloth. It shined up nicely. I did engrave a little too dark when using this color of foil, and I was stingy on material, so it’s pretty small. This made the “Welcome to Glowsconsin” a bit hard to read. It’s about 5" by 3 1/4" I elected to leave the outside trim foiled in green. Reportedly, the longer you leave the foil on, the stronger the bond becomes. They recommend applying it just before you cut, or you might have problems weeding out the unwanted foil material.


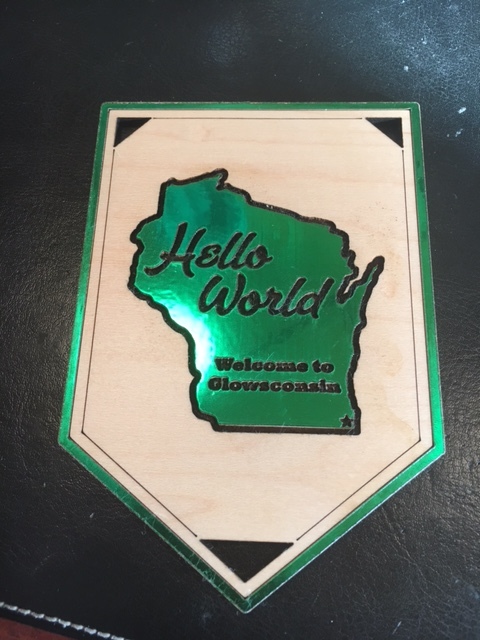
One last, and better, picture. Here are the stats for those keeping score:
1/8" Proofgrade Maple. 5" by 3 1/4. Cut at 100 power / 27 speed. Deep Engrave. Processing time 16:22.

79 Likes

Looks great! I’ll have to get some of that foil…

4 Likes

Cool stuff that foil!! Design looks great!
:smile::smile:

5 Likes

And you were worried about being worthy! Congratulations!

4 Likes

I love seeing how you did this, Bill. A companion technique to me using that other way of adding foil and also adding embossing powder. This looks great!

5 Likes

Love the foil! Looks :+1:

2 Likes

Here was my next batch of projects. These took a little looonger, Issue being I did not understand the difference between raster and vector PDFs. I had naively thought that I could use the Adobe PDF 8.0 print option that was installed on my Mac to create useable PDFs. Boy, was I wrong. We played around with some conversion programs and got no where. Not the machine’s fault, we just didn’t have the right file type and I didn’t want to spend the time tracing and cleaning them up in Inkscape in order to get them to a proper SVG. I WANTED TO CUT!!

Well, :glowforge: to the rescue (sort of). I was able to print the PDFs on my inkjet and use the trace function to get them going. I’ll talk about the “sort of” at the end of this post.

I had previously laid out some fun, geeky coasters for myself and friends. Not for sale - no rights to the properties depicted. Here’s a bit about the process.


Here are two of them just out of the machine. Proofgrade Maply ply, still masked, but not a whole lot of charring. These were traced on the bed and engraved at the medium setting for the Maple. They were cut individually, so the stats at the end are for one coaster.


All unmasked and ready to rule the world. They turned out GREAT for just using the trace function on the :glowforge:. It is magically delicious because you can get results like this with really little to no vector abilities. To paraphrase one of my favorite movies: “If you print it, It will will cut” (or at least engrave).

Now, you can’t have evil rule the world and somedays I feel a little Heroic. Soon, flip them over and here’s what you get:


Yup, this is the backside of the Hydra coaster. Again, it was just a bed trace of a black and white graphic. I was able to flip the coaster over, move the traced graphic over the material, manually tell the machine that it was Proofgrade Maple and hit the glowy button. And, here you are. Your family can tell at a glance whether you are in a Heroic or Evil mood that day.

Now, here’s where it got dicey. You’ll notice that there is no Batman to fight the Joker. Even though it should be just a scan of a piece of paper, this is what we got over and over again. Just on the Batman graphic. I sent info to support and they are looking into it.


This is the Bed Image. Looks good. Magnets to hold it down to make sure paper curl isn’t causing the issue in the next photo.


Here’s what it traced, time after time. We moved the image in the bed, blocked outside light, moved the image again. Always some variation on the hole in th middle of the bat. It’s like DC Comics is fine with exploiting images of the Joker, but go after the Batman and they’ll mess you up!

We’ll see what comes of this. This may cause me to seek out more SVG conversion solutions or resign myself to doing more tracing and cleaning up vector nodes.

Overall, I’m over the moon on how these are turning out. Will probably try on 1/4 stock eventually, but for now, these are great. I have 4 more variations to cut.

Here are the stats: Proofgrade 1/8" Maple ply. About 4" around. Cut at 100 power / 27 speed. Medium Engrave. 340 Lines per inch.

So, a little quirk in the trace function, but wow, wait until you see the next post done with a simple trace of a JPEG.

47 Likes

Love that plaque!

1 Like

The engrave on those is so clean and amazing!!
And you were worried about not being what??

7 Likes

So awesome!!!

2 Likes

Here’s the next project. Decided to stick with bed traces for most of tonight. My niece’s husband came down and joined us. He is a Batman fan (freak?).

He found a linocut image that he liked and my niece traced it, cut it out of freezer paper on a Silhouette so he could make himself a bleach out stencil t shirts as a project with the kids at his school. Took her about 4 tries to get it to cut well without tearing. Anyway, this is not at all my image and sorry I have no attribution for it, and I’ll never use it commercially. Here it is in some of the stages of completion.


Engraved and cut with no masking removed. It was a deep engrave on Proofgrade Maple ply and is 3 3/4" wide. Didn’t measure the height and he took it with him. Remember, this was a TRACE by the :glowforge:. We did print it to fill an 8 1/2" x 11" sheet of paper so details would get picked up, then scaled it down in the machine’s interface. By the way, calling it “the machine” or even :glowforge: is getting impersonal as I get to know him better. From now on, note that when I talk about Geordi, I’ll mean my PRODUCTION :glowforge: :smiley:

Here it is after some masking removal. My niece got to a point, and I said STOP, I need a picture of this first.


It looked sharp with the smokey masking left on the “dirty” building and gargoyle below. Actually pretty cool like this, but we moved on.


Here it is fully weeded. Lighting is a little different than the previous picture. I still can’t believe this detail could come from the camera on the lid. I’m a Superman kind of guy, so guess who’s getting cut in the next few days?

Stats: 1/8 Proofgrade Maple Ply. About 3 3/4" tall (didn’t measure the height). 100 power / 27 speed. 340 Lines per inch. Engrave and cut time was 46:20.

Here’a a picture of Guy modeling the T-shirt I mentioned, along with his new artwork.

46 Likes

Unreal!

2 Likes

Here’s a real simple one. We did want to see how uploading SVG worked and wanted to see acrylic cuts in action. I had some Inventables translucent blue cast acrylic that was cut to fit the bed. We found a snowflake SVG and dragged the file to Geordi’s interface. Up popped the graphic, we resized it, told Geordi that this stuff was the same as Proofgrade acrylic and hit the button.


Beautiful cut, a joy to watch it zip around. I don’t think I mentioned how surprised my niece and her husband were at what we could now do!

They said that they knew I was excited about getting a laser, thought I was overstating the creative power of it and had their doubts. Doubts erased. They were Amazed by it. Even after the Batman engrave, which Guy couldn’t stop watching, this blew them away.

Stats: Inventables 1/8" translucent blue acrylic. Used proofgrade acrylic settings to cut: 100 power / 30 speed. Cut time 1:30.

32 Likes

Last one for tonight, then I have to go to bed so I can experiment tomorrow. May not get as many cuts done, as I will be trying to see if I can find a better way to manipulate my files - Although, dang, bed traces of prints provide some outstanding engraves. Just can’t cut them!

This one didn’t turn out that great. :poop: I count it as a learning experience. Cheap materials result in cheap looking, unpredictable results. I’m not saying that I we couldn’t get better at using inexpensive materials, but it is nice to have stuff look great with nominal effort and knowledge. That’s why I’ll probably like Proofgrade materials for my major projects for quite awhile.

This was a cheap $3-$4 (I think) LED menu light I ordered a long time ago. The lights are just fair, the acrylic is thin and probably extruded. I guess its OK, for a first try, but I will get better!


Here it is still masked on the front and back and just after cutting. Note that the artwork is intentionally crude subway style art. The original picture looked worn, without true blacks in the text. The insides of letters were intentionally filled.
The thin acrylic warped a bit while engraving.


Here’s a shot of it after weeding. I guess it actually does look OK when unlit. Kind of a pebbled finish to the engraves. Next is the disappointing clip, and it’s not Geordi’s fault, and not completely mine. I do take some blame for not yet knowing how to tweak settings or realizing the limitations of cheap materials.


These have cycling lights.Red/Blue/Green. I bought a few of these, and may still play with them. Given the light intensity, I’ll probably cut the acrylic and image area down by about 1/2 and play with the settings more. The one good thing about failures using cheap materials is that they don’t cost much!

Time for bed. Should have more stuff out late tomorrow night. I think I’ll set up new topics for each day’s projects, but put them in individual posts in that topic. Any other suggestions on that - or should I just shut up and Laser? :laughing:

34 Likes

This is just astonishing–right out of the box!!! I’m really looking forward to seeing more from you and Geordi (PERFECT NAME, btw).

3 Likes

Thanks,
I’m tired now - but it’s a good tired. . . . . .

By the way @Tom_A had the same thought for a name and beat me to it by a day. Mine is officially Geordi G-Forge. I decided they are cousins.

And - Apparently the folks at Glowforge like the name also. The “filler” when they ask you to name your unit is something like “Geordi The Forge”. :slight_smile:

5 Likes

Definitely do each day as a separate post. I tend to see the new posts quicker than the unread added ones…I like the moniker you have: WJL’s Production Machine Projects. Just add a description to it like todays could have said
WJL’s Production Machine Projects - day 1…

4 Likes

Thanks,
You should get some sleep now. I’m beat. I don’t know how you laser all day, every day for a living. :grin:

3 Likes

It’s pretty mundane…cutting stencils…
Thats why I play in between. :smile:

Although even after doing this for 16 years, I still watch my laser work.:blush:

5 Likes

Great first projects!

1 Like